
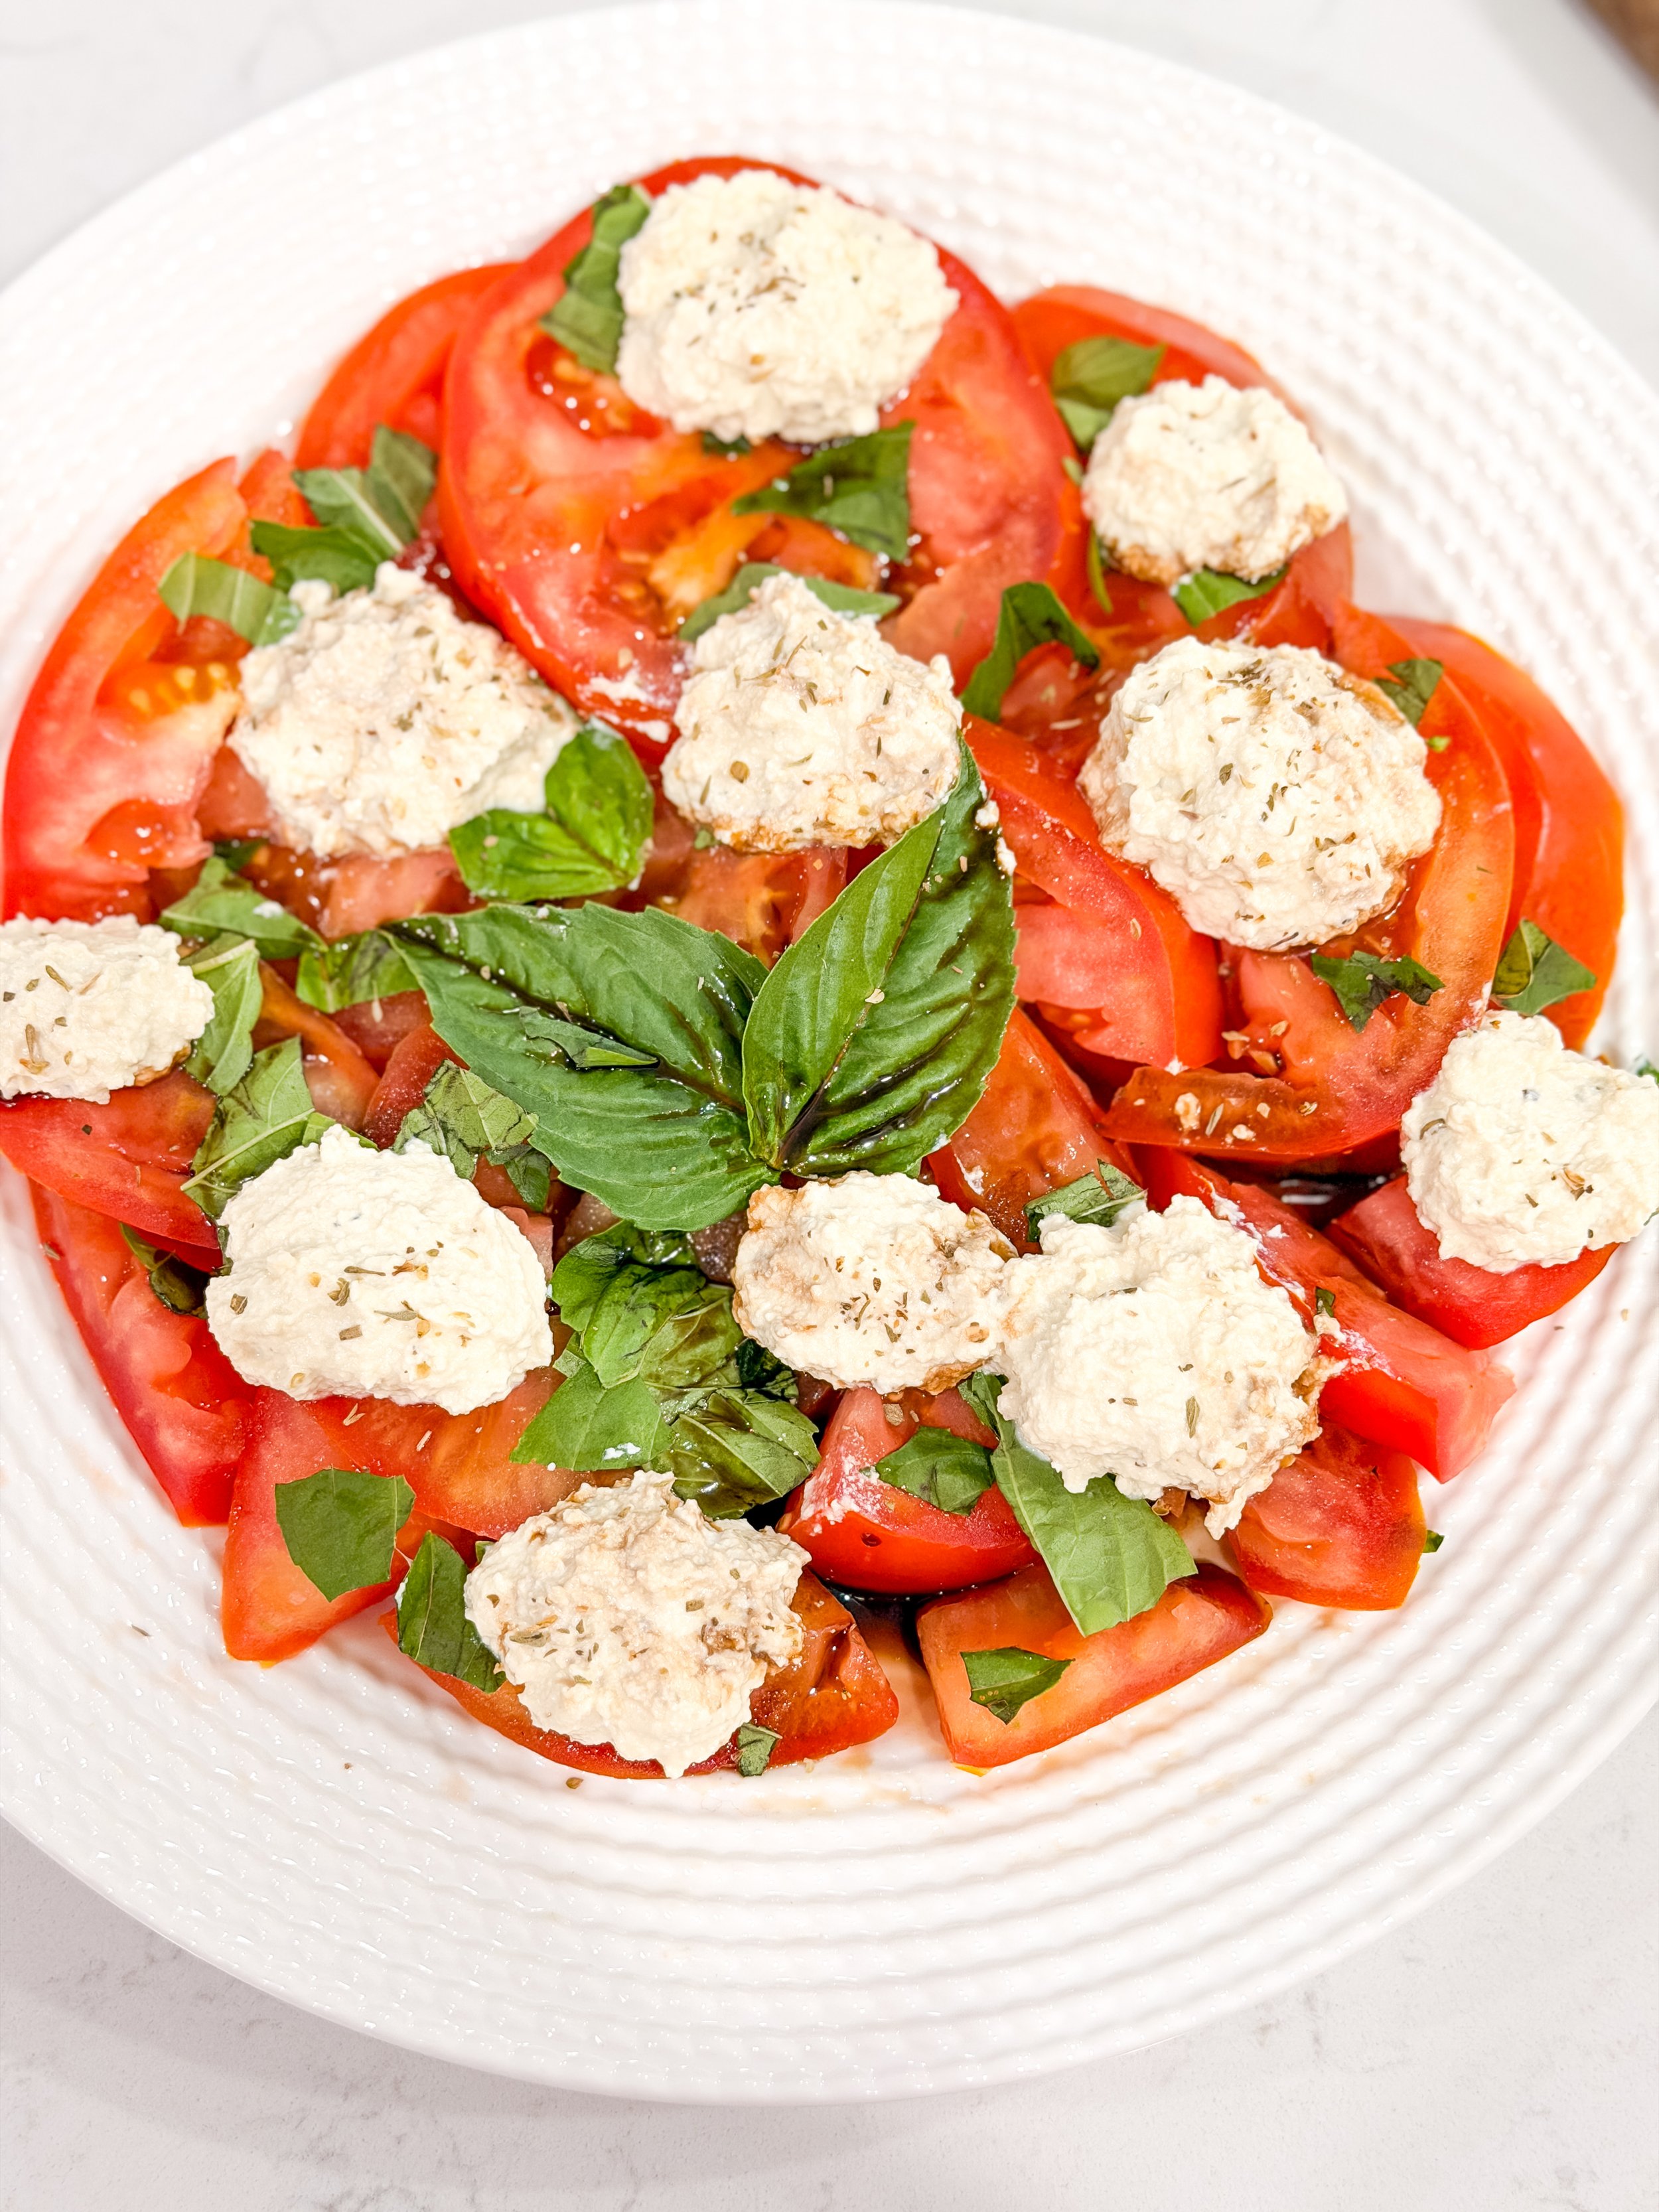
Vegan Caprese

It’s a hot weekend, the quarterfinals are on, and the last thing I want to do is stand over a stove. This is the recipe I keep coming back to: classic caprese, but with a vegan mozzarella that might just be the best version I’ve made.
A lot of my friends have been cutting back on dairy lately, which sent me on a mission to perfect a vegan mozzarella that actually tastes like something you’d want to eat — not just a stand-in. After a few rounds of testing, this one’s it: five ingredients, no cooking, just blend and chill.
The Vegan Mozzarella
Ingredients:
14 oz Nasoya silken tofu, drained
2 tbsp Brightland olive oil
1 tbsp lemon juice
1 garlic clove
2 tbsp nutritional yeast
¾ tsp fine sea salt
1 tsp dried oregano
Instructions:
1. Add everything to a food processor (or you can add to a medium bowl and use an immersion blender). Blend until completely smooth, scraping down the sides as needed.
2. Scoop the mixture onto plastic wrap or into a small bowl and shape into a ball or log.
3. Refrigerate until firm, at least 1 hour, before slicing.
That’s it — no boiling, no stretching curds, no stovetop babysitting. Just blend it, chill it, and let the fridge do the work.
Building the Plate
Once the mozzarella has set, the rest comes together in minutes:
Sliced ripe tomatoes
Sliced vegan mozzarella
Fresh basil leaves
A generous drizzle of Brightland olive oil
That syrupy balsamic that tastes like candy (balsamic glaze)
Flaky salt and cracked pepper
Layer the tomatoes, mozzarella, and basil, then finish with the oil, balsamic glaze, salt, and pepper. Serve immediately, ideally with the game on in the background.
Why This One’s a Keeper
This recipe came out of wanting something simple enough for a lazy summer weekend but still special enough to serve to guests — dairy-free or not. The tofu base keeps things light, the nutritional yeast brings a savory, cheesy note, and the oregano nods right back to the caprese flavors you’re already expecting. Whether you’re hosting a watch party or just want a no-cook dinner on a hot night, this one delivers.
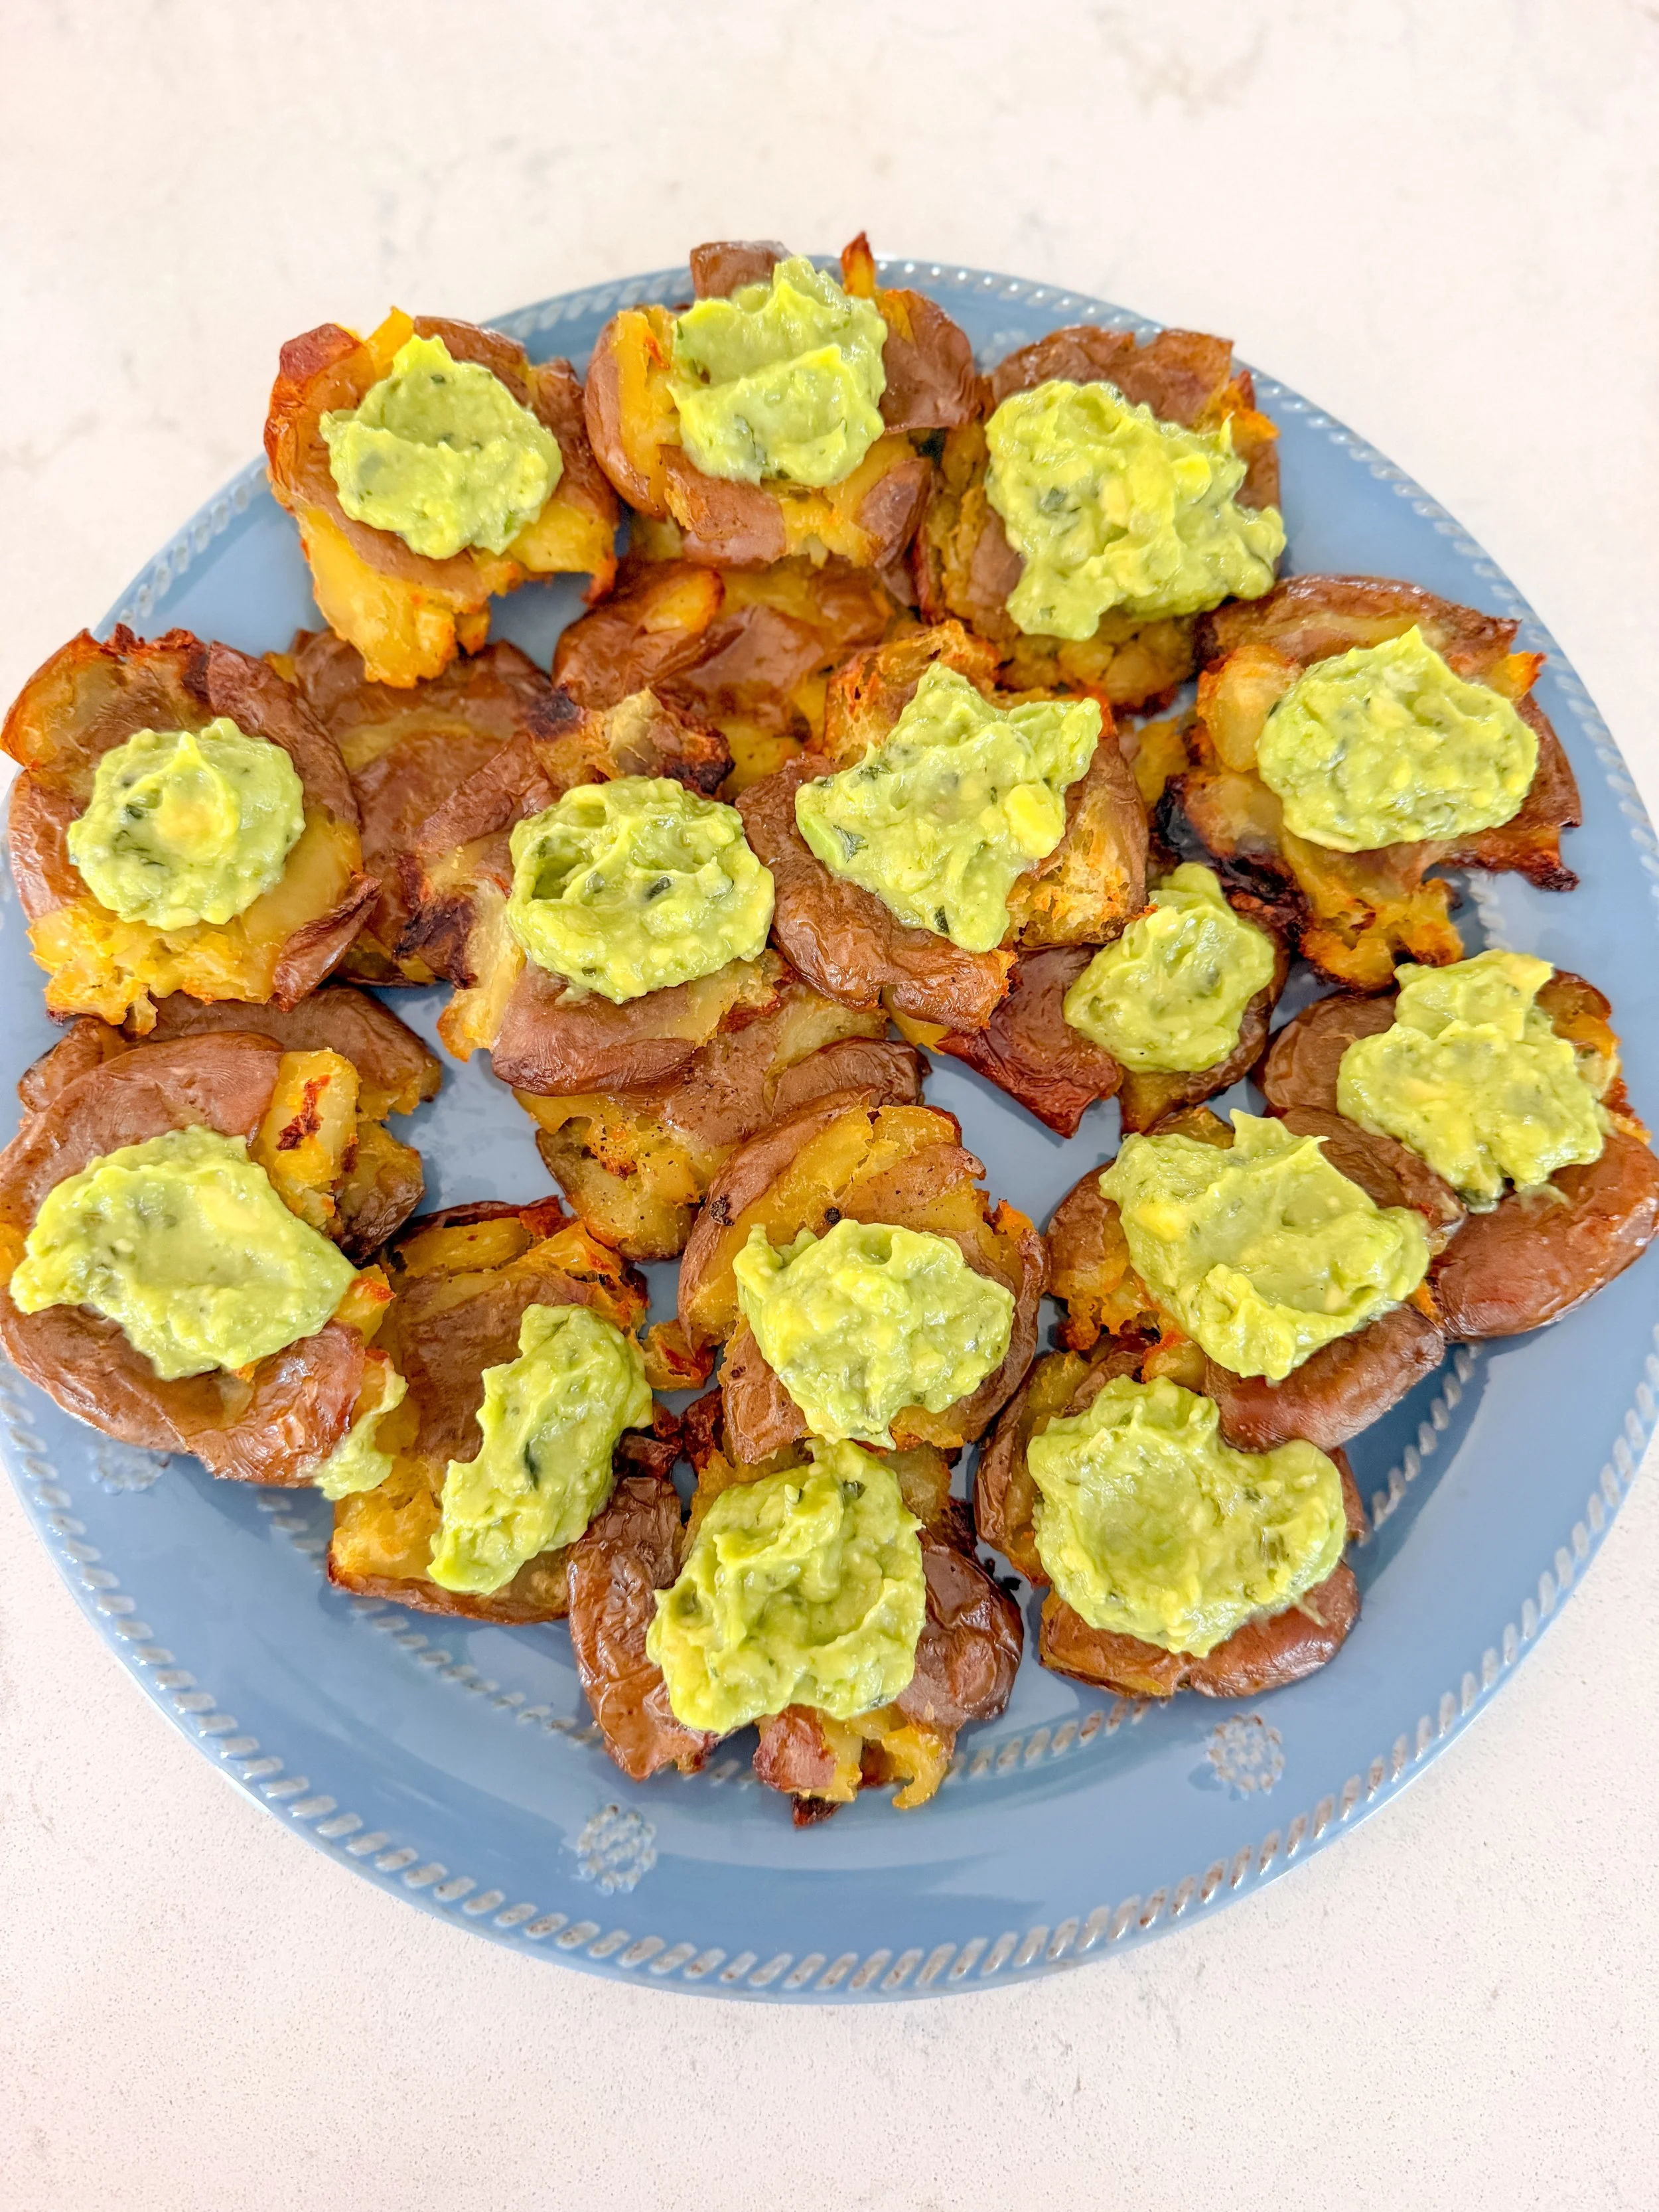
Crispy Smashed Potatoes with Avocado Lime Crema
Crispy, golden smashed potatoes with a cool, tangy avocado crema — this one's a crowd-pleaser every time.

Ingredients
1.5 lbs red bliss potatoes, boiled until fork-tender
Brightland Awake olive oil
Salt and pepper to taste
Avocado Lime Crema
2 avocados
Juice of 1-2 limes
1 clove garlic, minced
2 tbsp olive oil
Salt and pepper to taste
Fresh cilantro or chives, chopped
Instructions
Boil potatoes until fork-tender. Drain and let cool slightly.
Preheat oven to 450°F. Place potatoes on a baking sheet and smash each one gently with the bottom of a glass.
Drizzle with Brightland Awake olive oil, salt, and pepper. Roast for 25-30 minutes until crispy and golden.
Blend avocados, lime juice, garlic, olive oil, salt, and pepper until smooth and creamy.
Serve smashed potatoes warm with avocado lime crema drizzled on top, finished with fresh cilantro or chives.
Crispy on the outside, creamy on top — this is the potato side that always gets requested again.

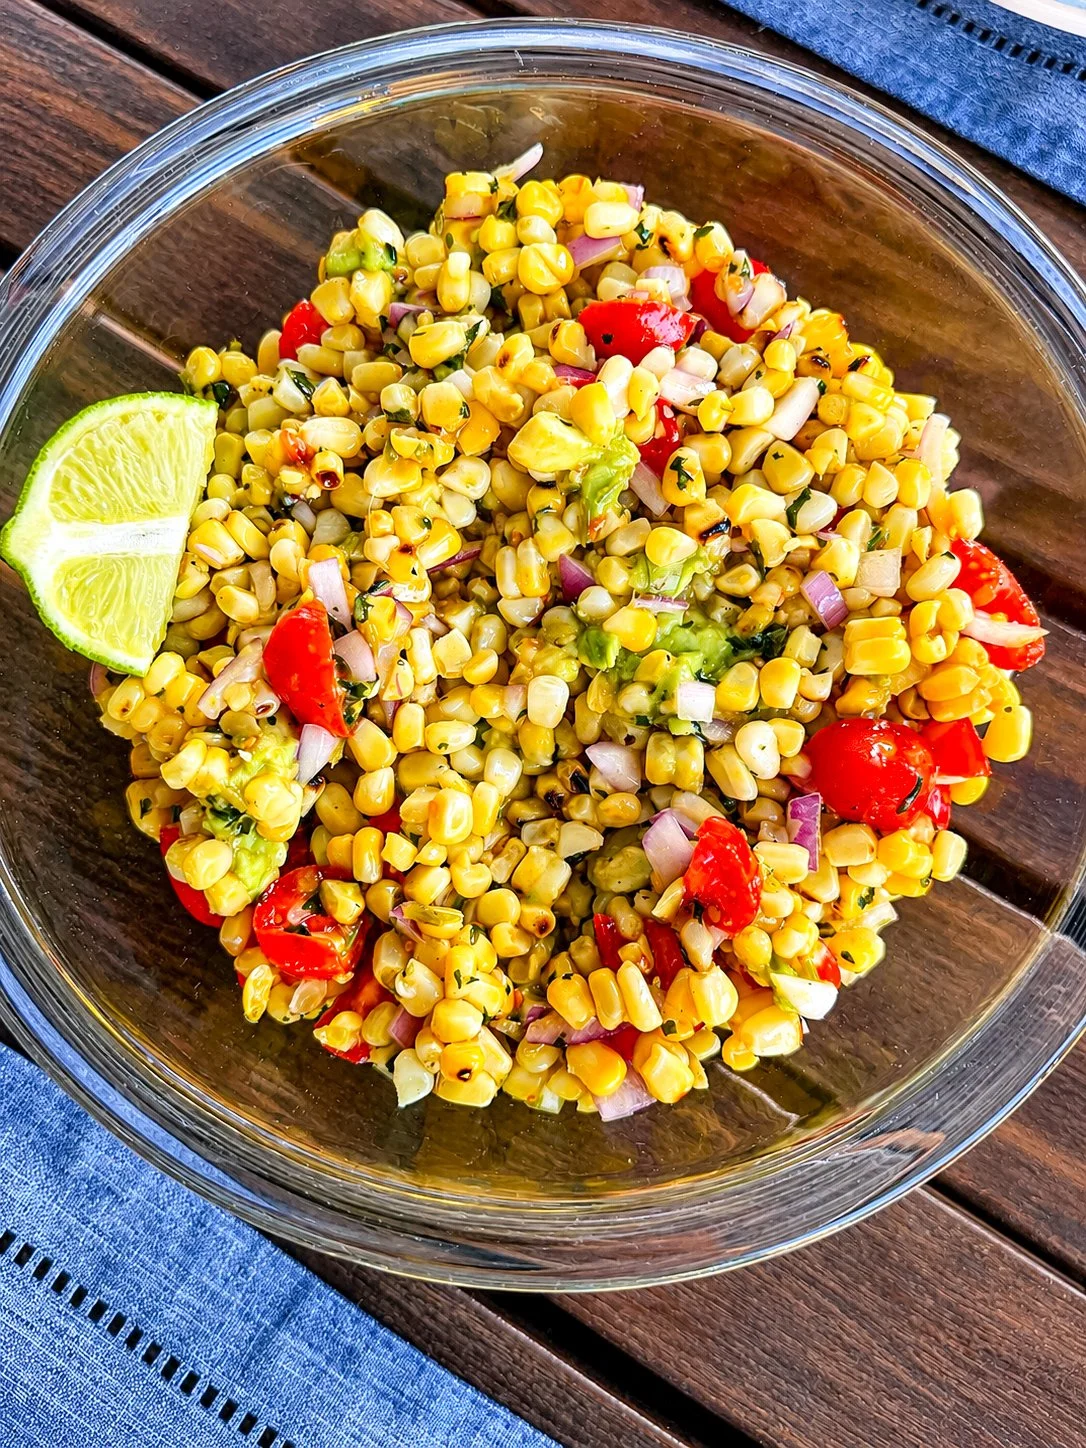
Grilled Corn Salad
Charred corn, juicy tomatoes, and a punchy lime dressing — this one's built for grilling season.
Ingredients
4 ears corn, grilled and kernels removed
1 cup cherry tomatoes, halved
1/4 cup red onion, diced
Fresh cilantro, chopped
1 avocado, diced
Dressing
3 tbsp olive oil
Juice of 1 lime
1 clove garlic, minced
1/2 tsp cumin
Salt to taste
Instructions
Grill corn until charred in spots, then cut kernels from the cob.
Whisk together olive oil, lime juice, garlic, cumin, and salt.
Combine grilled corn, tomatoes, red onion, and cilantro in a bowl.
Toss with the dressing, then fold in avocado just before serving.
Smoky grilled corn and a punchy lime dressing make this the salad you'll want at every summer cookout.
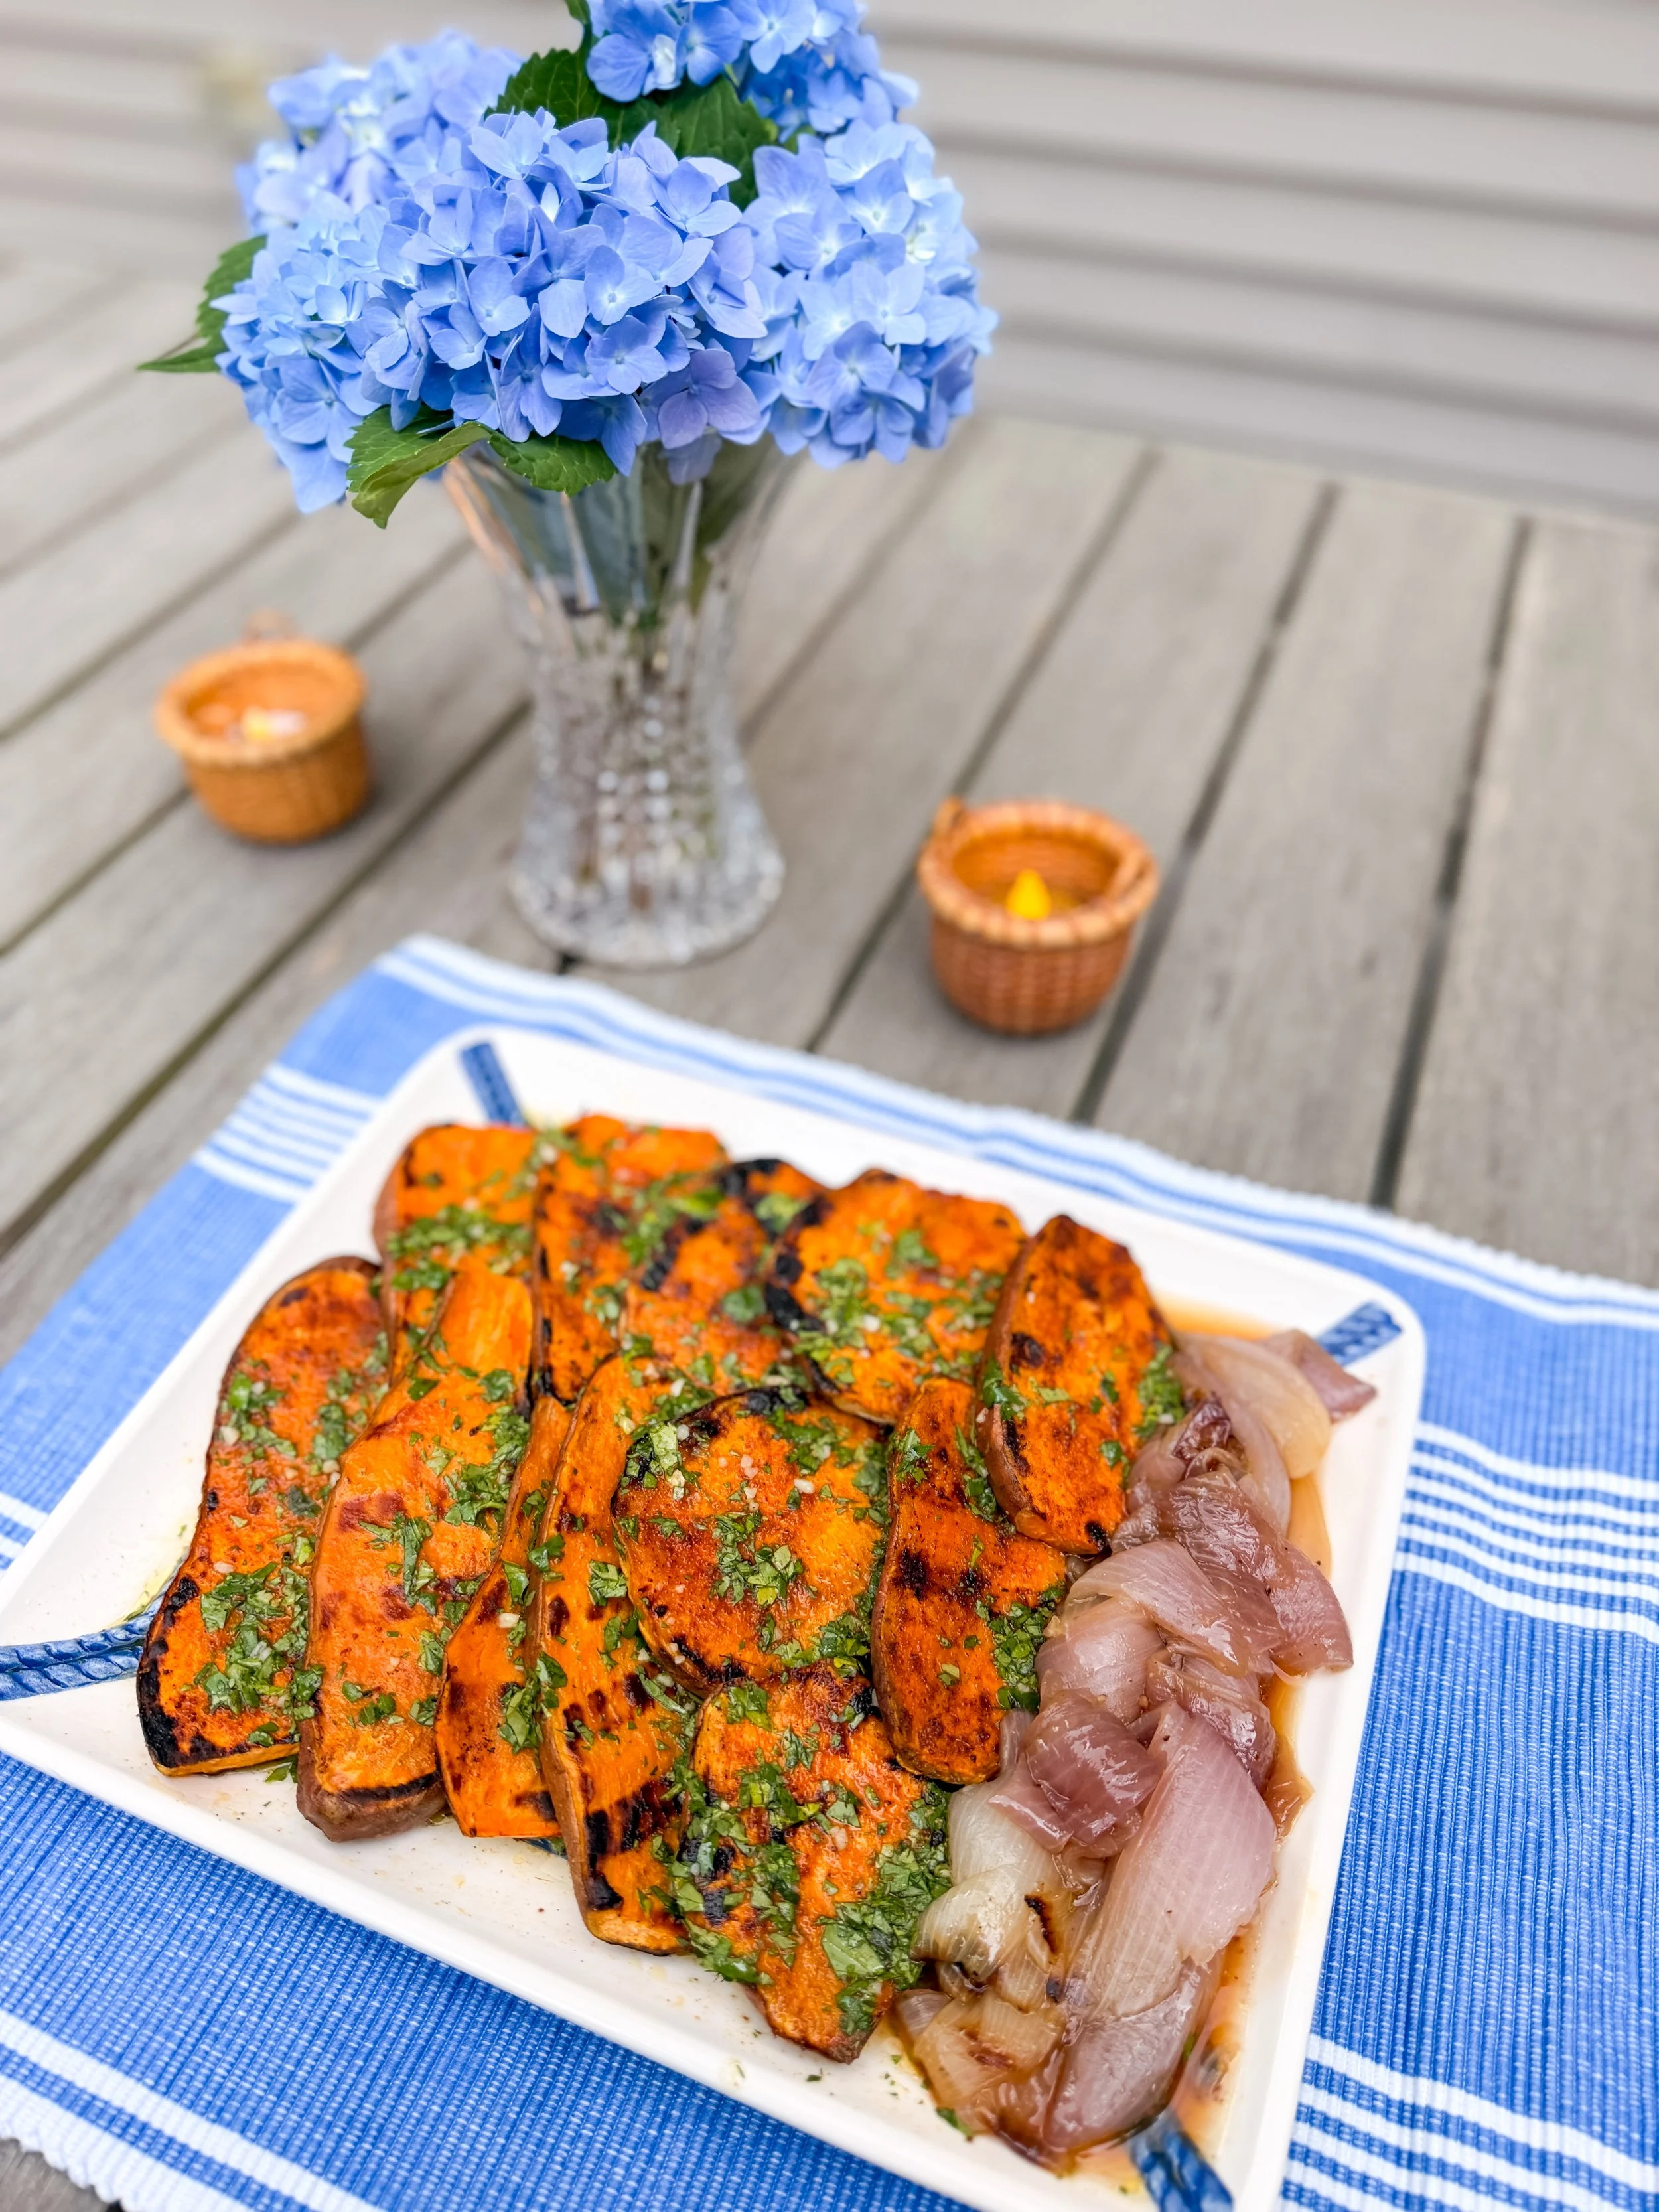
Smoky Sweet Potatoes with Cilantro Lime Drizzle
Smoky, sweet, and finished with a bright cilantro lime drizzle — this is a simple side that steals the show.

Ingredients
2-3 sweet potatoes, cubed
Olive oil
1 tsp paprika
Salt and pepper to taste
Cilantro Lime Drizzle
Fresh cilantro
1 clove garlic
Juice of 1-2 limes
3 tbsp olive oil
1 tsp maple syrup
1/2 tsp ground cumin
Salt to taste
Instructions
Preheat oven to 425°F. Toss sweet potato cubes with olive oil, paprika, salt, and pepper.
Roast for 25-30 minutes, flipping halfway, until crisp and caramelized.
Blend cilantro, garlic, lime juice, olive oil, maple syrup, cumin, and salt until smooth.
Drizzle sweet potatoes with the cilantro lime sauce just before serving.
Smoky, sweet, and a little tangy — this is the side dish that turns any meal into something special.

Summer Squash Pizza with Banza Crust
A chickpea-crust pizza loaded with summer squash and heirloom tomatoes — proof that pizza night can still feel light and seasonal.
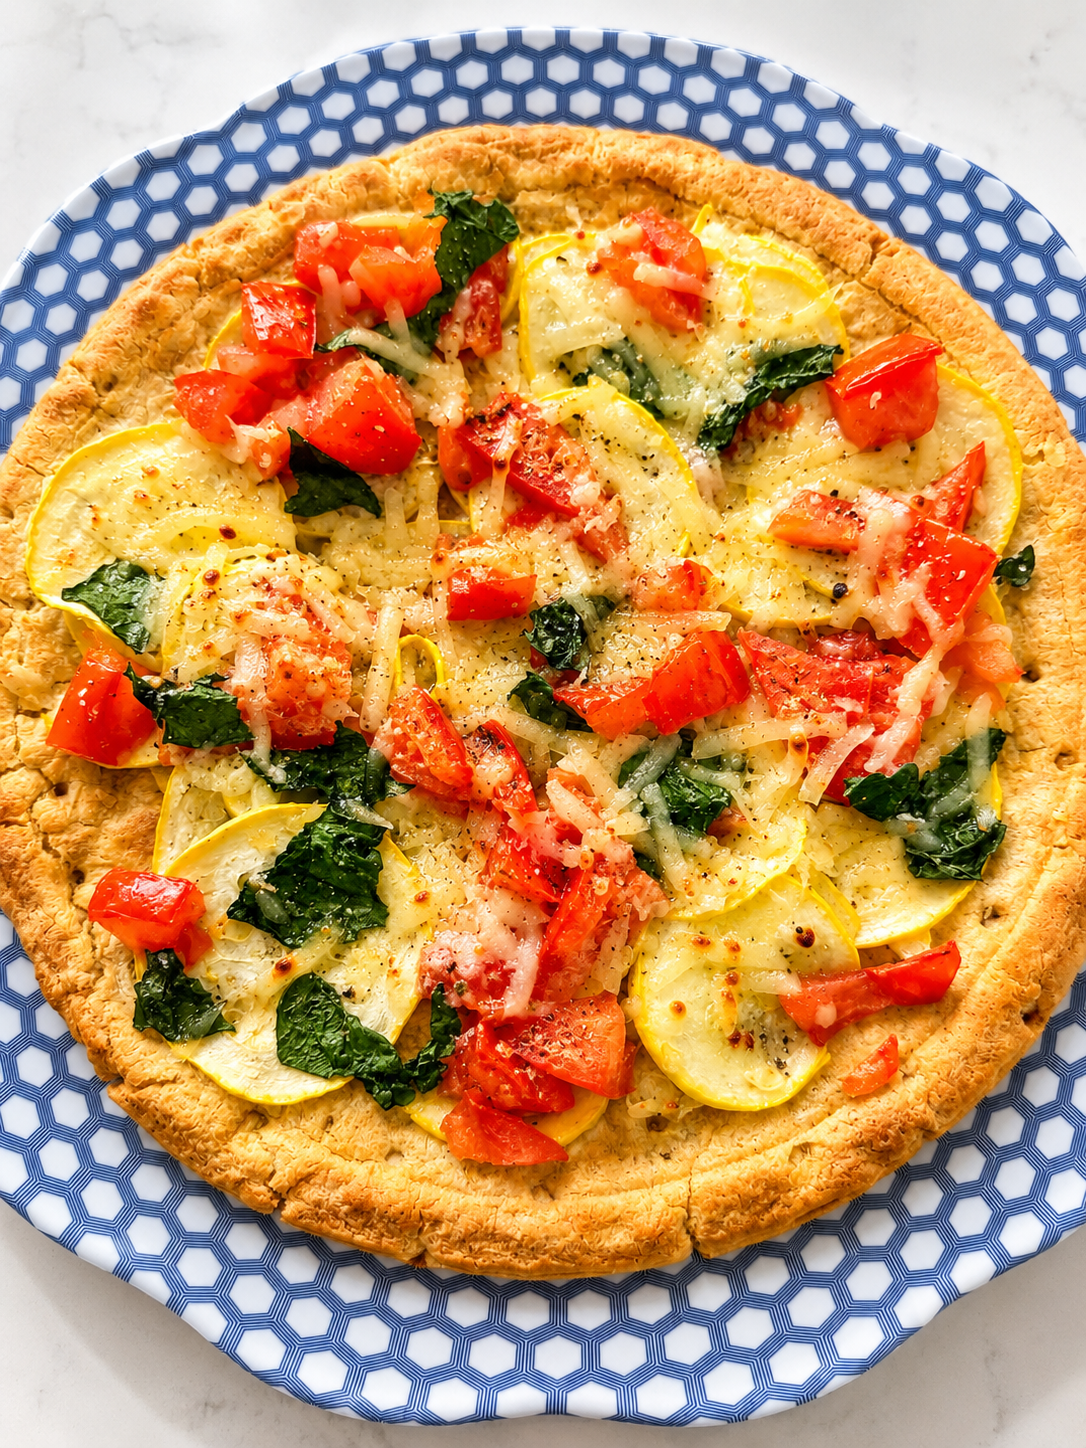
Ingredients
1 Banza chickpea pizza crust
1 summer squash, thinly sliced
1 cup heirloom tomatoes, sliced
Fresh basil, torn
Violife mozzarella shreds
Instructions
Preheat oven according to Banza crust package instructions.
Top crust with Violife mozzarella, sliced summer squash, and heirloom tomatoes.
Bake until crust is golden and cheese is melted, following package time and temperature.
Finish with fresh torn basil before slicing and serving.
Pizza night, but make it seasonal — this one's light enough for summer but still totally satisfying.
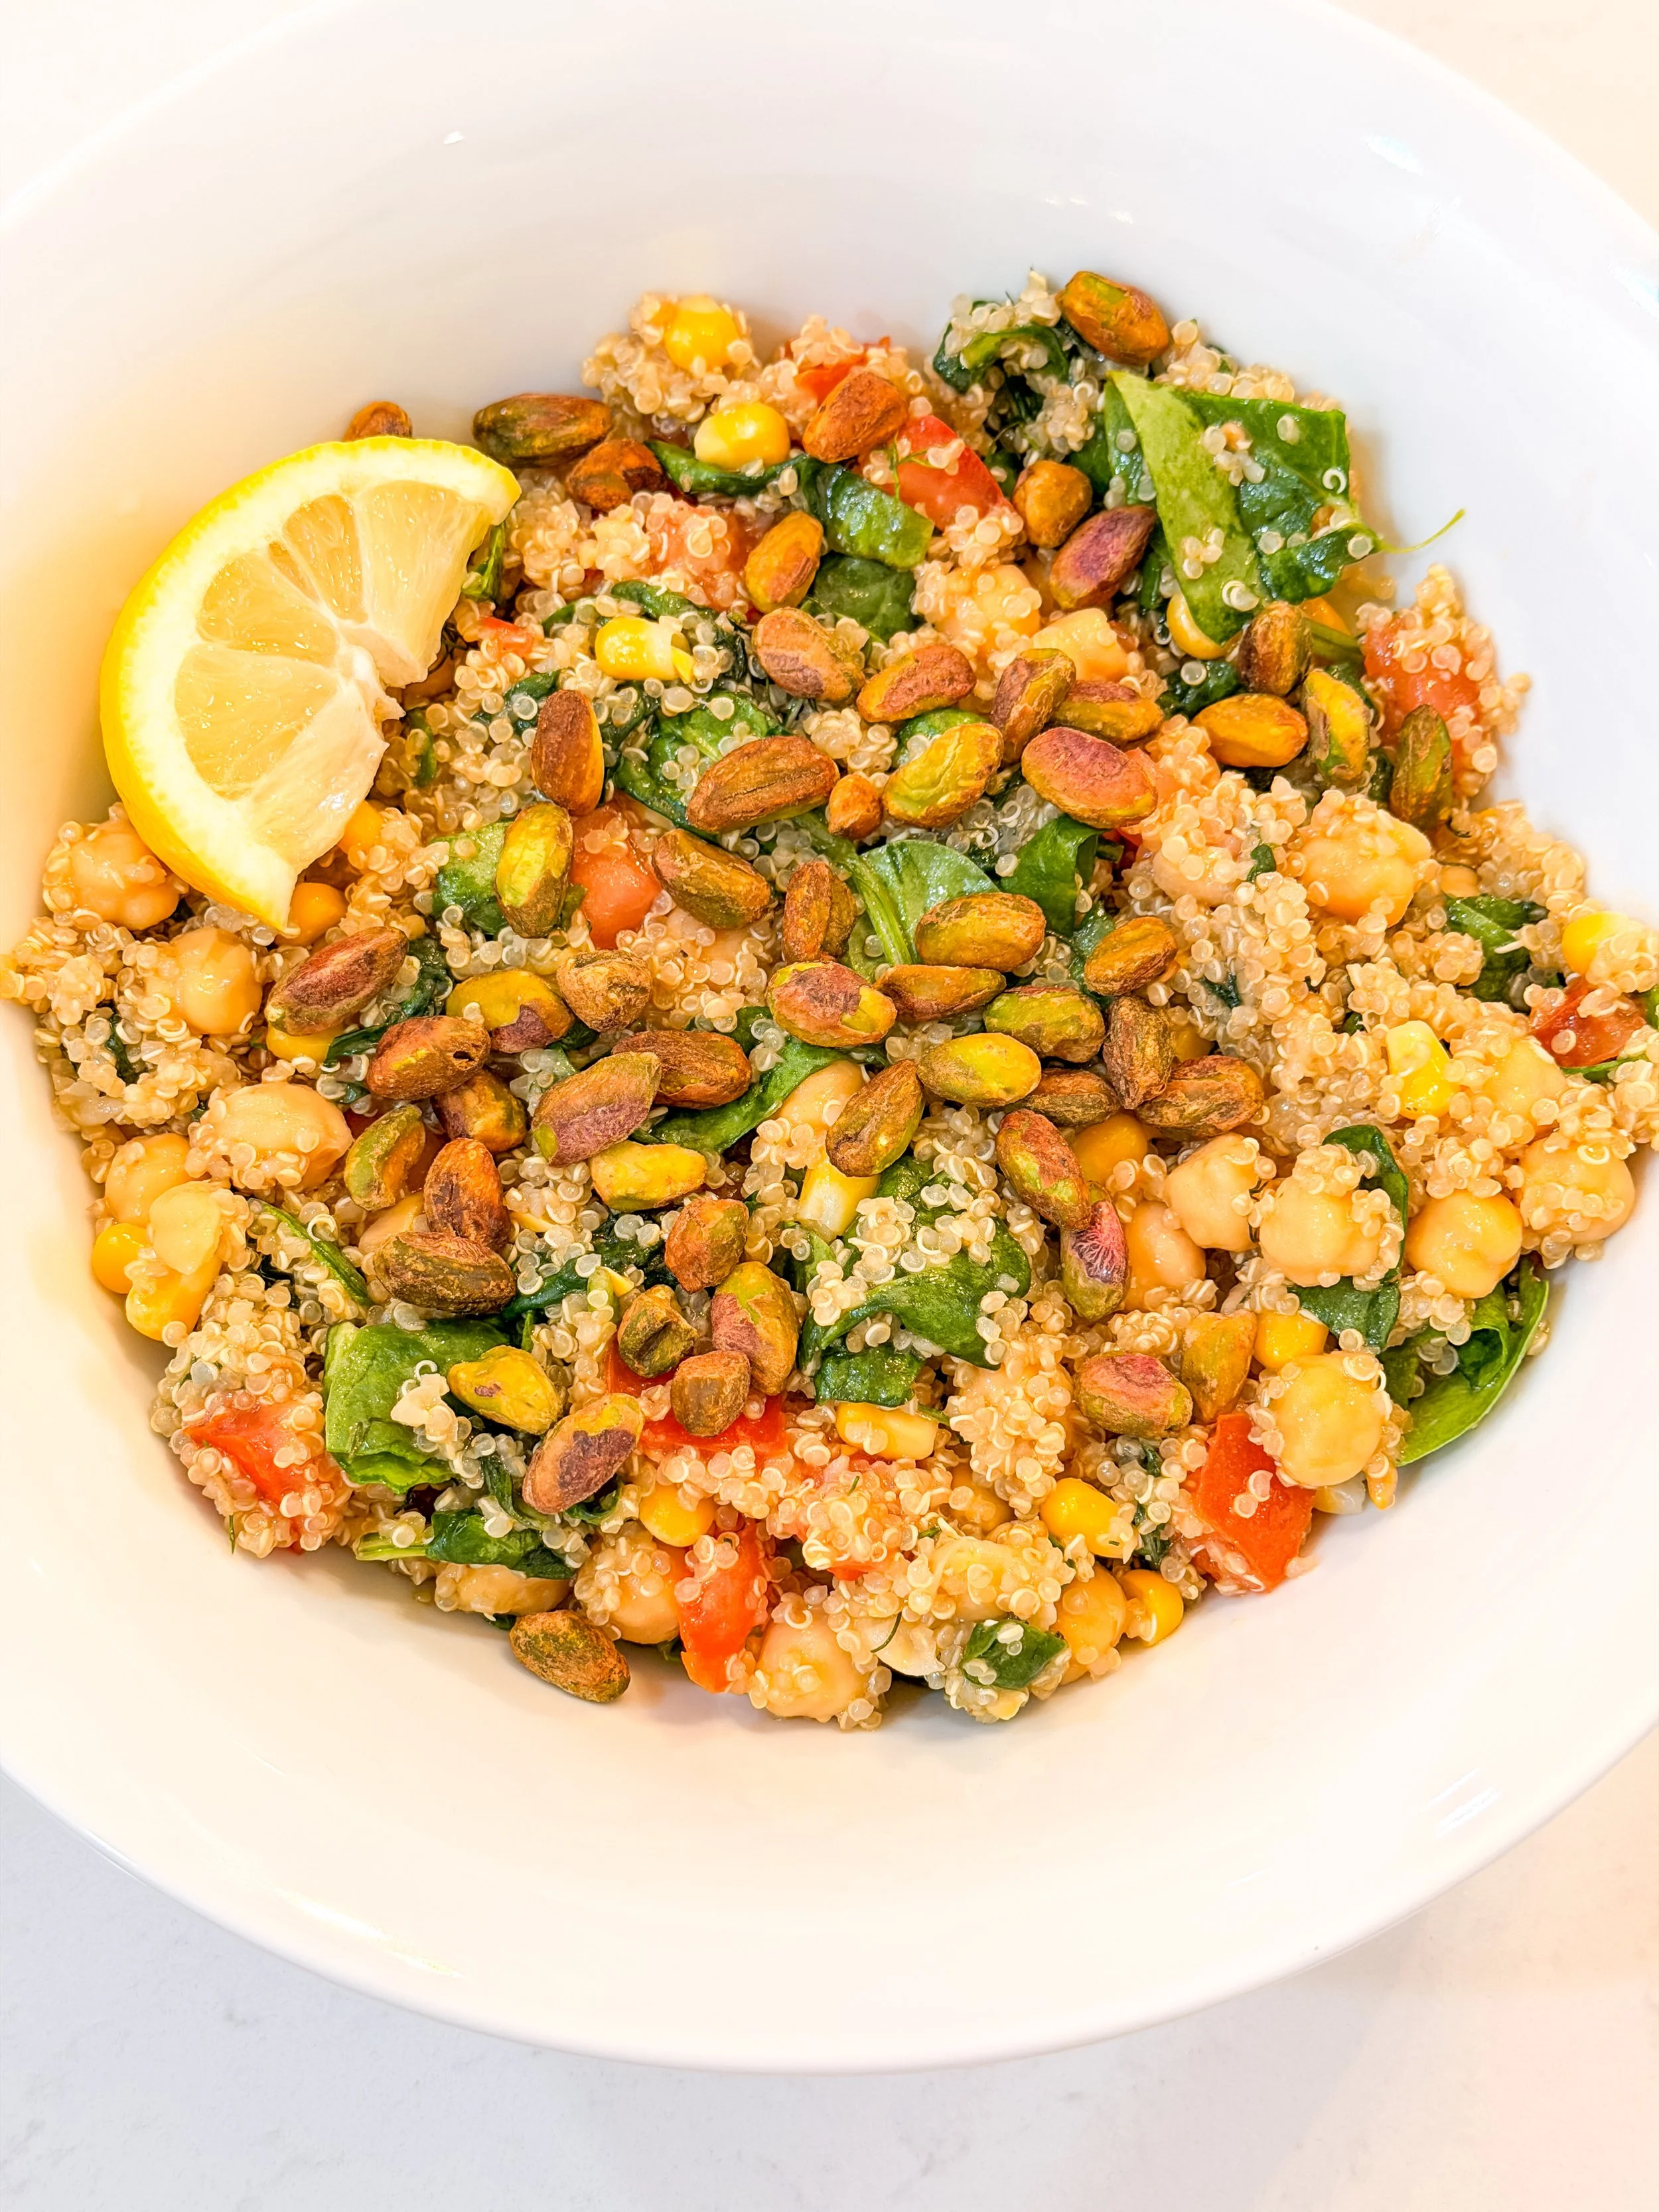
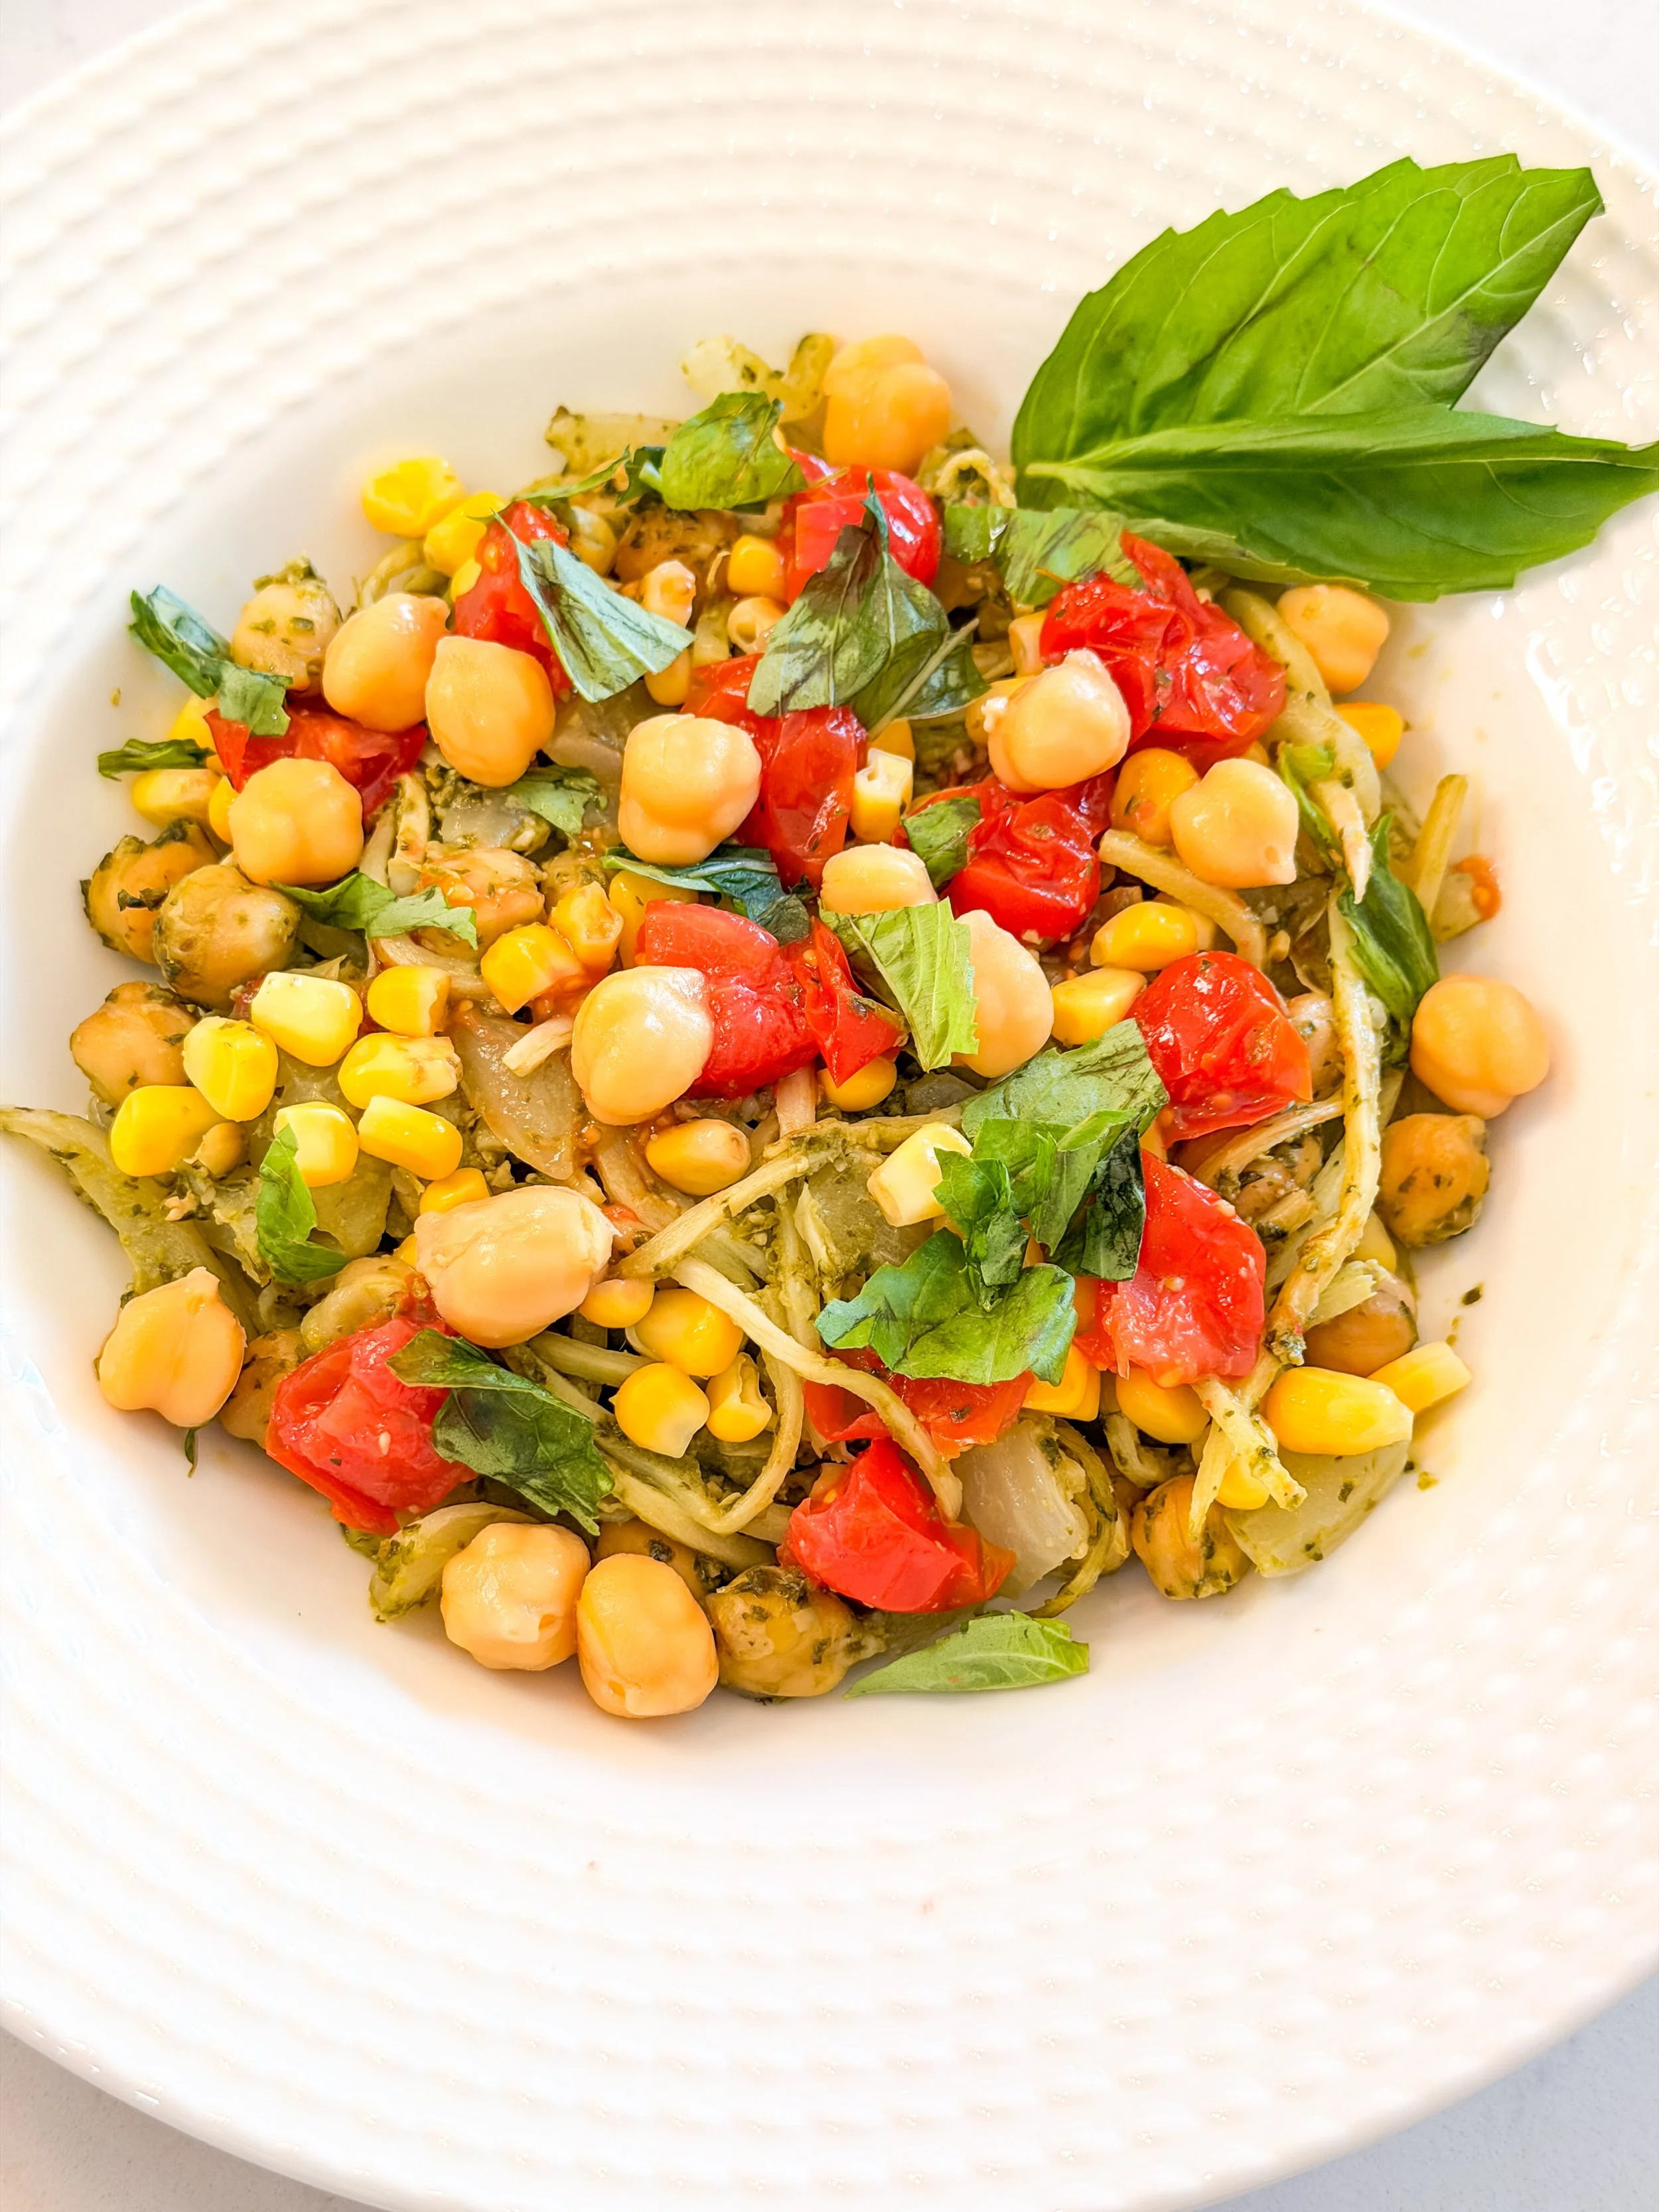
Quinoa Bowl with Corn, Tomato & Pistachios
Fresh corn and tomatoes make this quinoa bowl feel like the peak of summer — light, herby, and easy to throw together.

Ingredients
1 cup quinoa, cooked
1 cup corn kernels
1 cup tomatoes, diced
1 cup chickpeas, drained and rinsed
Fresh basil, chopped
Fresh dill, chopped
1/4 cup toasted pistachios
Lemon Dijon Dressing
Juice of 1 lemon
1 tsp Dijon mustard
3 tbsp olive oil
Salt and pepper to taste
Instructions
Whisk lemon juice, Dijon, olive oil, salt, and pepper for the dressing.
Combine quinoa, corn, tomatoes, and chickpeas in a large bowl.
Pour dressing over and toss well.
Fold in fresh basil and dill.
Top with toasted pistachios before serving.
Fresh, simple, and full of summer produce — this is the bowl I make when tomatoes and corn are at their best.
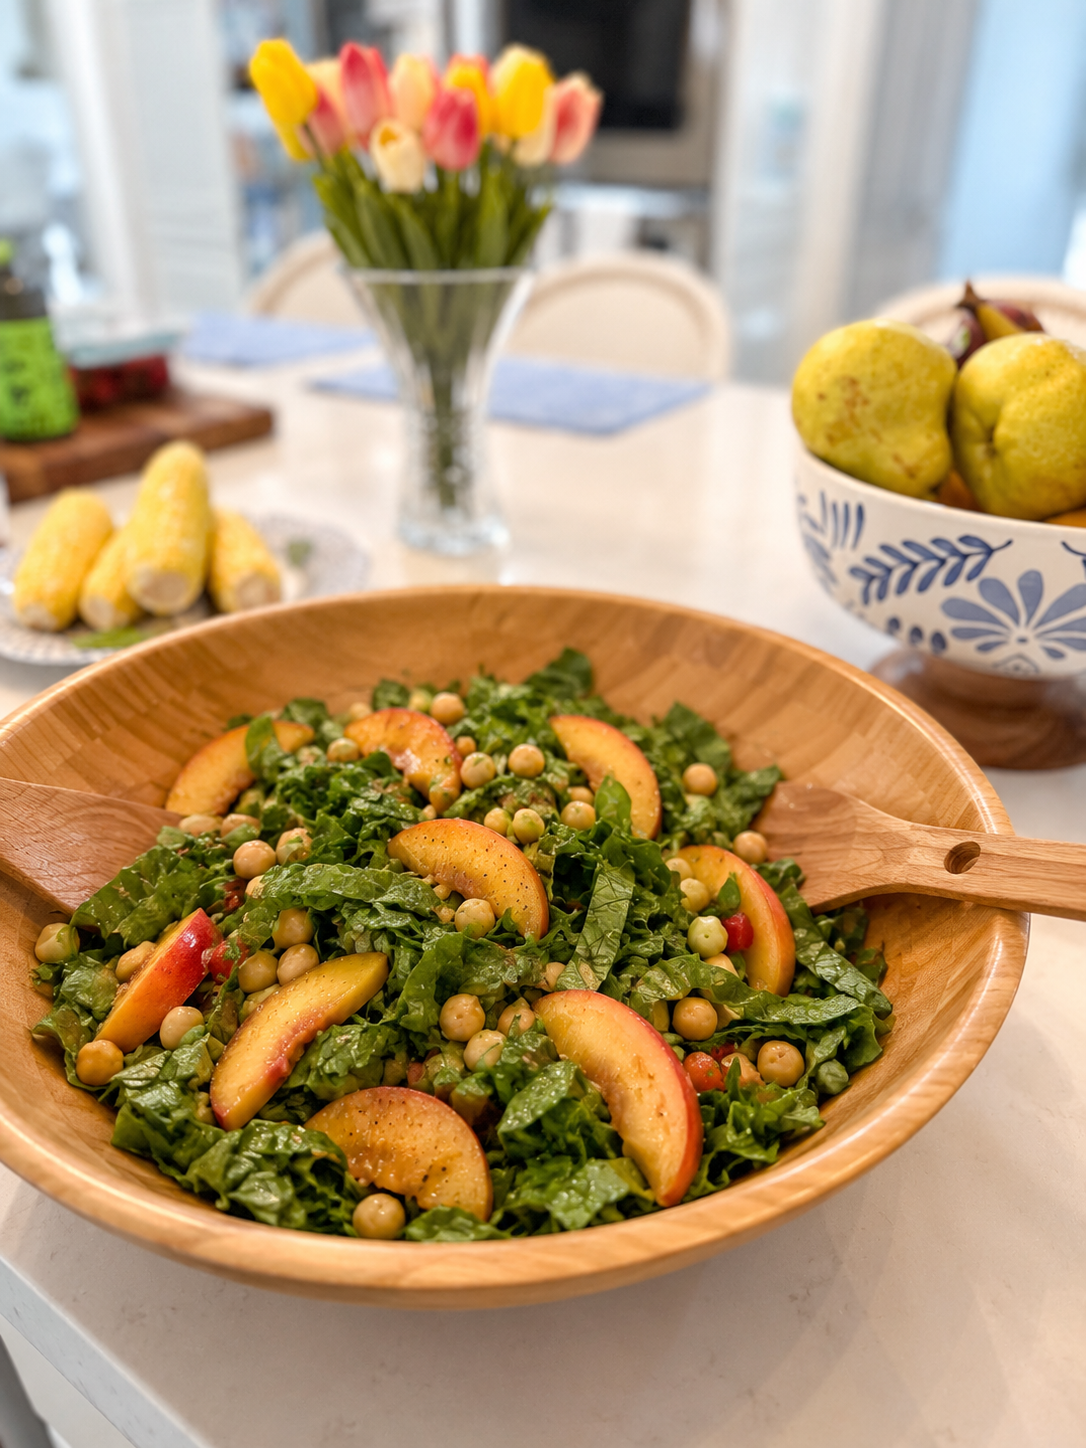
Peach & Arugula Salad with White Balsamic
A slightly different take on the classic peach arugula combo — this one leans sweet and herby with mint, basil, and a maple Dijon vinaigrette.

Ingredients
4 cups arugula
2 peaches, sliced
1 avocado, sliced
1 cup chickpeas, drained and rinsed
1/4 cup toasted pistachios
Fresh mint, torn
Fresh basil, torn
Maple Dijon Vinaigrette
3 tbsp olive oil
1 tbsp white balsamic vinegar
1 tsp maple syrup
1/2 tsp Dijon mustard
Salt and pepper to taste
Instructions
Whisk together olive oil, white balsamic, maple syrup, Dijon, salt, and pepper.
Arrange arugula on a platter and top with sliced peaches, avocado, and chickpeas.
Scatter toasted pistachios, mint, and basil over the top.
Drizzle with the vinaigrette just before serving.
A little sweet, a little tangy, and a whole lot of fresh herbs — this salad is a great one to bring to a summer dinner party.
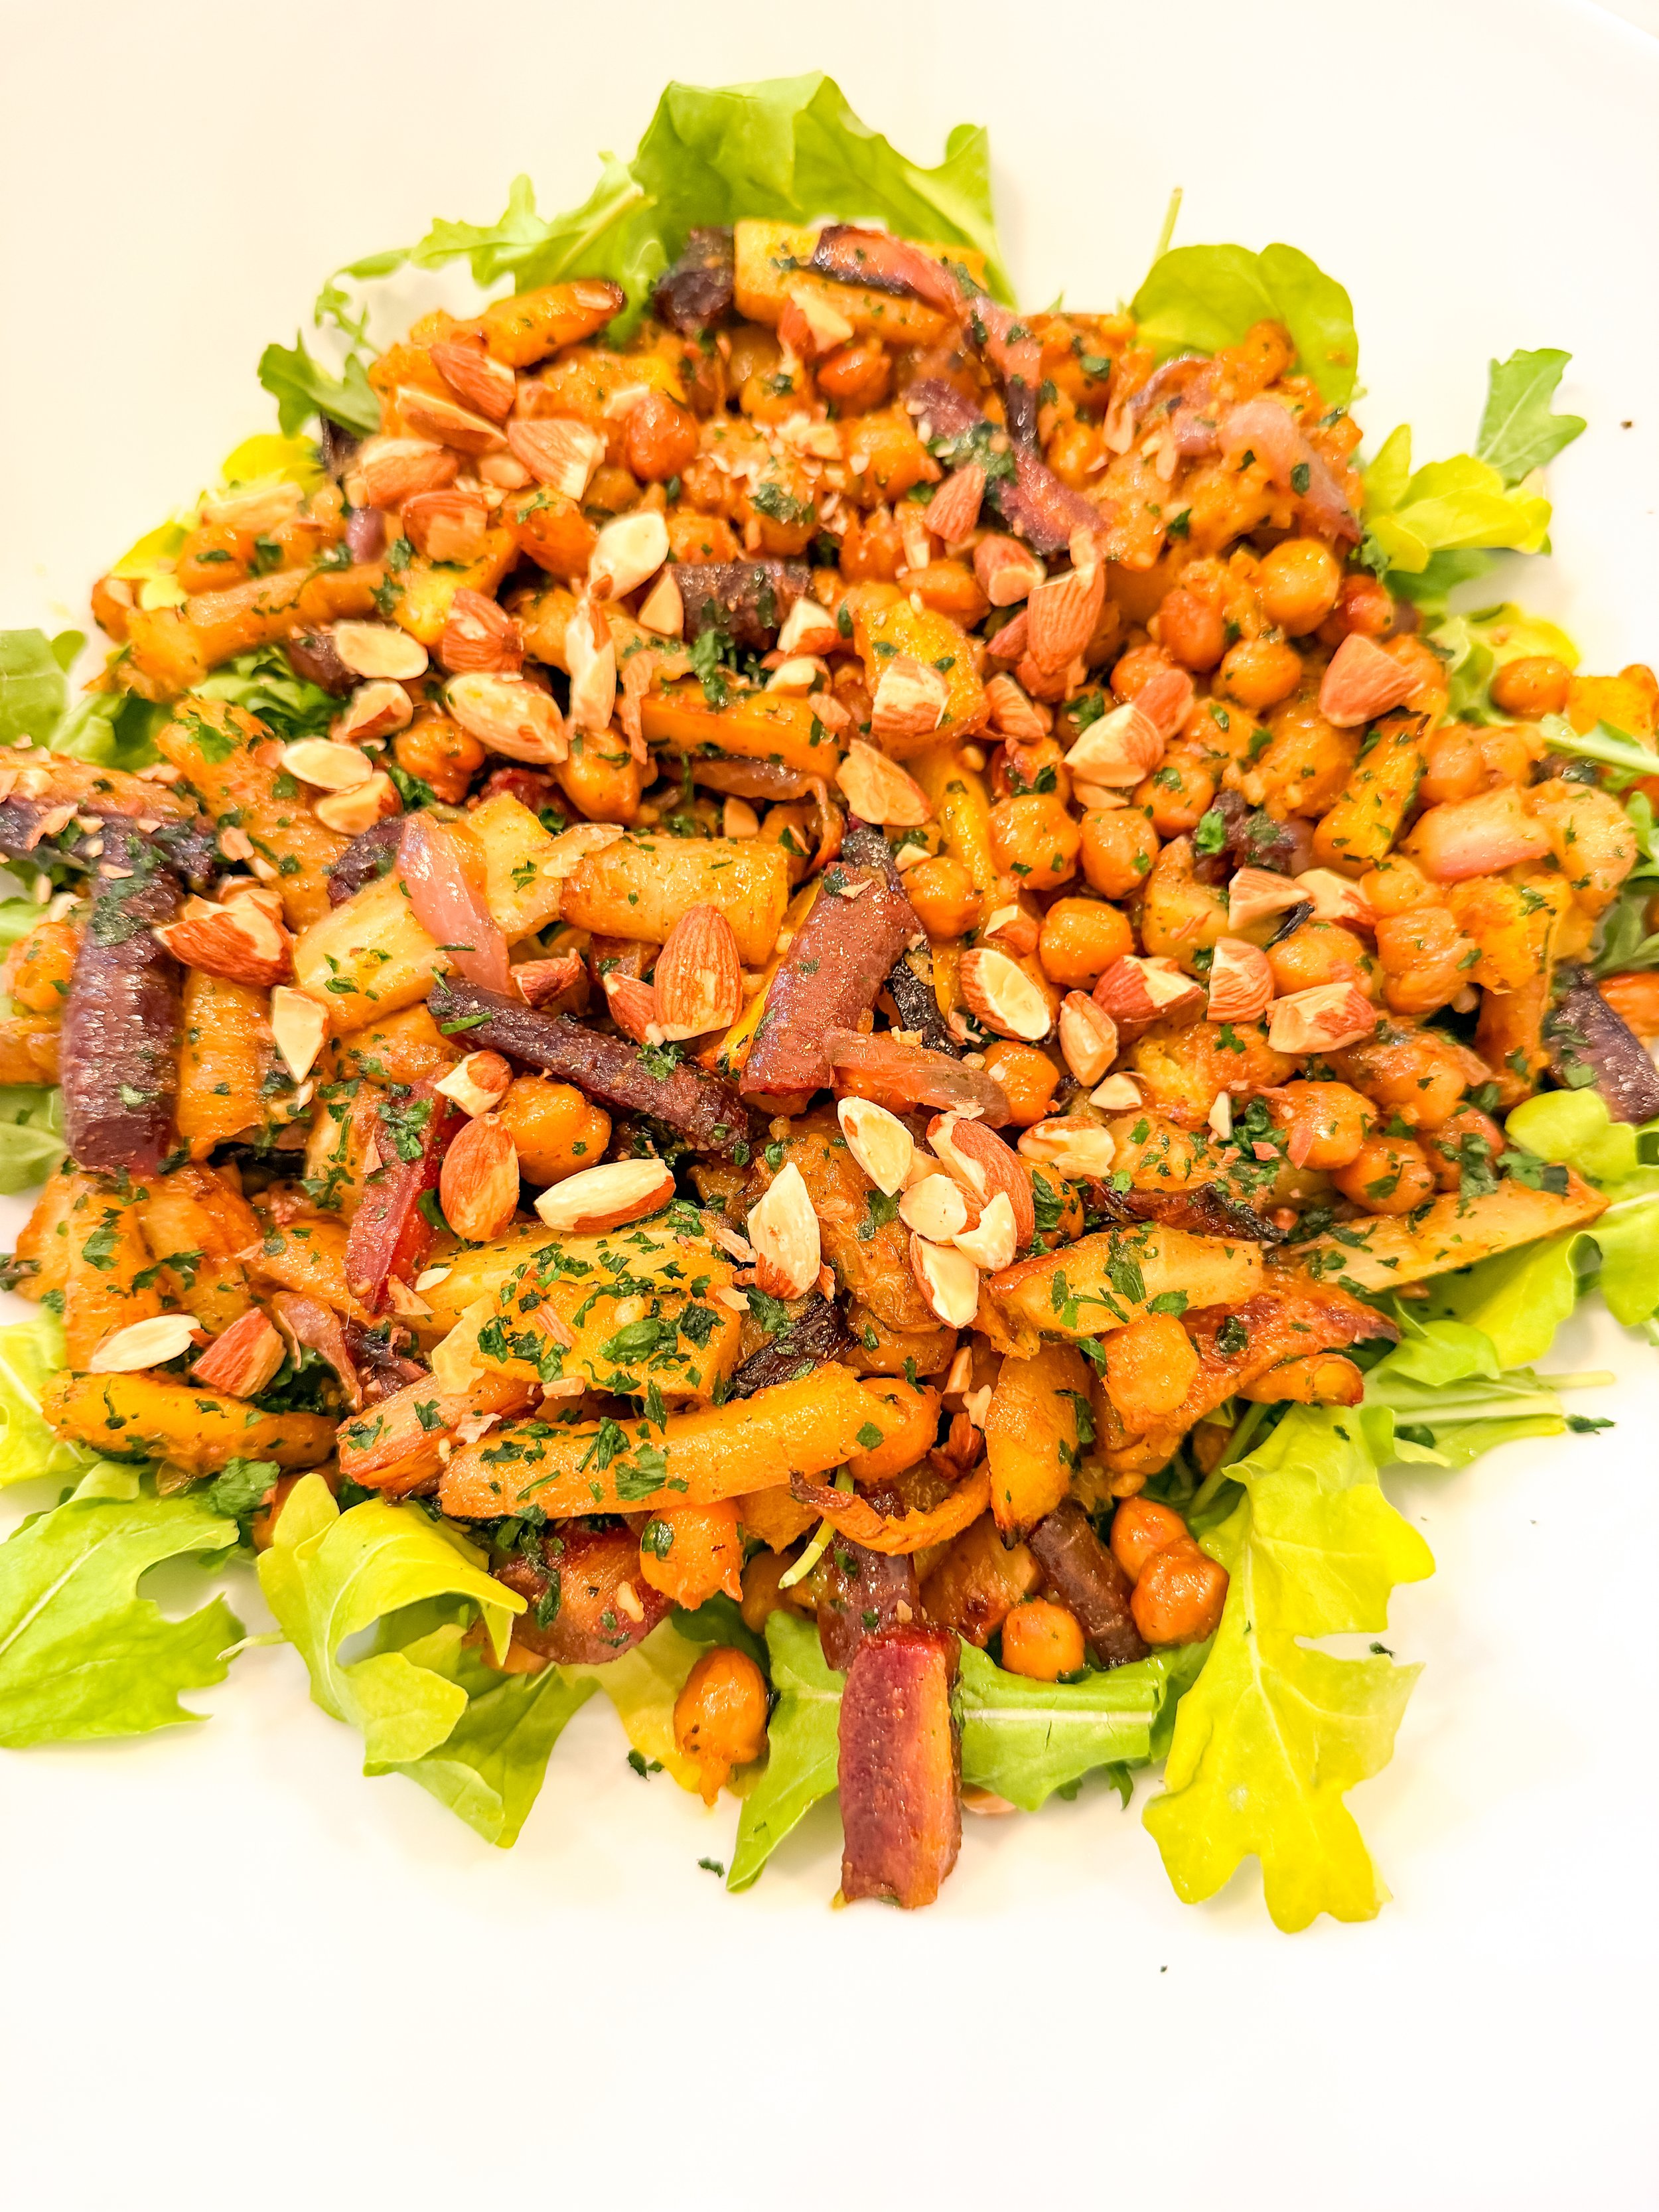
Roasted Veggie Curry Salad
Warm spices and pomegranate seeds make this one feel a little more special — great for when you want a salad that still feels like a full experience.
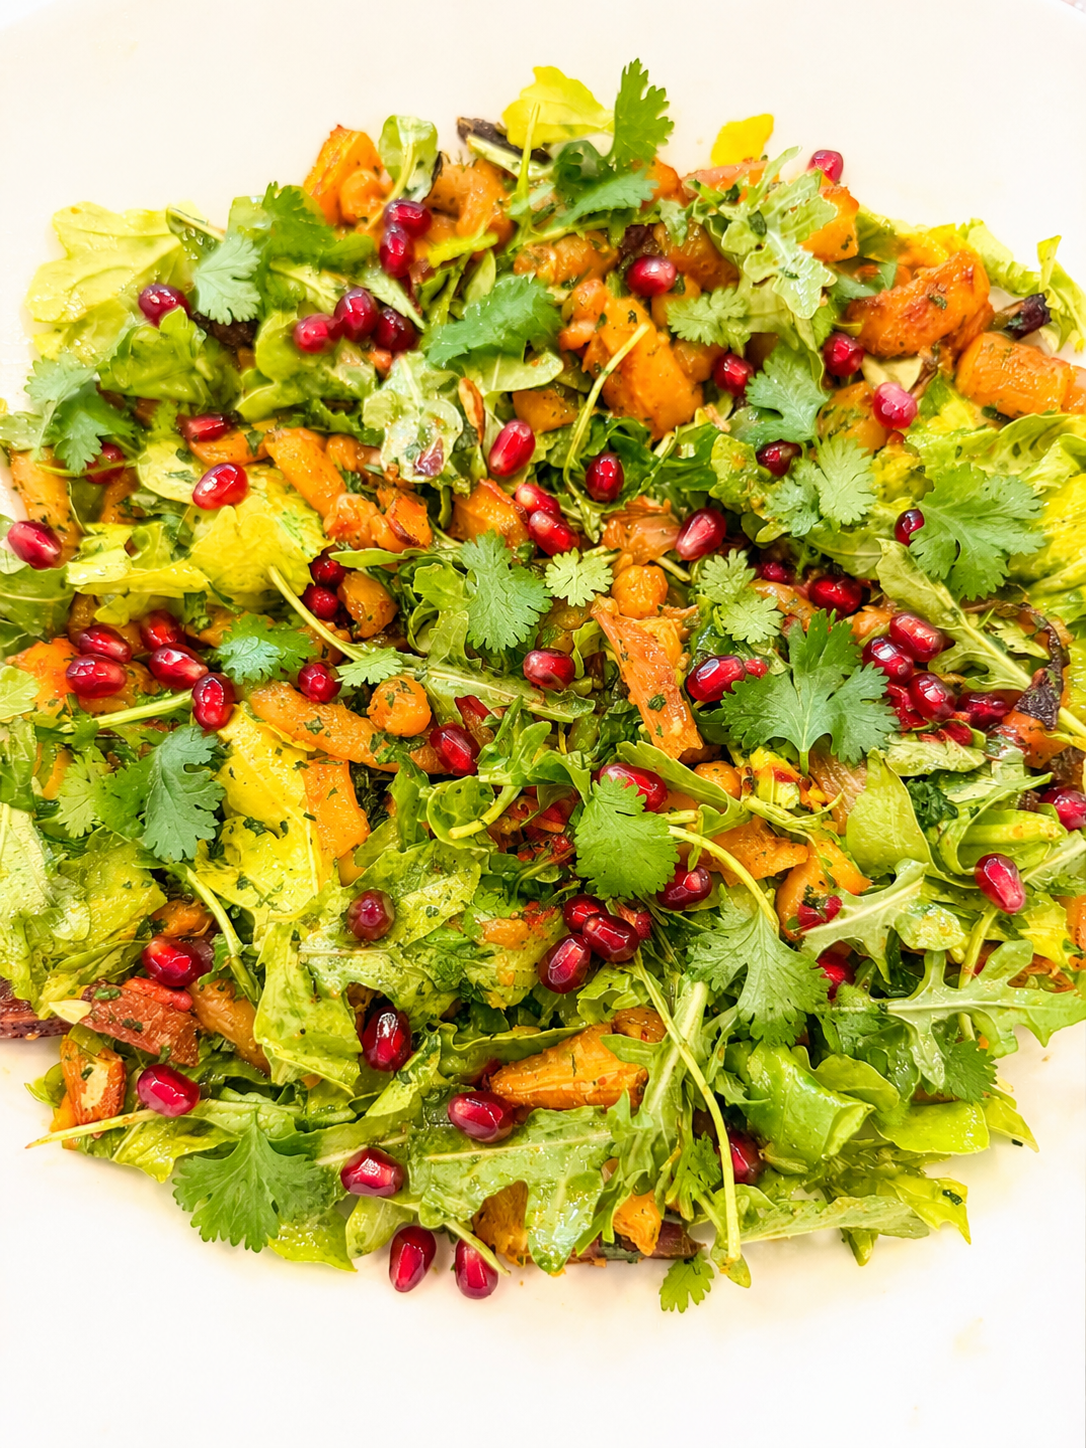
Ingredients
1 lb rainbow carrots, roasted
1 cup chickpeas, drained and rinsed
1/4 cup toasted almonds
Fresh cilantro, chopped
1/4 cup pomegranate seeds
Curry Dressing
1 tsp curry powder
1/2 tsp ground cumin
Juice of 1 lemon
1 tbsp maple syrup
1 clove garlic, minced
3 tbsp olive oil
Salt to taste
Instructions
Roast rainbow carrots at 400°F with olive oil, salt, and pepper until tender, about 20-25 minutes.
Whisk together curry powder, cumin, lemon juice, maple syrup, garlic, olive oil, and salt for the dressing.
Toss roasted carrots and chickpeas with the curry dressing.
Top with toasted almonds, fresh cilantro, and pomegranate seeds.
Warm spice, bright citrus, and a little crunch and sweetness from the pomegranate — this one's a flavor bomb in the best way.
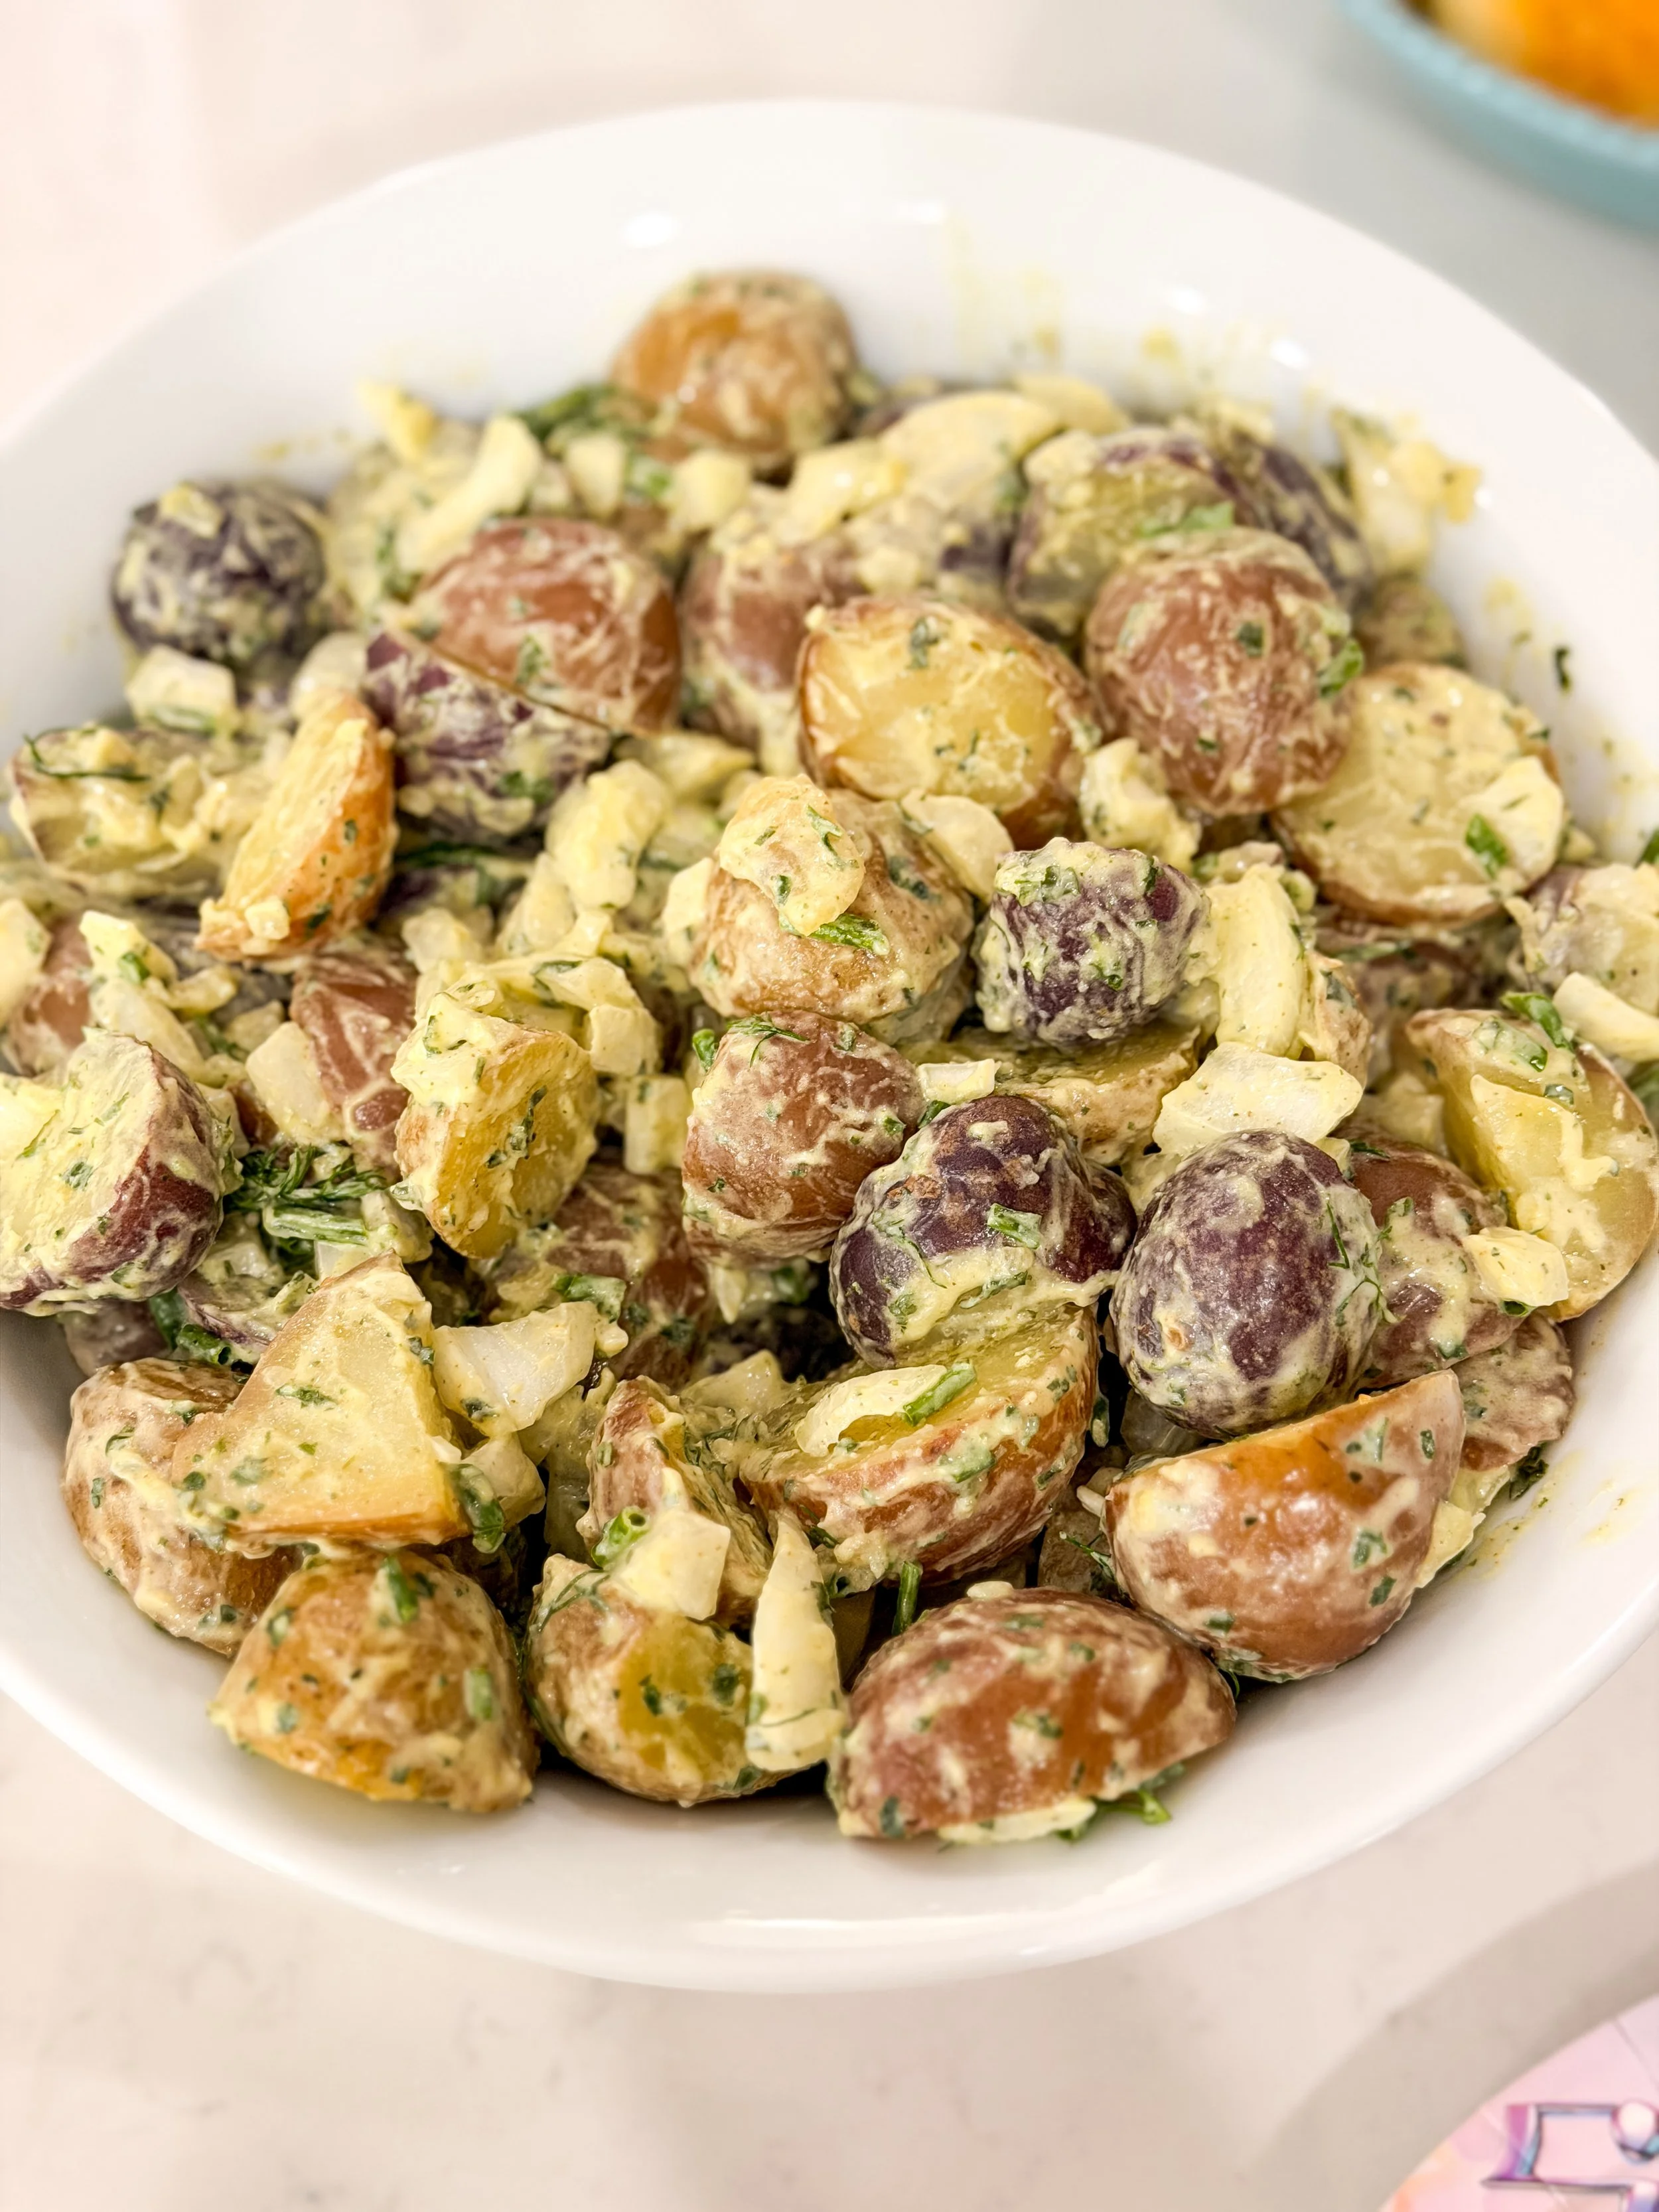
Herby Pesto Potato Salad
A pesto twist on classic potato salad — this one's begging to be brought to your next cookout.

Ingredients
2 lbs baby or red potatoes, boiled until fork-tender and halved
1/2 cup vegan pesto
Fresh herbs, chopped (basil, parsley, or your favorite mix)
Salt and pepper to taste
Olive oil, to taste
Instructions
Boil potatoes until fork-tender, then drain and let cool slightly.
While still warm, toss potatoes with vegan pesto and a drizzle of olive oil.
Fold in fresh chopped herbs.
Season with salt and pepper, and serve warm or chilled.
Classic potato salad, reimagined — this pesto version is the one that always disappears first at a cookout.

Roasted Asparagus & Avocado Rice Bowl
A simple, clean bowl built for busy days — roasted asparagus, creamy avocado, and crispy chickpeas over rice.
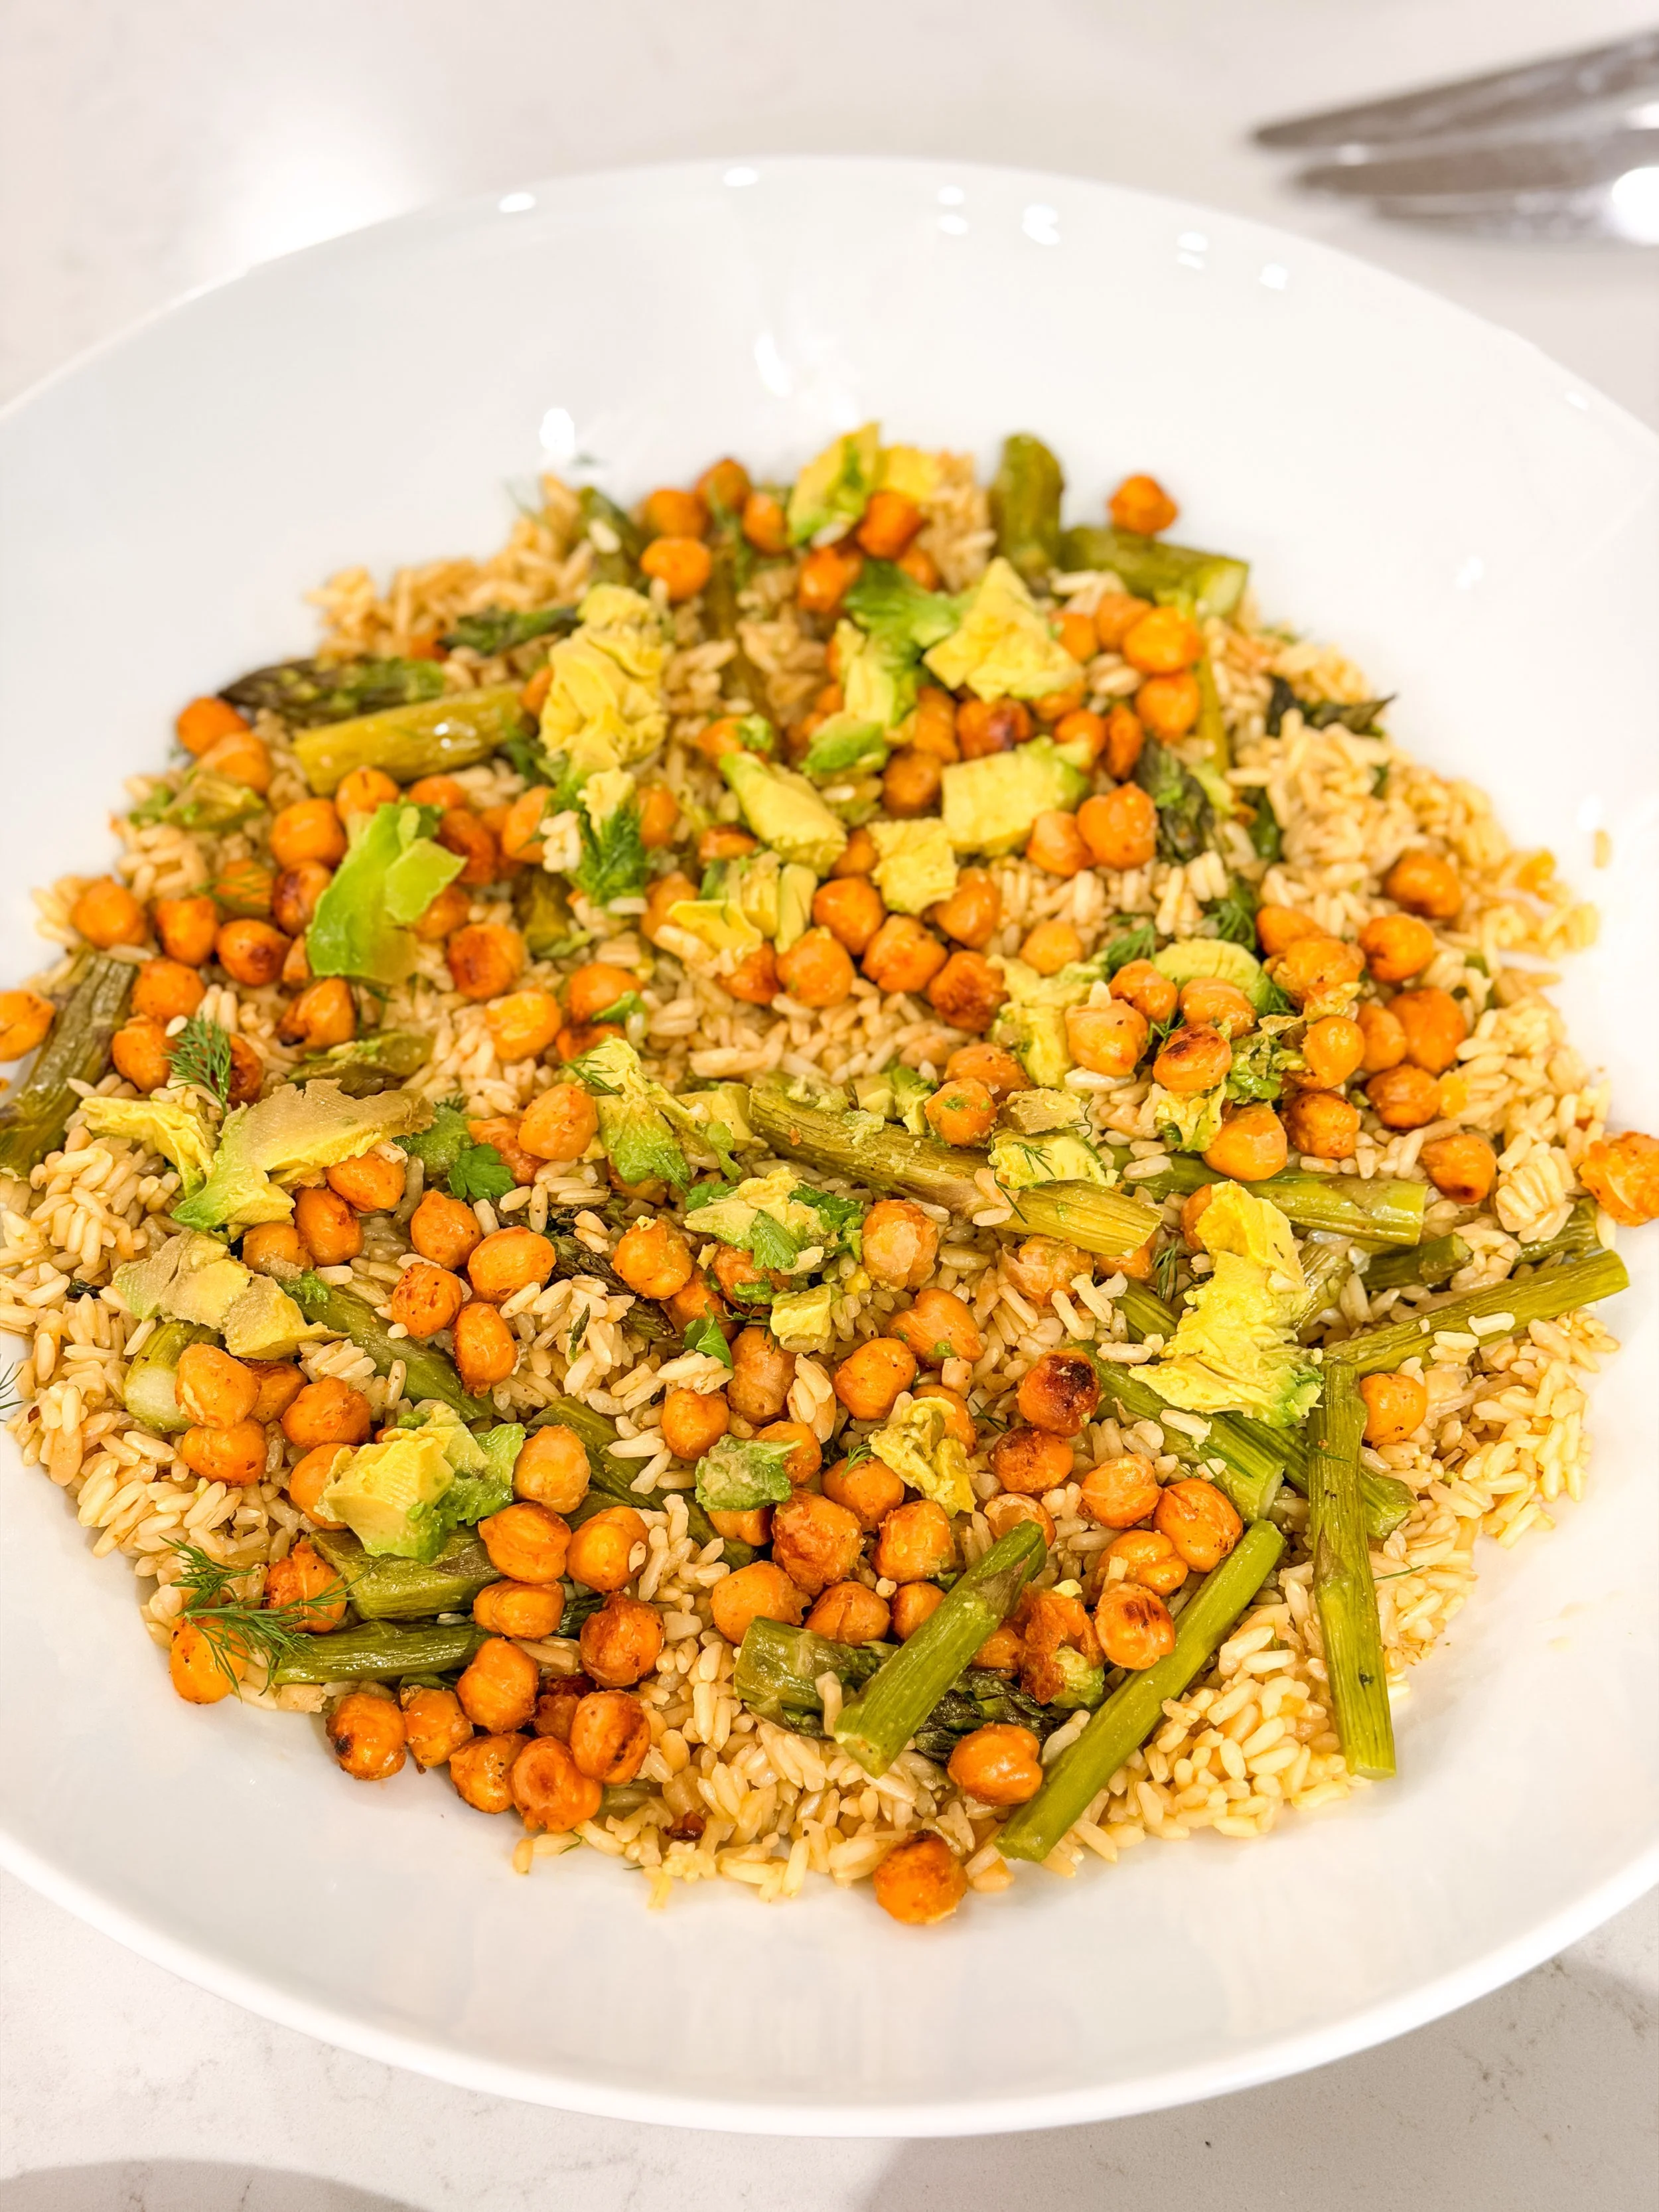
Ingredients
1 cup rice, cooked
1 bunch asparagus, roasted
1 avocado, sliced
1 cup chickpeas, crisped in the oven
Instructions
Roast asparagus at 400°F with olive oil, salt, and pepper for 12-15 minutes.
Toss chickpeas with olive oil and seasonings of choice, then roast or air-fry until crispy.
Build bowls with rice as the base, topped with roasted asparagus, avocado, and crispy chickpeas.
Finish with a drizzle of olive oil, lemon, or your favorite sauce.
Simple ingredients, big flavor — this is the kind of bowl I make on repeat when I want something easy but still feels put-together.
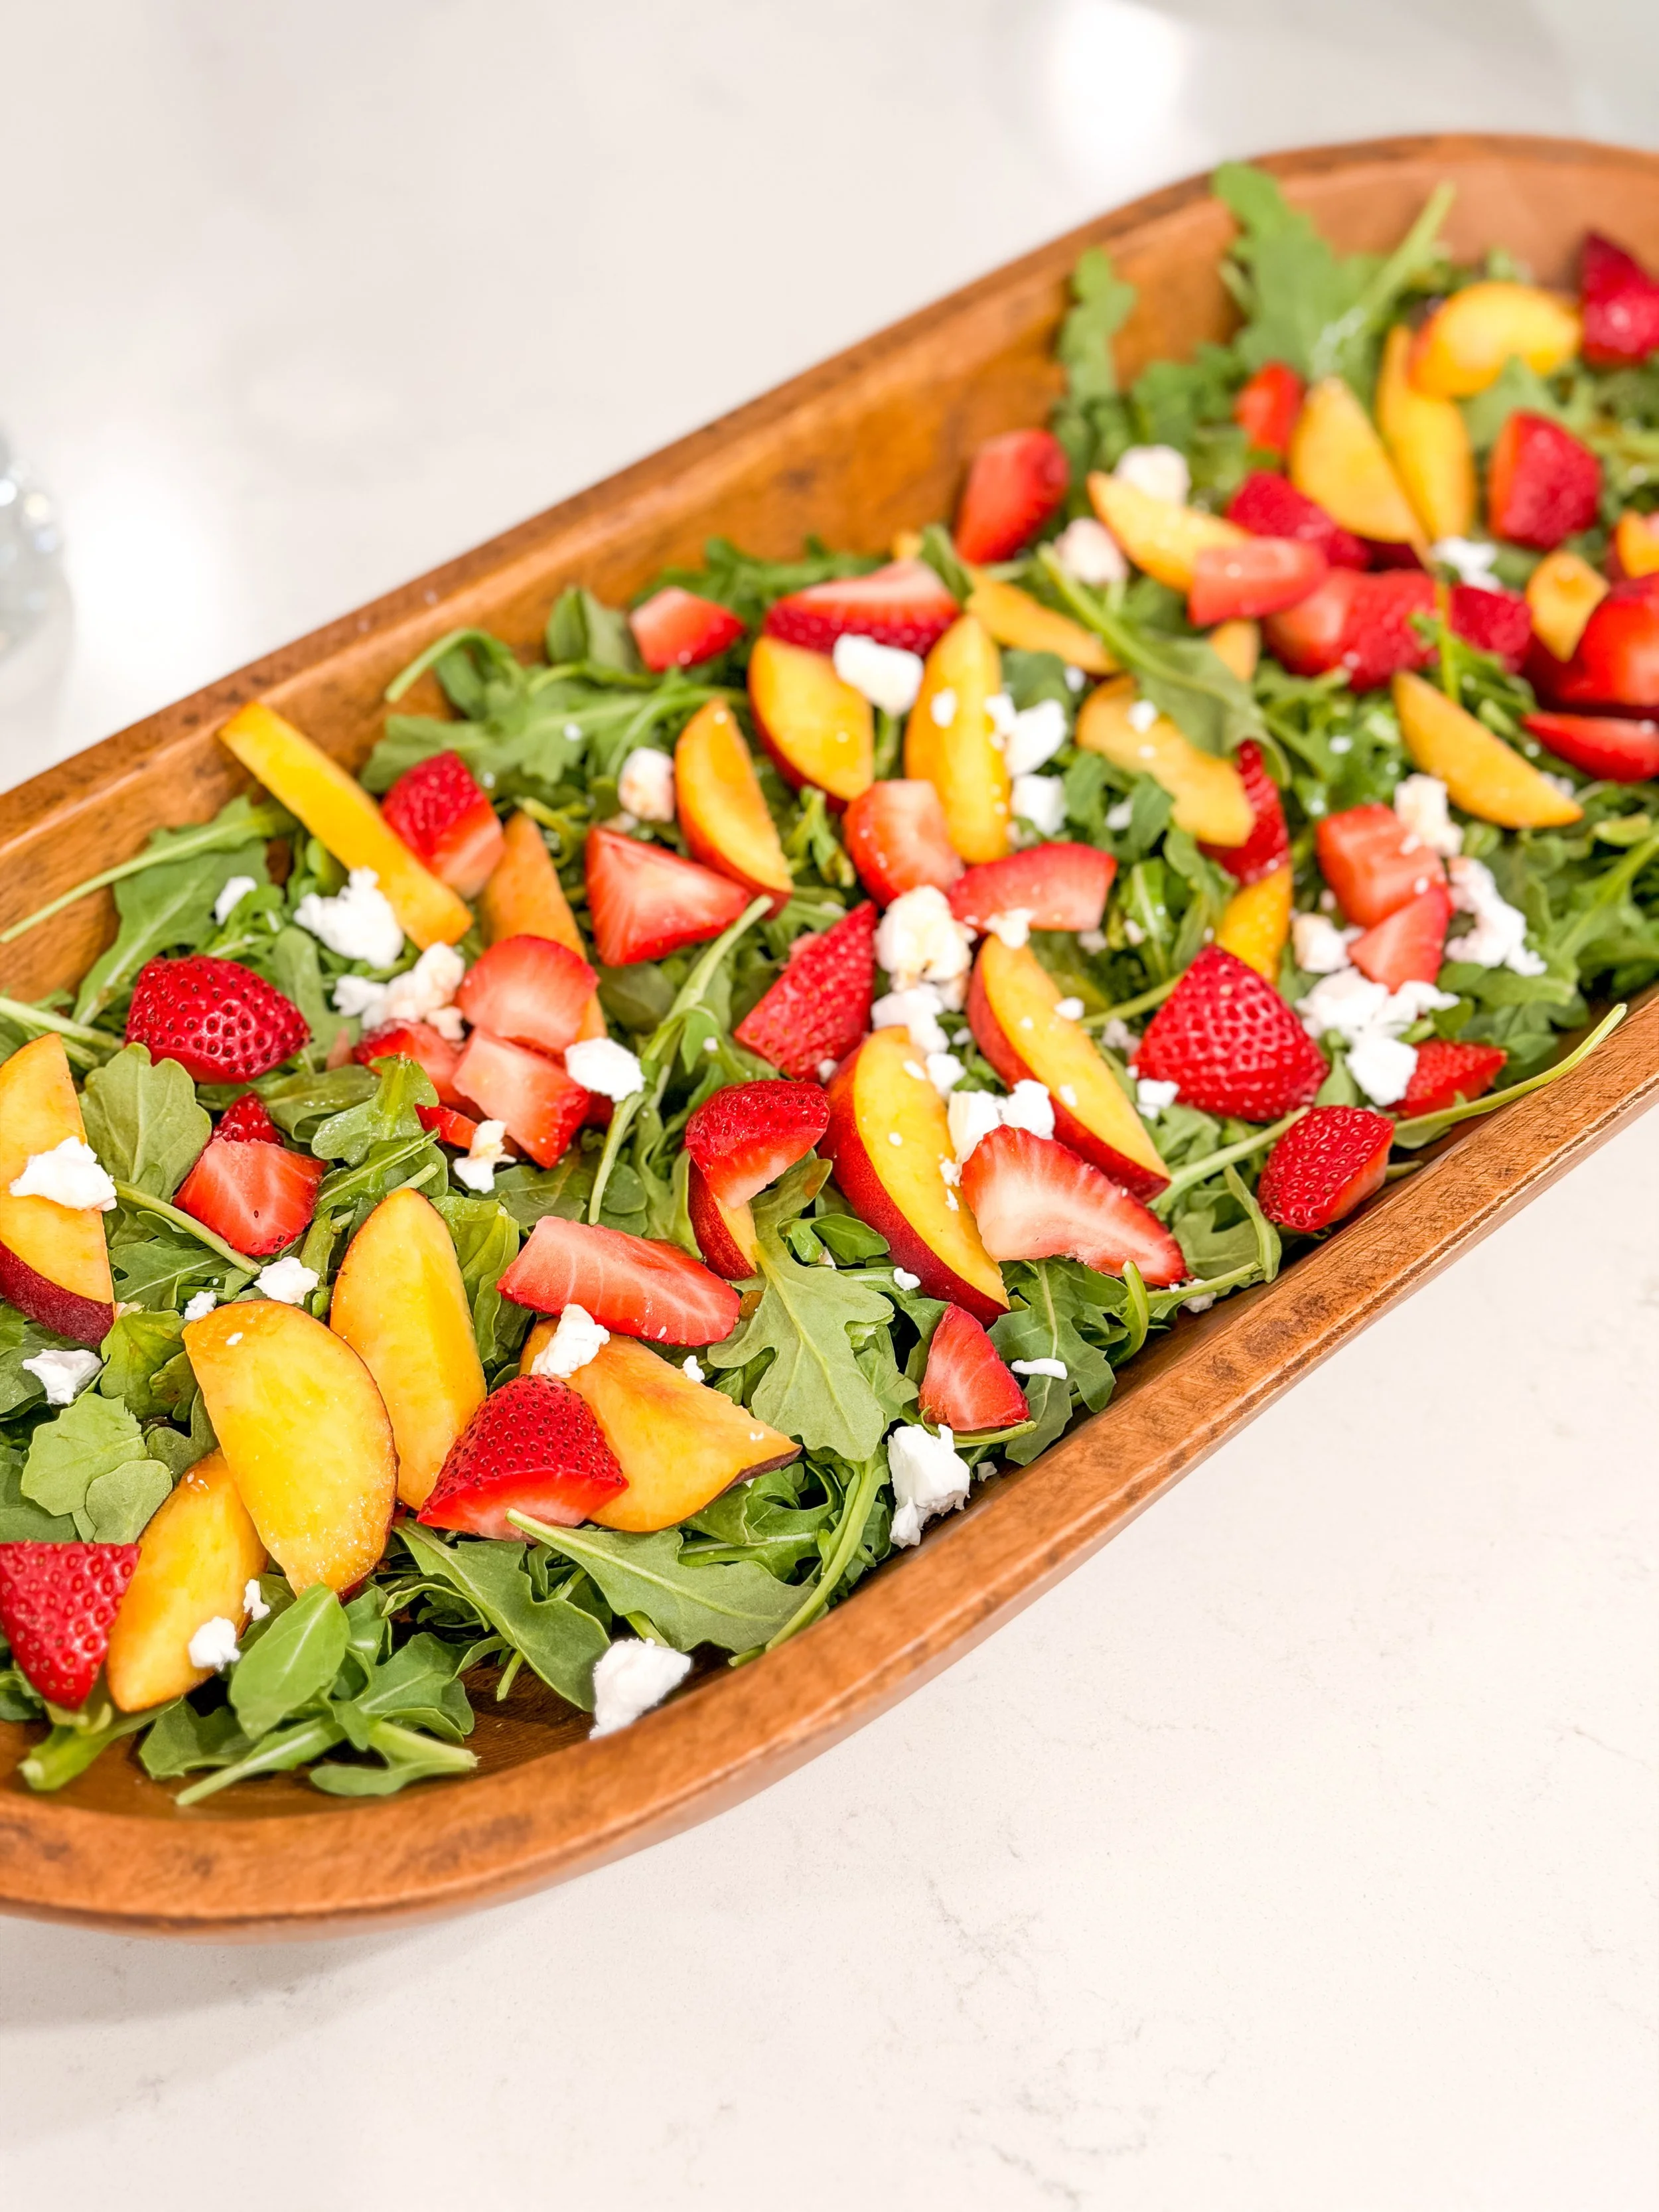
Strawberry & Peach Arugula Salad
Summer stone fruit meets peppery arugula in this simple, no-fuss salad that's basically summer on a plate.

Ingredients
4 cups arugula
1 cup strawberries, sliced
1 peach, sliced
1/2 cup Violife feta, crumbled
Olive oil and balsamic, or your favorite light vinaigrette
Salt and pepper to taste
Instructions
Arrange arugula on a platter or in a large bowl.
Top with sliced strawberries and peaches.
Sprinkle with crumbled Violife feta.
Drizzle with olive oil and balsamic, and season with salt and pepper.
Minimal effort, maximum payoff — this is the salad I make when peaches and strawberries are both at their peak.

Summer Palmini Pesto Bowl
Caramelized onions and burst tomatoes take this pesto bowl to another level — sweet, savory, and herby all at once.
Ingredients
1 bag Palmini noodles or pasta of choice, rinsed
1 onion, thinly sliced and caramelized
1 cup cherry tomatoes, burst in a hot pan
1 cup chickpeas, crisped in the oven or pan
1 cup corn kernels
Fresh basil, torn
Vegan pesto
Instructions
Caramelize sliced onions in olive oil over low heat until golden, about 20 minutes.
In a separate pan, blister cherry tomatoes over medium-high heat until they burst.
Crisp chickpeas in the oven or a hot skillet until golden.
Toss Palmini noodles with vegan pesto, caramelized onions, burst tomatoes, corn, and crispy chickpeas.
Top with fresh basil before serving.
Sweet caramelized onions, juicy tomatoes, crispy chickpeas — this bowl has texture and flavor in every bite.

Chickpea "Tuna" Sushi Burrito
A fun spin on sushi night — mashed chickpeas stand in for tuna, wrapped up burrito-style with all your favorite fillings.
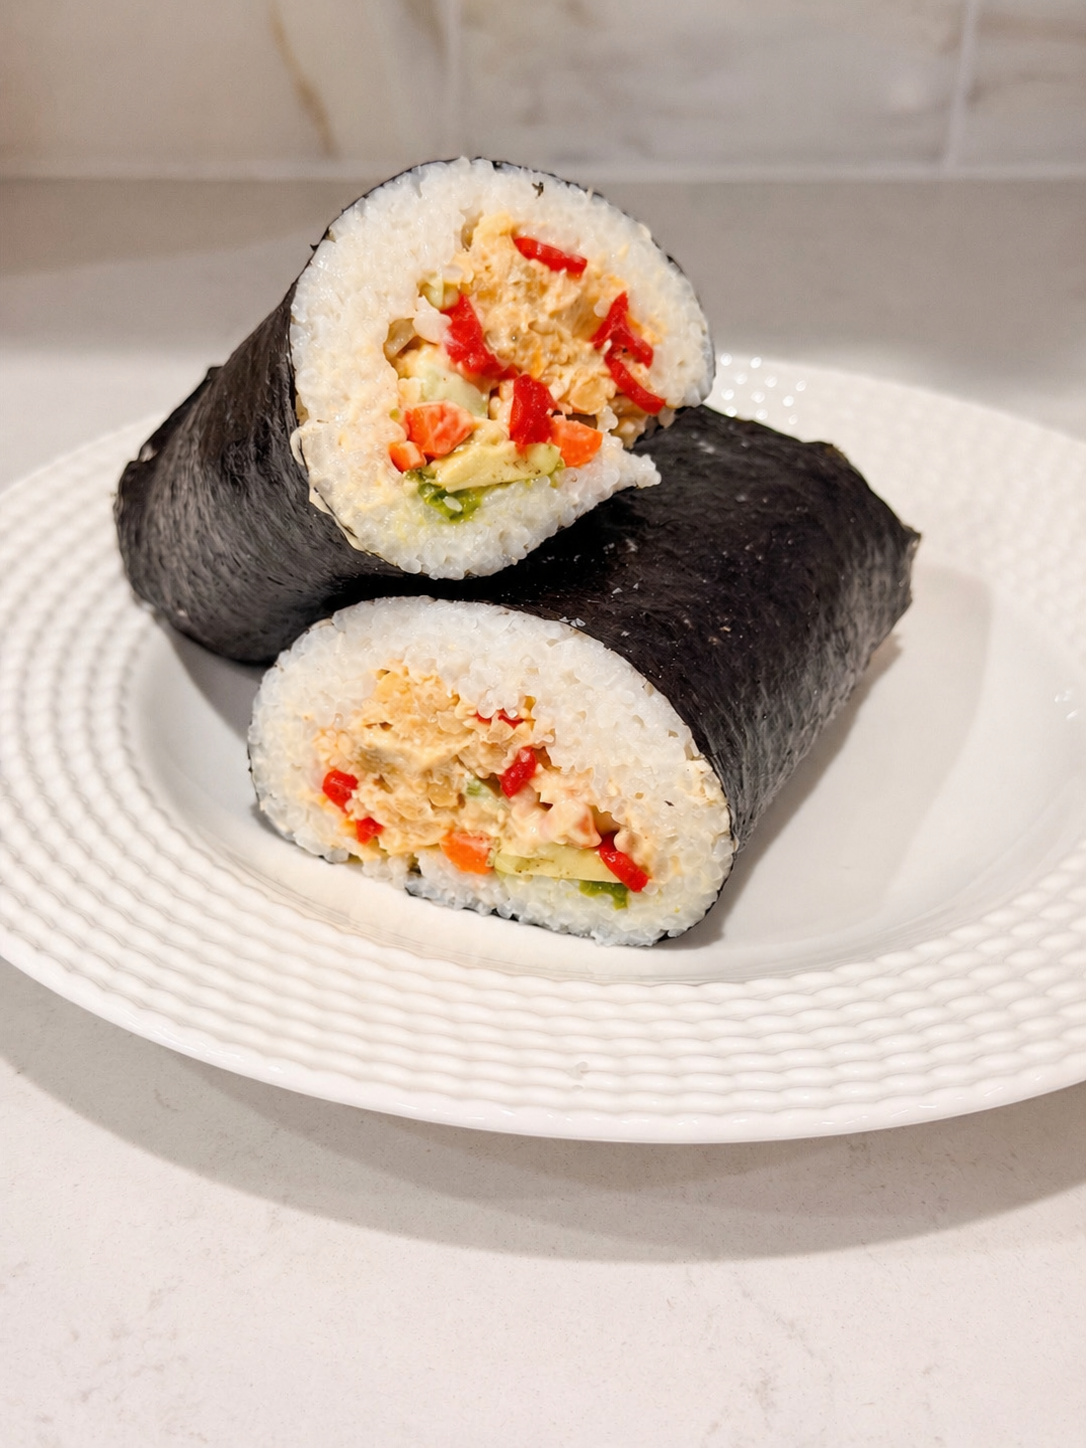
Ingredients
1 can chickpeas, drained, rinsed, and mashed
1 cucumber, sliced into strips
1 red pepper, sliced into strips
1 carrot, julienned
1 avocado, sliced
Nori sheets
Sushi rice, cooked
Spicy "Mayo"
Vegan mayo
Sriracha, to taste
Instructions
Mash chickpeas and mix with a bit of spicy mayo to make the "tuna" filling.
Lay a nori sheet flat and spread a layer of sushi rice over it.
Layer chickpea "tuna," cucumber, red pepper, carrot, and avocado down the center.
Roll tightly burrito-style, slice in half, and drizzle with extra spicy mayo.
Sushi night just got a plant-based upgrade — same craveable flavors, no fish required.

Peanut Crunch Noodle Bowl
Crunchy, saucy, and packed with fresh herbs — this is my go-to when I want something fast that still feels special.

Ingredients
1 bag Palmini noodles, rinsed
1 cup carrots, ribboned
1 cucumber, sliced thin
1 cup chickpeas, drained and rinsed
Fresh mint, chopped
Fresh parsley, chopped
Sesame seeds, for topping
Peanut Sauce
1/3 cup peanut butter
2 tbsp tamari
Juice of 1 lime
1 tbsp maple syrup
1 tsp sesame oil
Water, to thin as needed
Instructions
Whisk together peanut butter, tamari, lime juice, maple syrup, and sesame oil. Add water a tablespoon at a time until pourable.
Rinse and drain Palmini noodles well; pat dry.
Toss noodles with carrot ribbons, cucumber, and chickpeas.
Pour peanut sauce over and toss to coat.
Top with fresh mint, parsley, and sesame seeds.
Crunchy, saucy, and done in under 15 minutes — this is the bowl I make when I want maximum flavor with minimum effort.

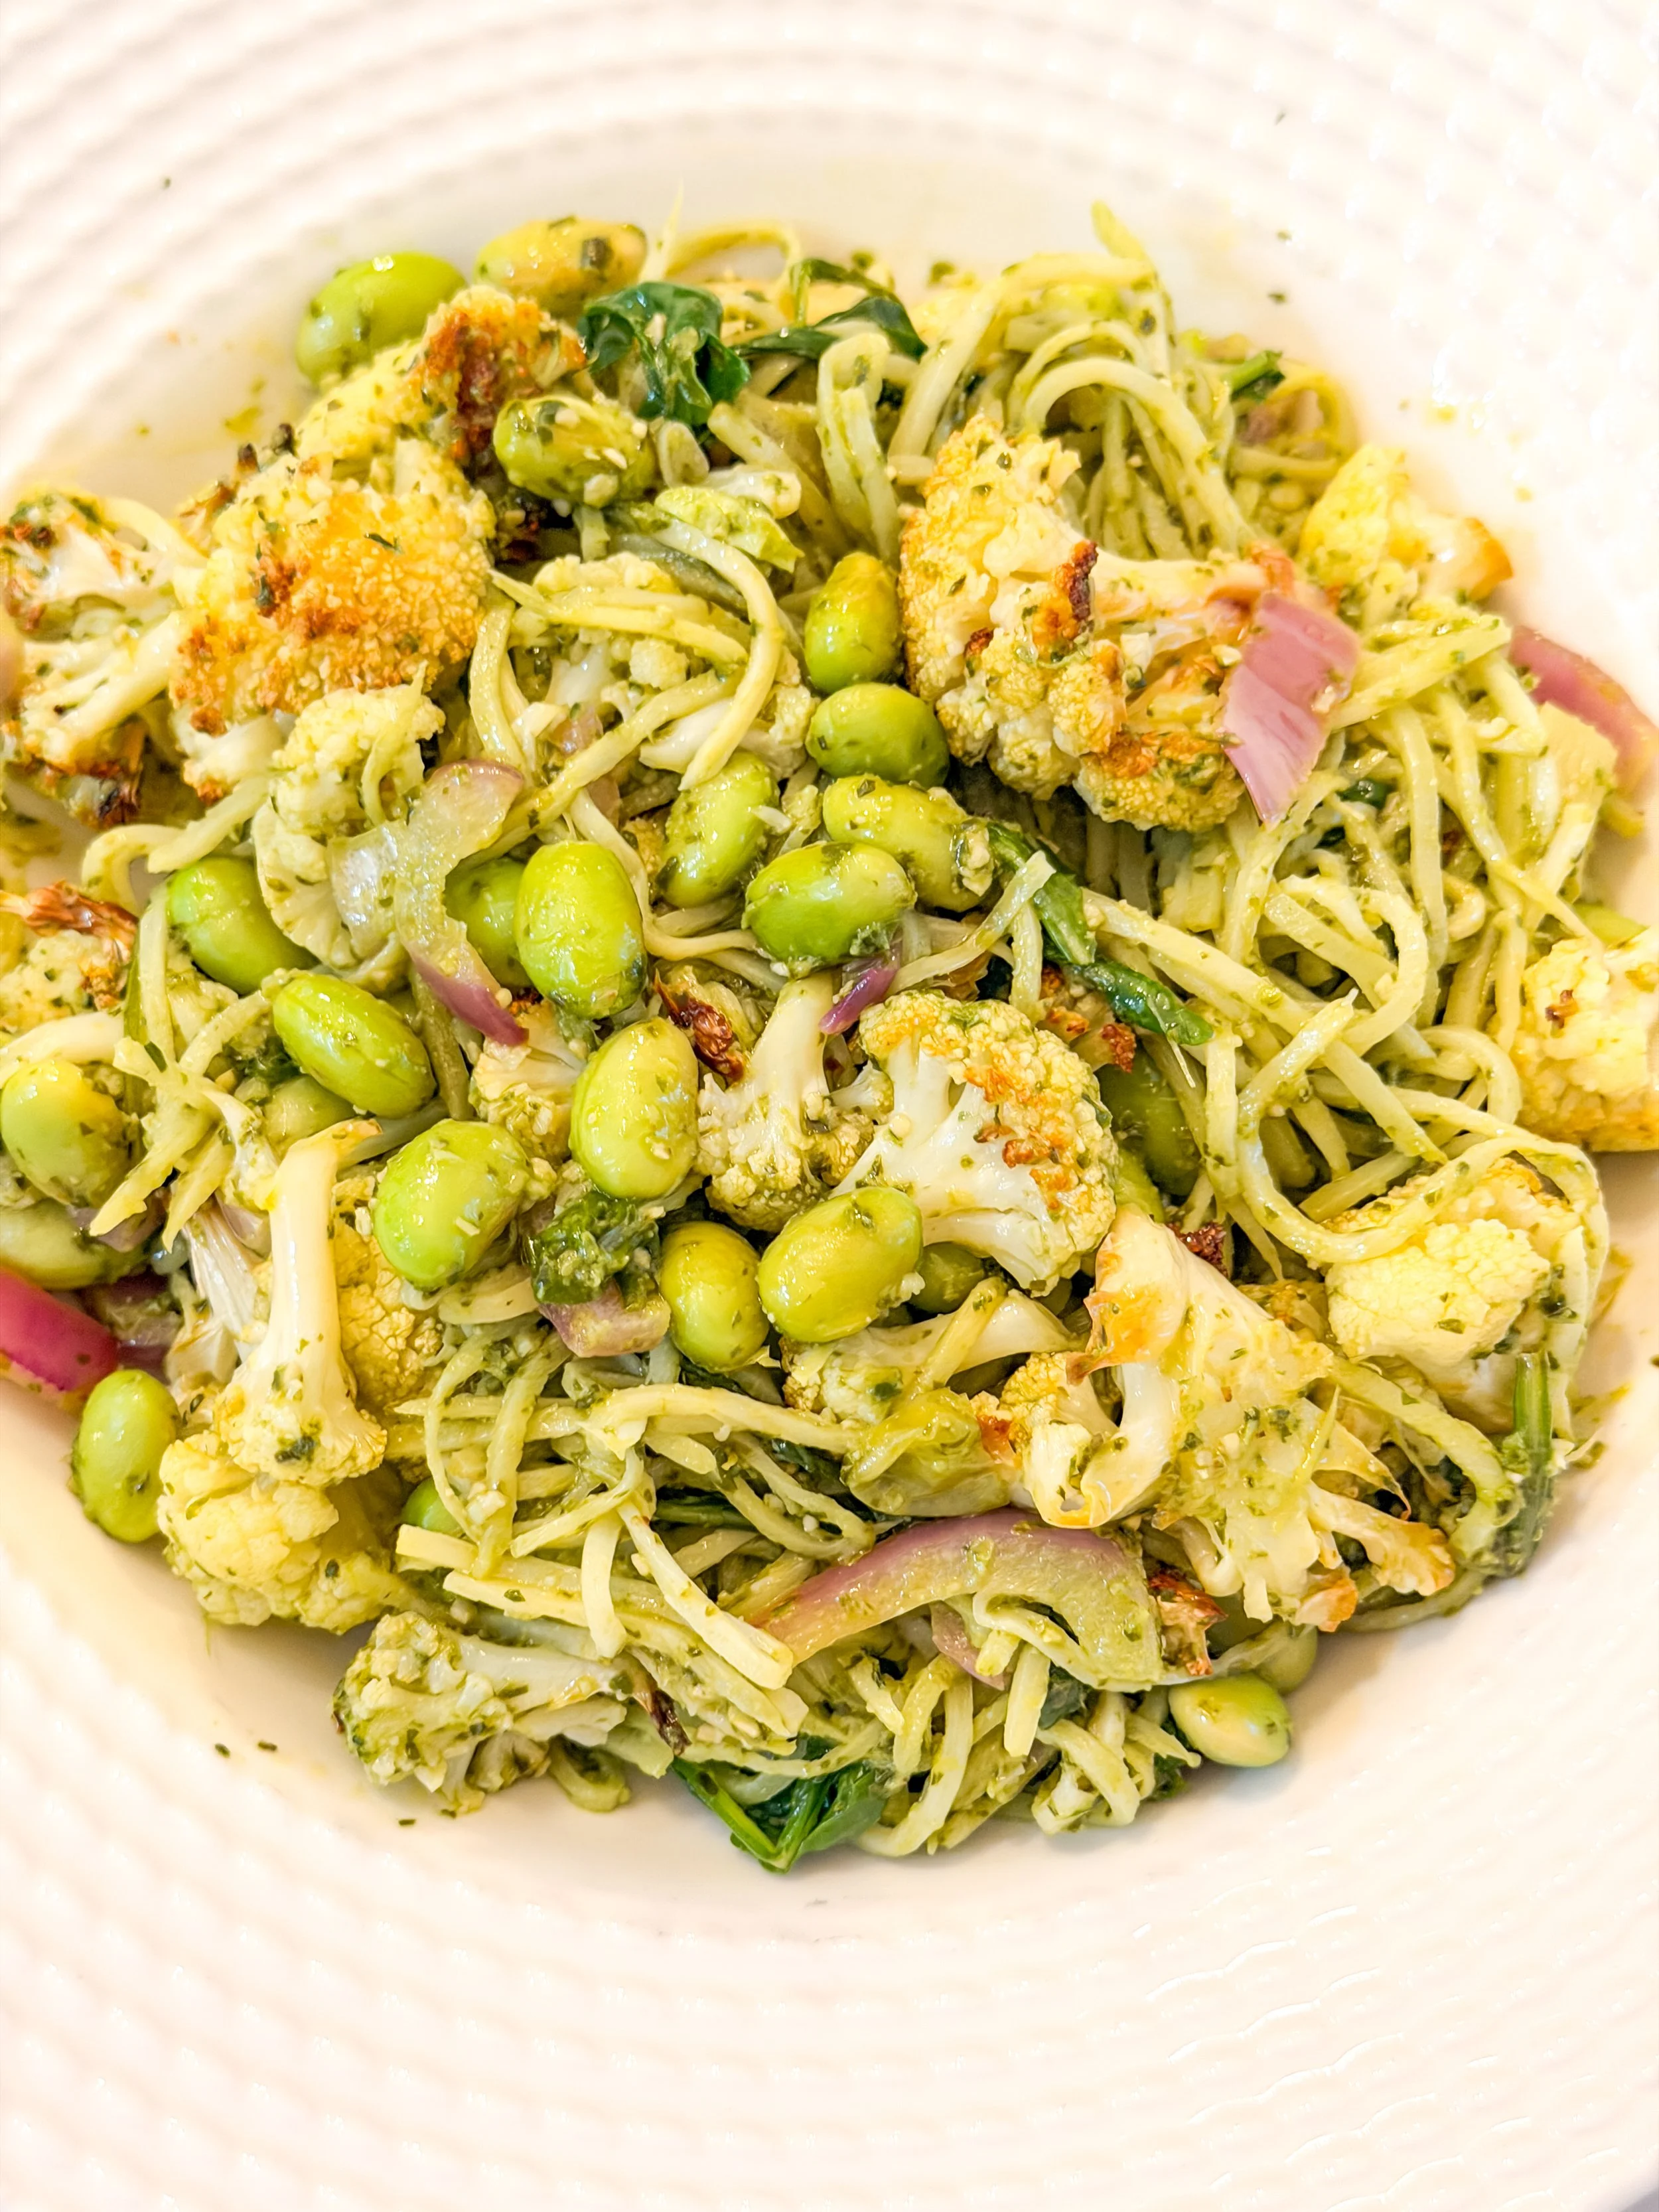
Earth Day Asparagus & Cauliflower Couscous Salad
A springtime favorite I made for Earth Day — packed with veggies and finished with crumbled feta for that little something extra.
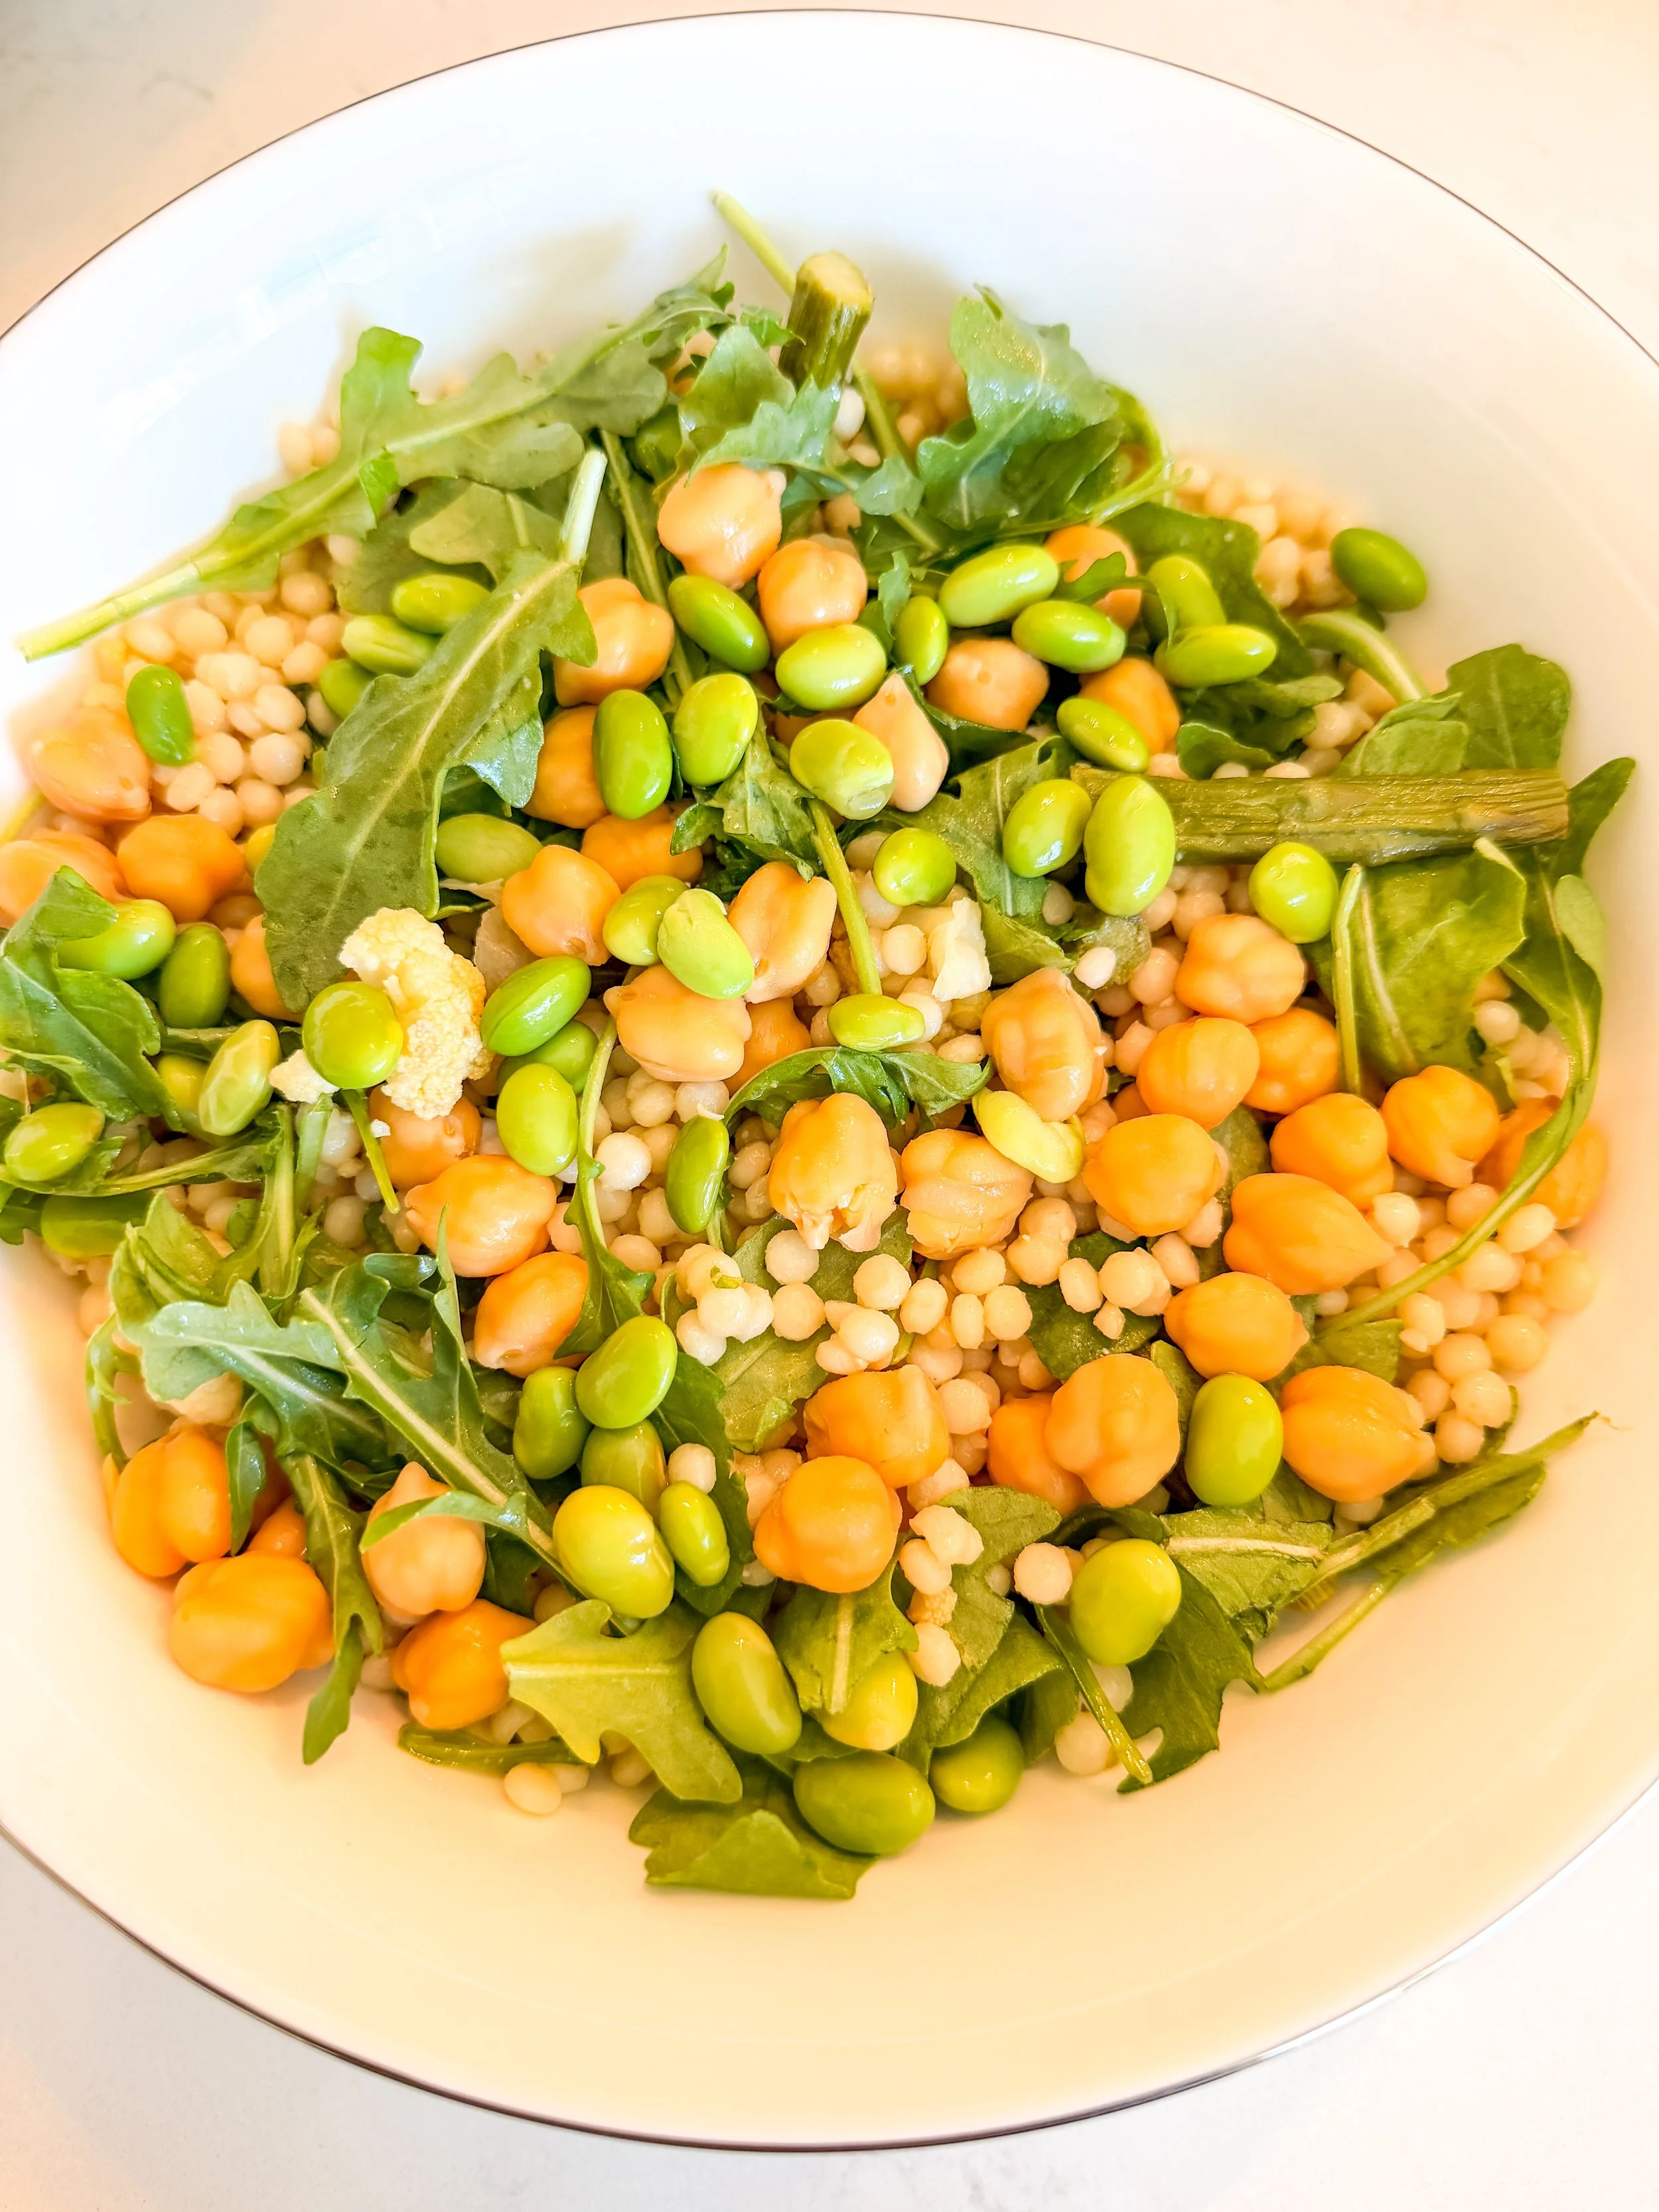
Ingredients
1 cup couscous, cooked
1 cup cauliflower, roasted
1 bunch asparagus, roasted and chopped
2 cups arugula
1 cup edamame, shelled
1 cup chickpeas, drained and rinsed
2 tbsp fresh dill, chopped
1/4 cup toasted pine nuts
1/2 cup Violife feta, crumbled
Instructions
Combine cooked couscous, roasted cauliflower, roasted asparagus, arugula, edamame, and chickpeas in a large bowl.
Toss with olive oil, a squeeze of lemon, salt, and pepper (or your favorite lemony dressing).
Fold in fresh dill.
Top with toasted pine nuts and crumbled Violife feta before serving.
A little Earth Day reminder that eating seasonally and plant-based can be this colorful and satisfying. Save this one for your next spring gathering.

Lemon "Cheesecake" with Nasoya Silken Tofu
I'm so excited to share this one — a collab recipe using Nasoya silken tofu to make a creamy, dreamy lemon cheesecake that's entirely plant-based.
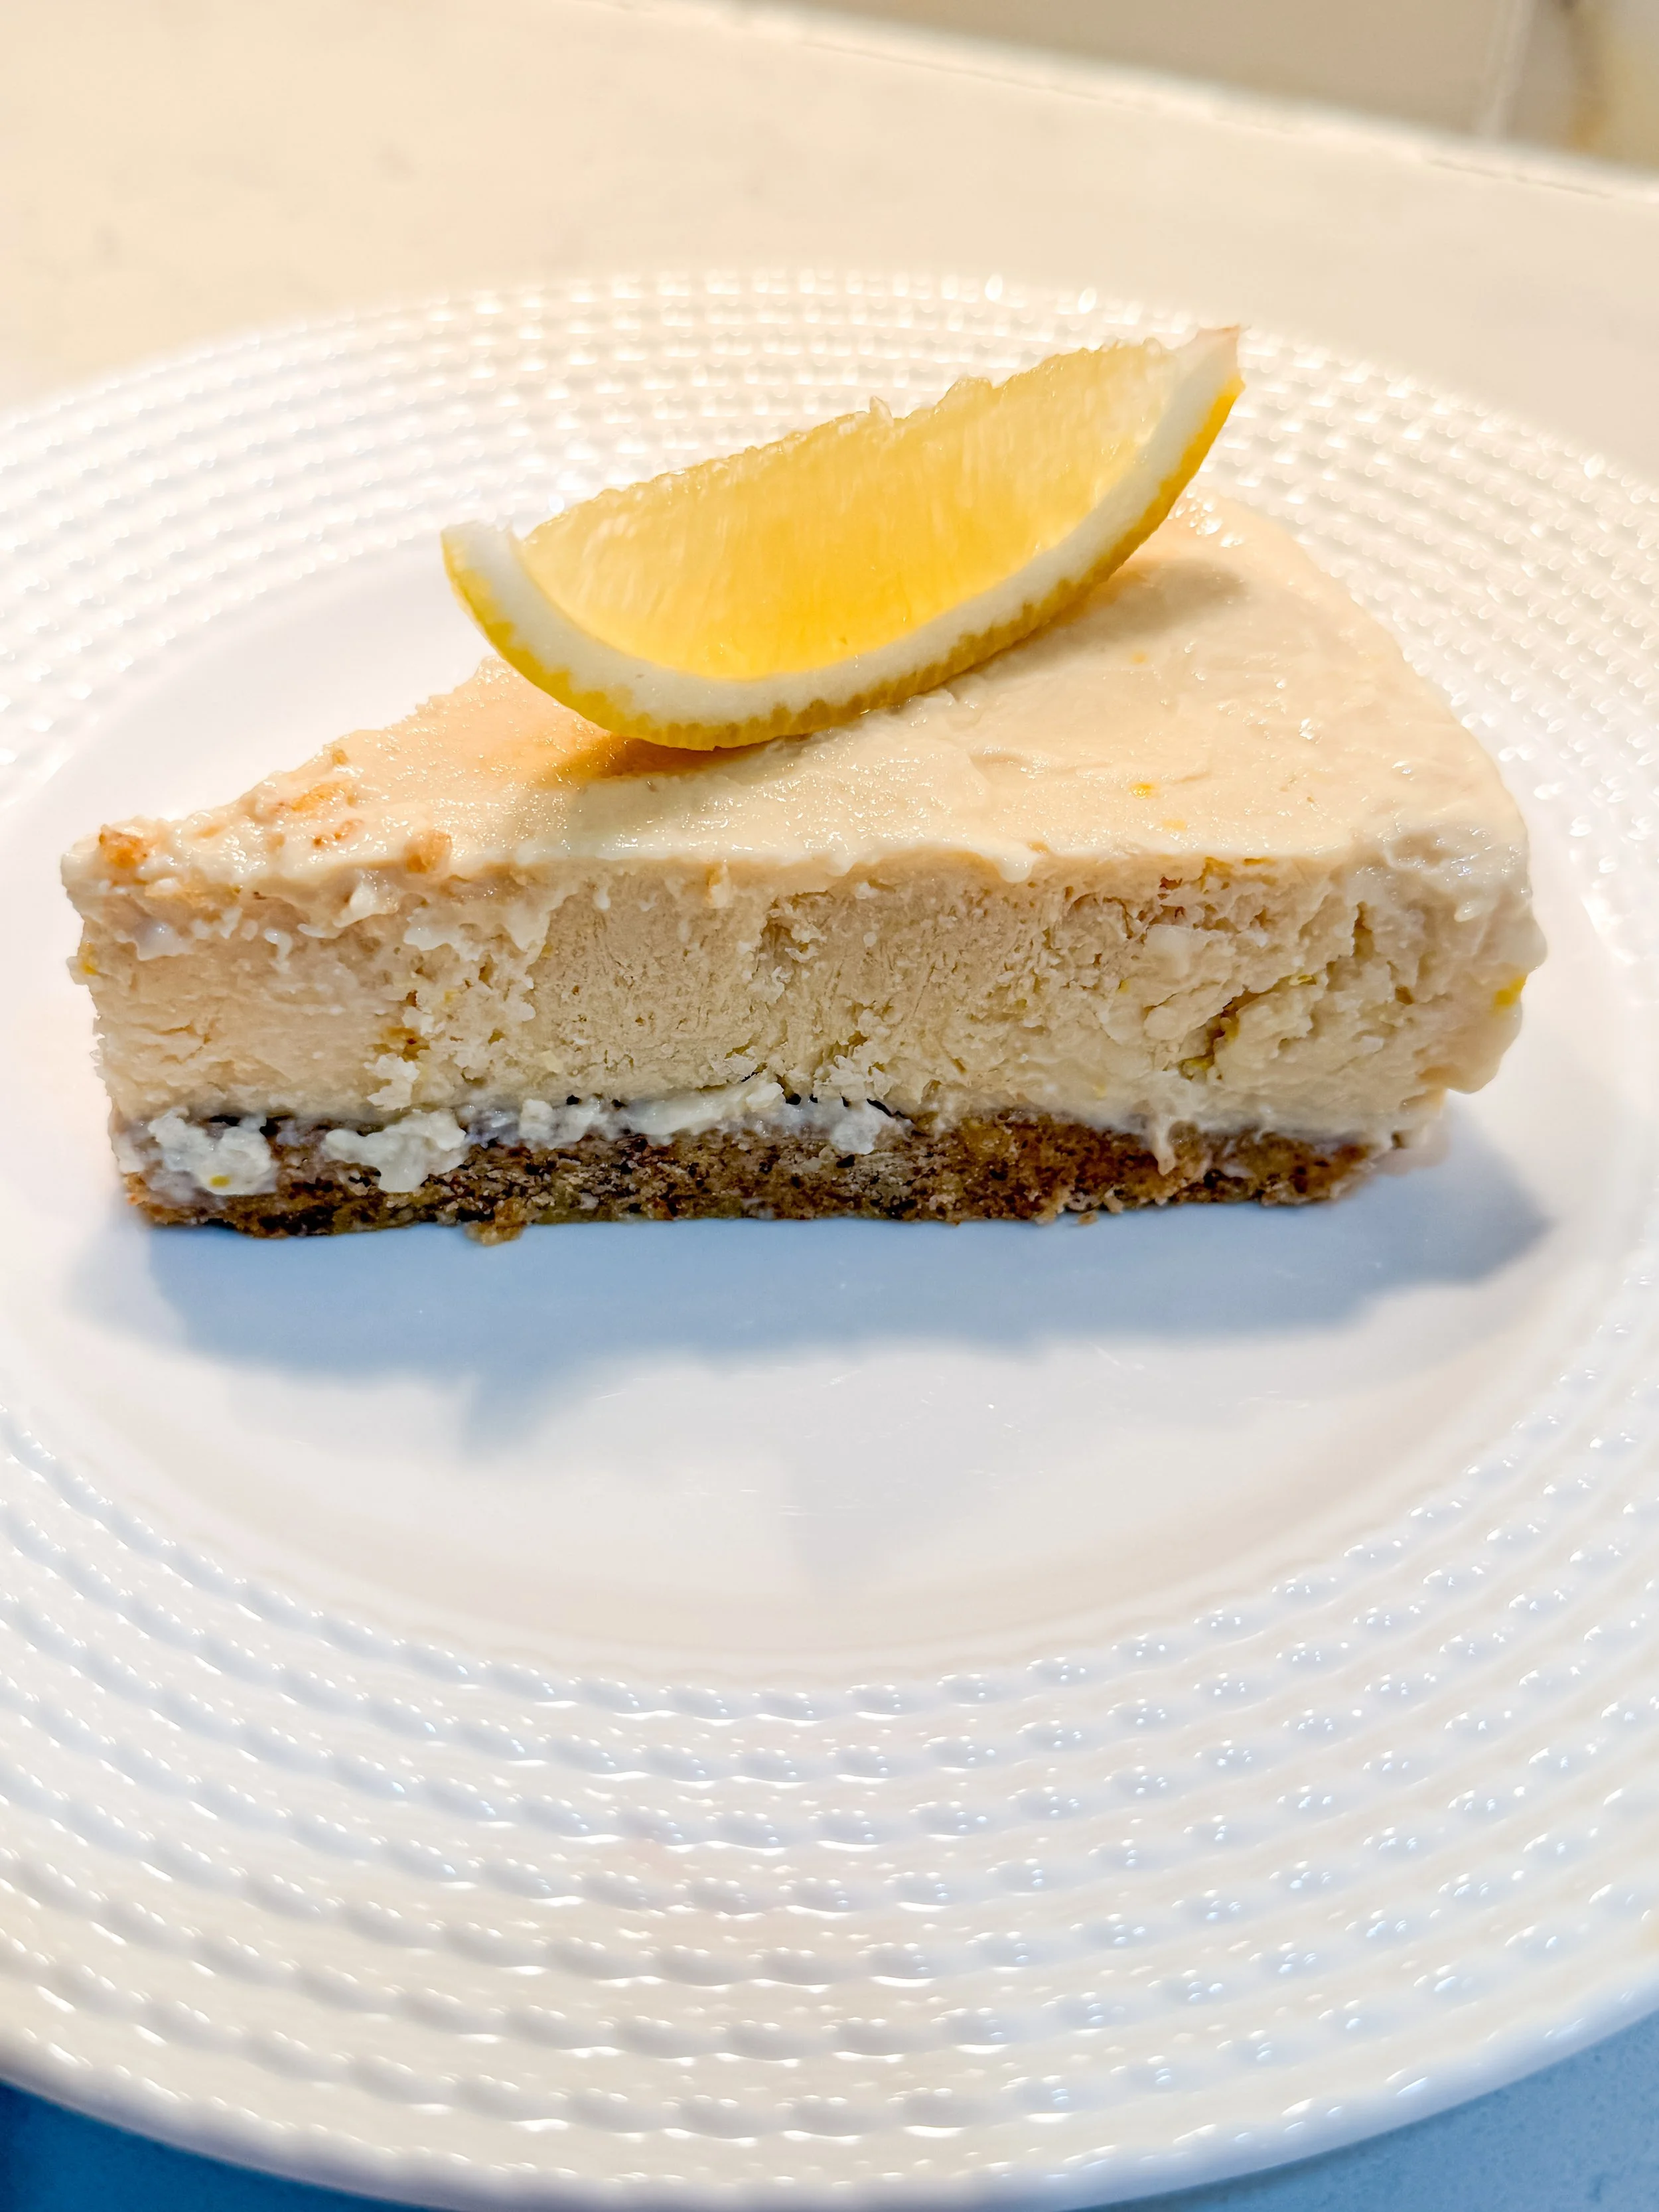
Crust
1 1/2 cups almond flour
8-10 pitted dates
2 tbsp coconut oil, melted
Filling
1 package Nasoya silken tofu
1/3 cup maple syrup
Juice of 2 lemons
2 tbsp coconut oil, melted
1 tsp vanilla extract
1 tbsp cornstarch
Pinch of salt
Instructions
Preheat oven to 350°F. In a food processor, pulse almond flour, dates, and coconut oil until it forms a sticky dough.
Press the crust mixture into a lined springform pan or tart pan. Bake for 8-10 minutes, then let cool.
Blend silken tofu, maple syrup, lemon juice, coconut oil, vanilla, cornstarch, and salt until completely smooth.
Pour filling over the cooled crust.
Bake at 325°F for 25-30 minutes, until the center is just set. Cool completely, then chill for at least 4 hours before serving.
Silky, citrusy, and secretly made with tofu — this is the dessert that convinces people plant-based can be just as indulgent. So excited to have partnered with Nasoya on this one!

Creamy Pesto Pasta with Palmini
Palmini noodles are such an easy lower-carb swap, and this creamy pesto version proves plant-based pasta night doesn't have to be complicated.
Ingredients
1 bag Palmini noodles, rinsed well
1 cup cauliflower, roasted
1 cup edamame, shelled
1/4 cup red onion, sliced
2 cups arugula
1/2 cup vegan pesto (homemade or store-bought)
1 tbsp olive oil
Vegan parmesan, to taste
Juice of 1/2 lemon
Toasted pine nuts, for topping
Instructions
Rinse Palmini noodles thoroughly and pat dry; sauté briefly in olive oil to warm through.
Toss noodles with roasted cauliflower, edamame, red onion, and arugula.
Stir in vegan pesto until everything is well coated.
Finish with a squeeze of lemon juice, a sprinkle of vegan parmesan, and toasted pine nuts.
Serve warm or at room temperature.
Comfort food, plant-based style. This one's proof that "healthy pasta night" doesn't mean sacrificing flavor.

Pearl Couscous Salad with Roasted Asparagus
Fresh herbs and lemon are doing all the heavy lifting in this one. It's light, a little tangy, and perfect for spring and summer tables.
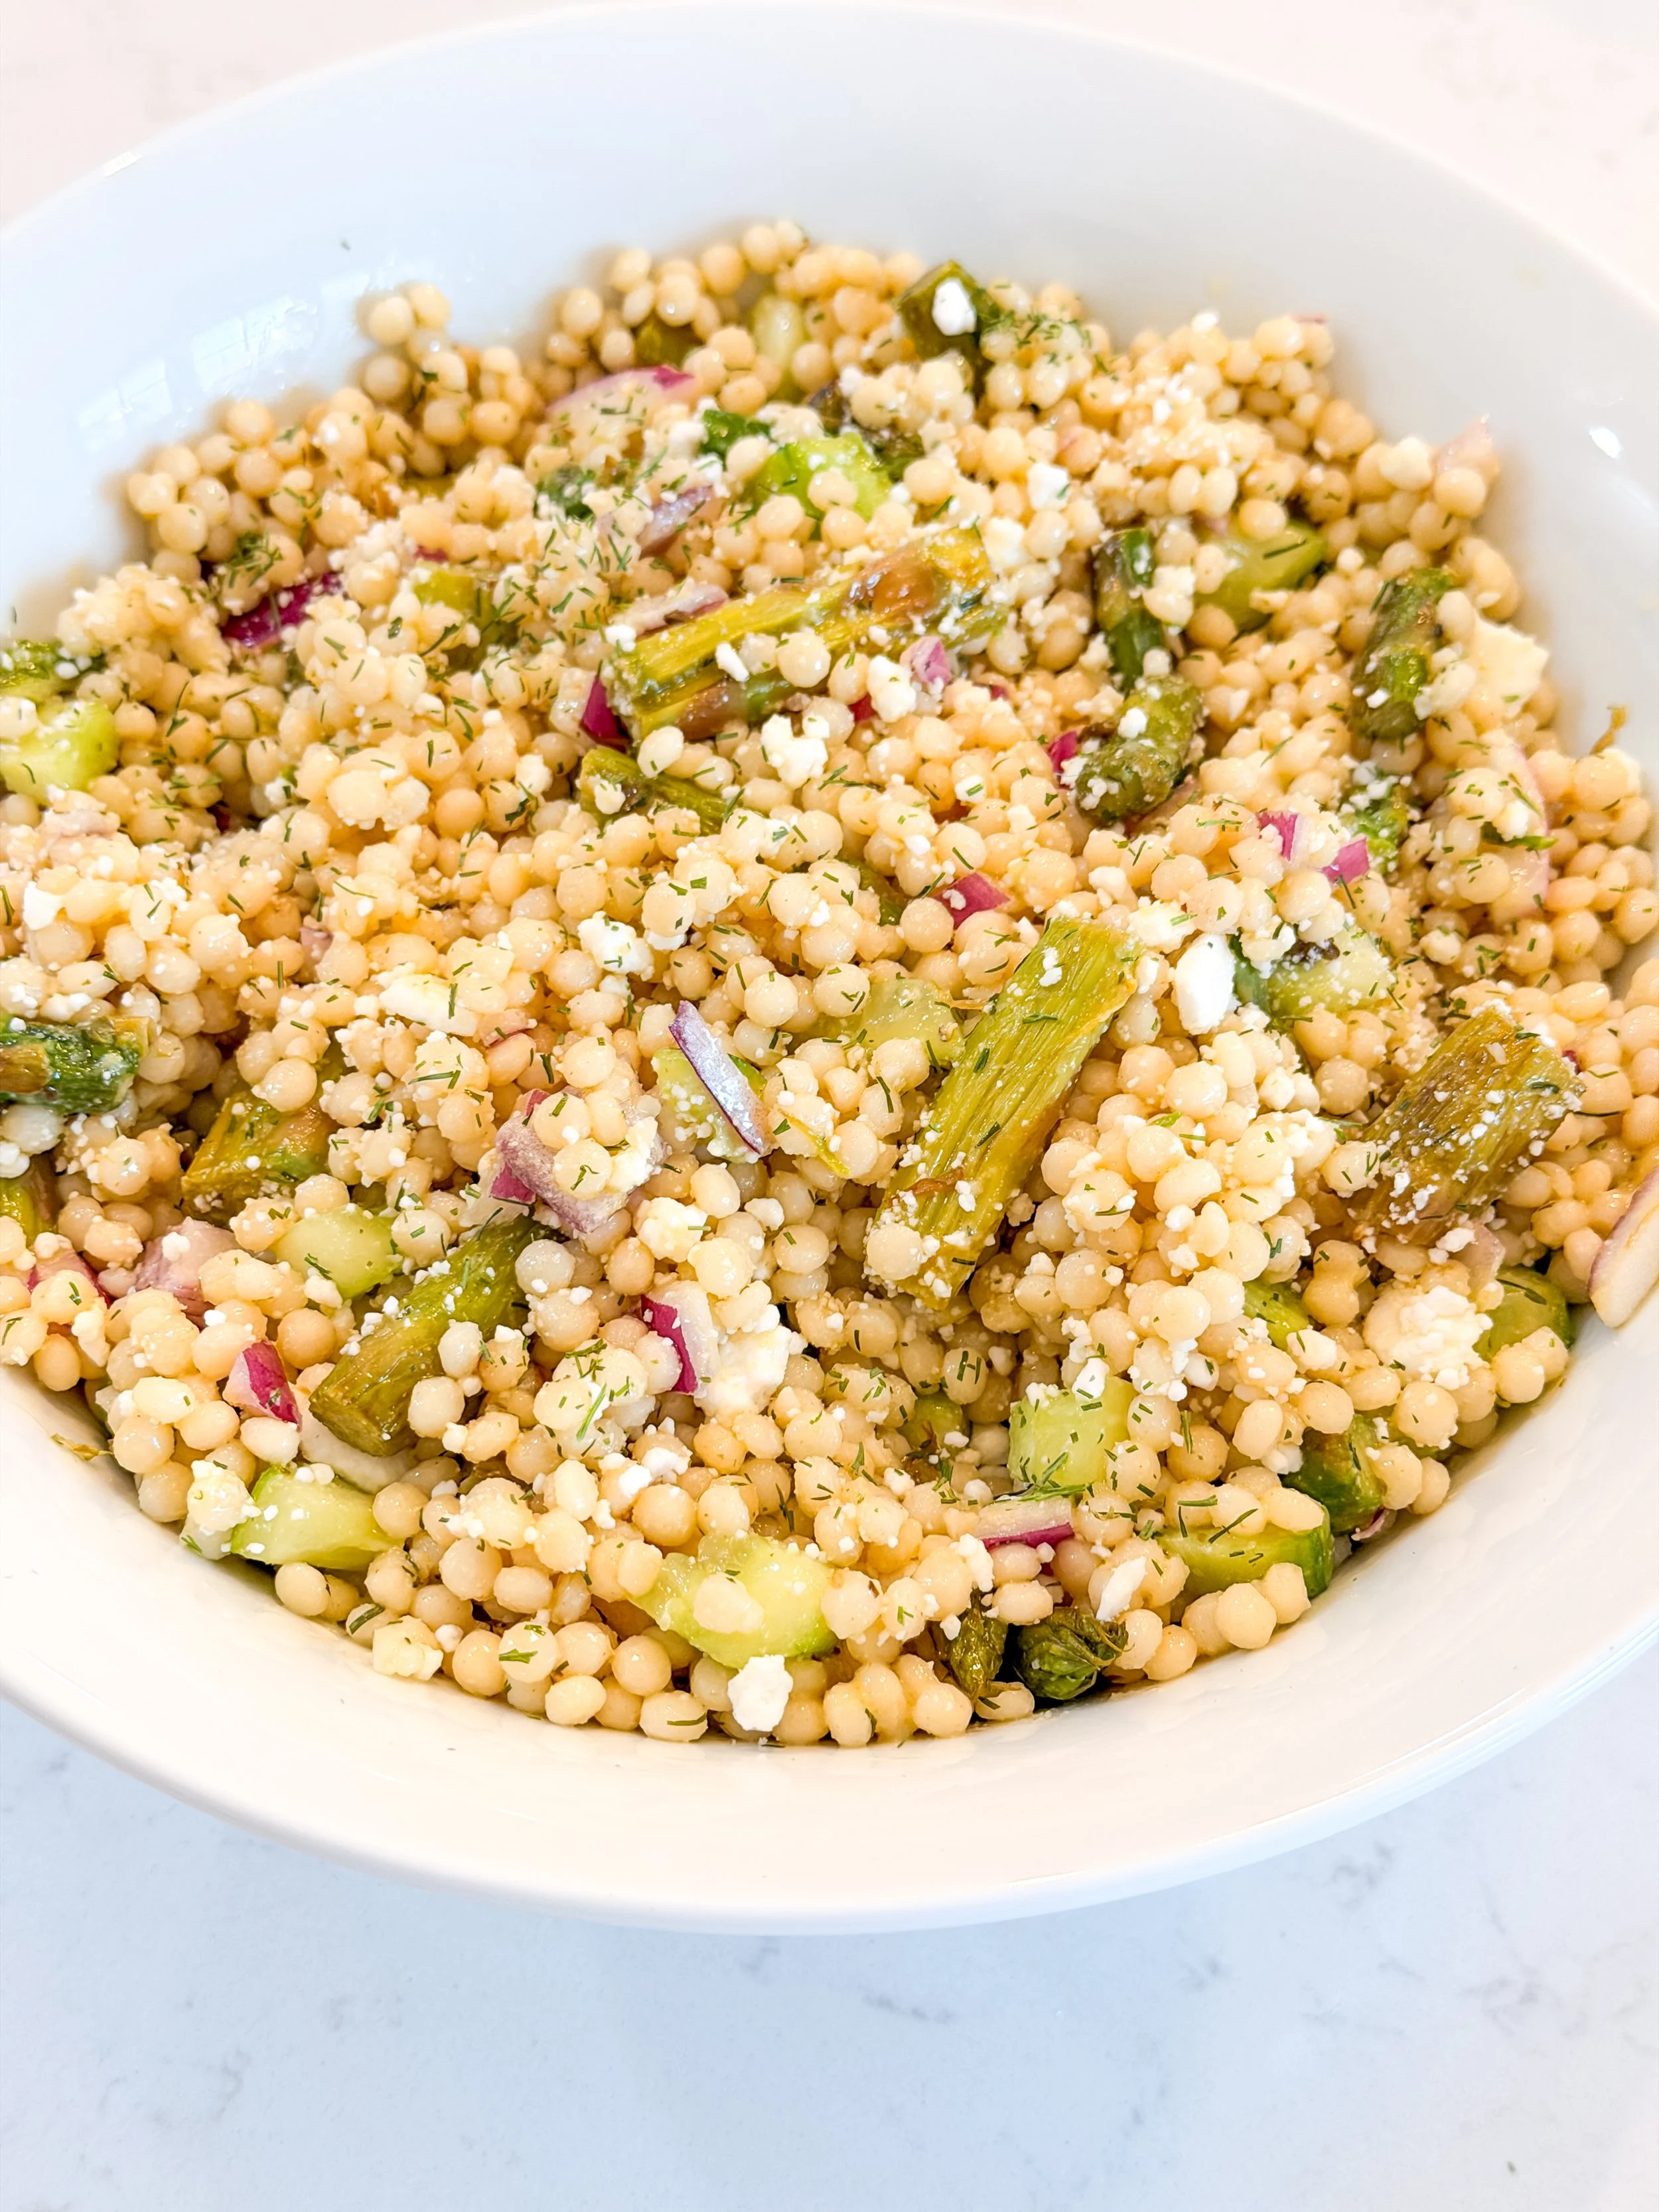
Ingredients
1 cup pearl couscous, cooked
1 bunch asparagus, trimmed and roasted or blanched, chopped
1/2 cup Follow Your Heart vegan feta, crumbled
1 cucumber, diced
1/4 cup red onion, thinly sliced
2 tbsp fresh dill, chopped
2 tbsp fresh parsley, chopped
1/4 cup toasted pine nuts
Bright Lemon Herb Dressing
Juice of 1-2 lemons
3 tbsp olive oil
Fresh dill and parsley (reserved from above)
Salt and pepper to taste
Instructions
Cook pearl couscous according to package directions and let cool slightly.
Whisk lemon juice, olive oil, herbs, salt, and pepper for the dressing.
Combine couscous, asparagus, cucumber, and red onion in a large bowl.
Pour dressing over and toss well.
Top with vegan feta and toasted pine nuts before serving.
This is my go-to for a dish that photographs as good as it tastes — perfect for a tablescape moment or a simple weeknight side.
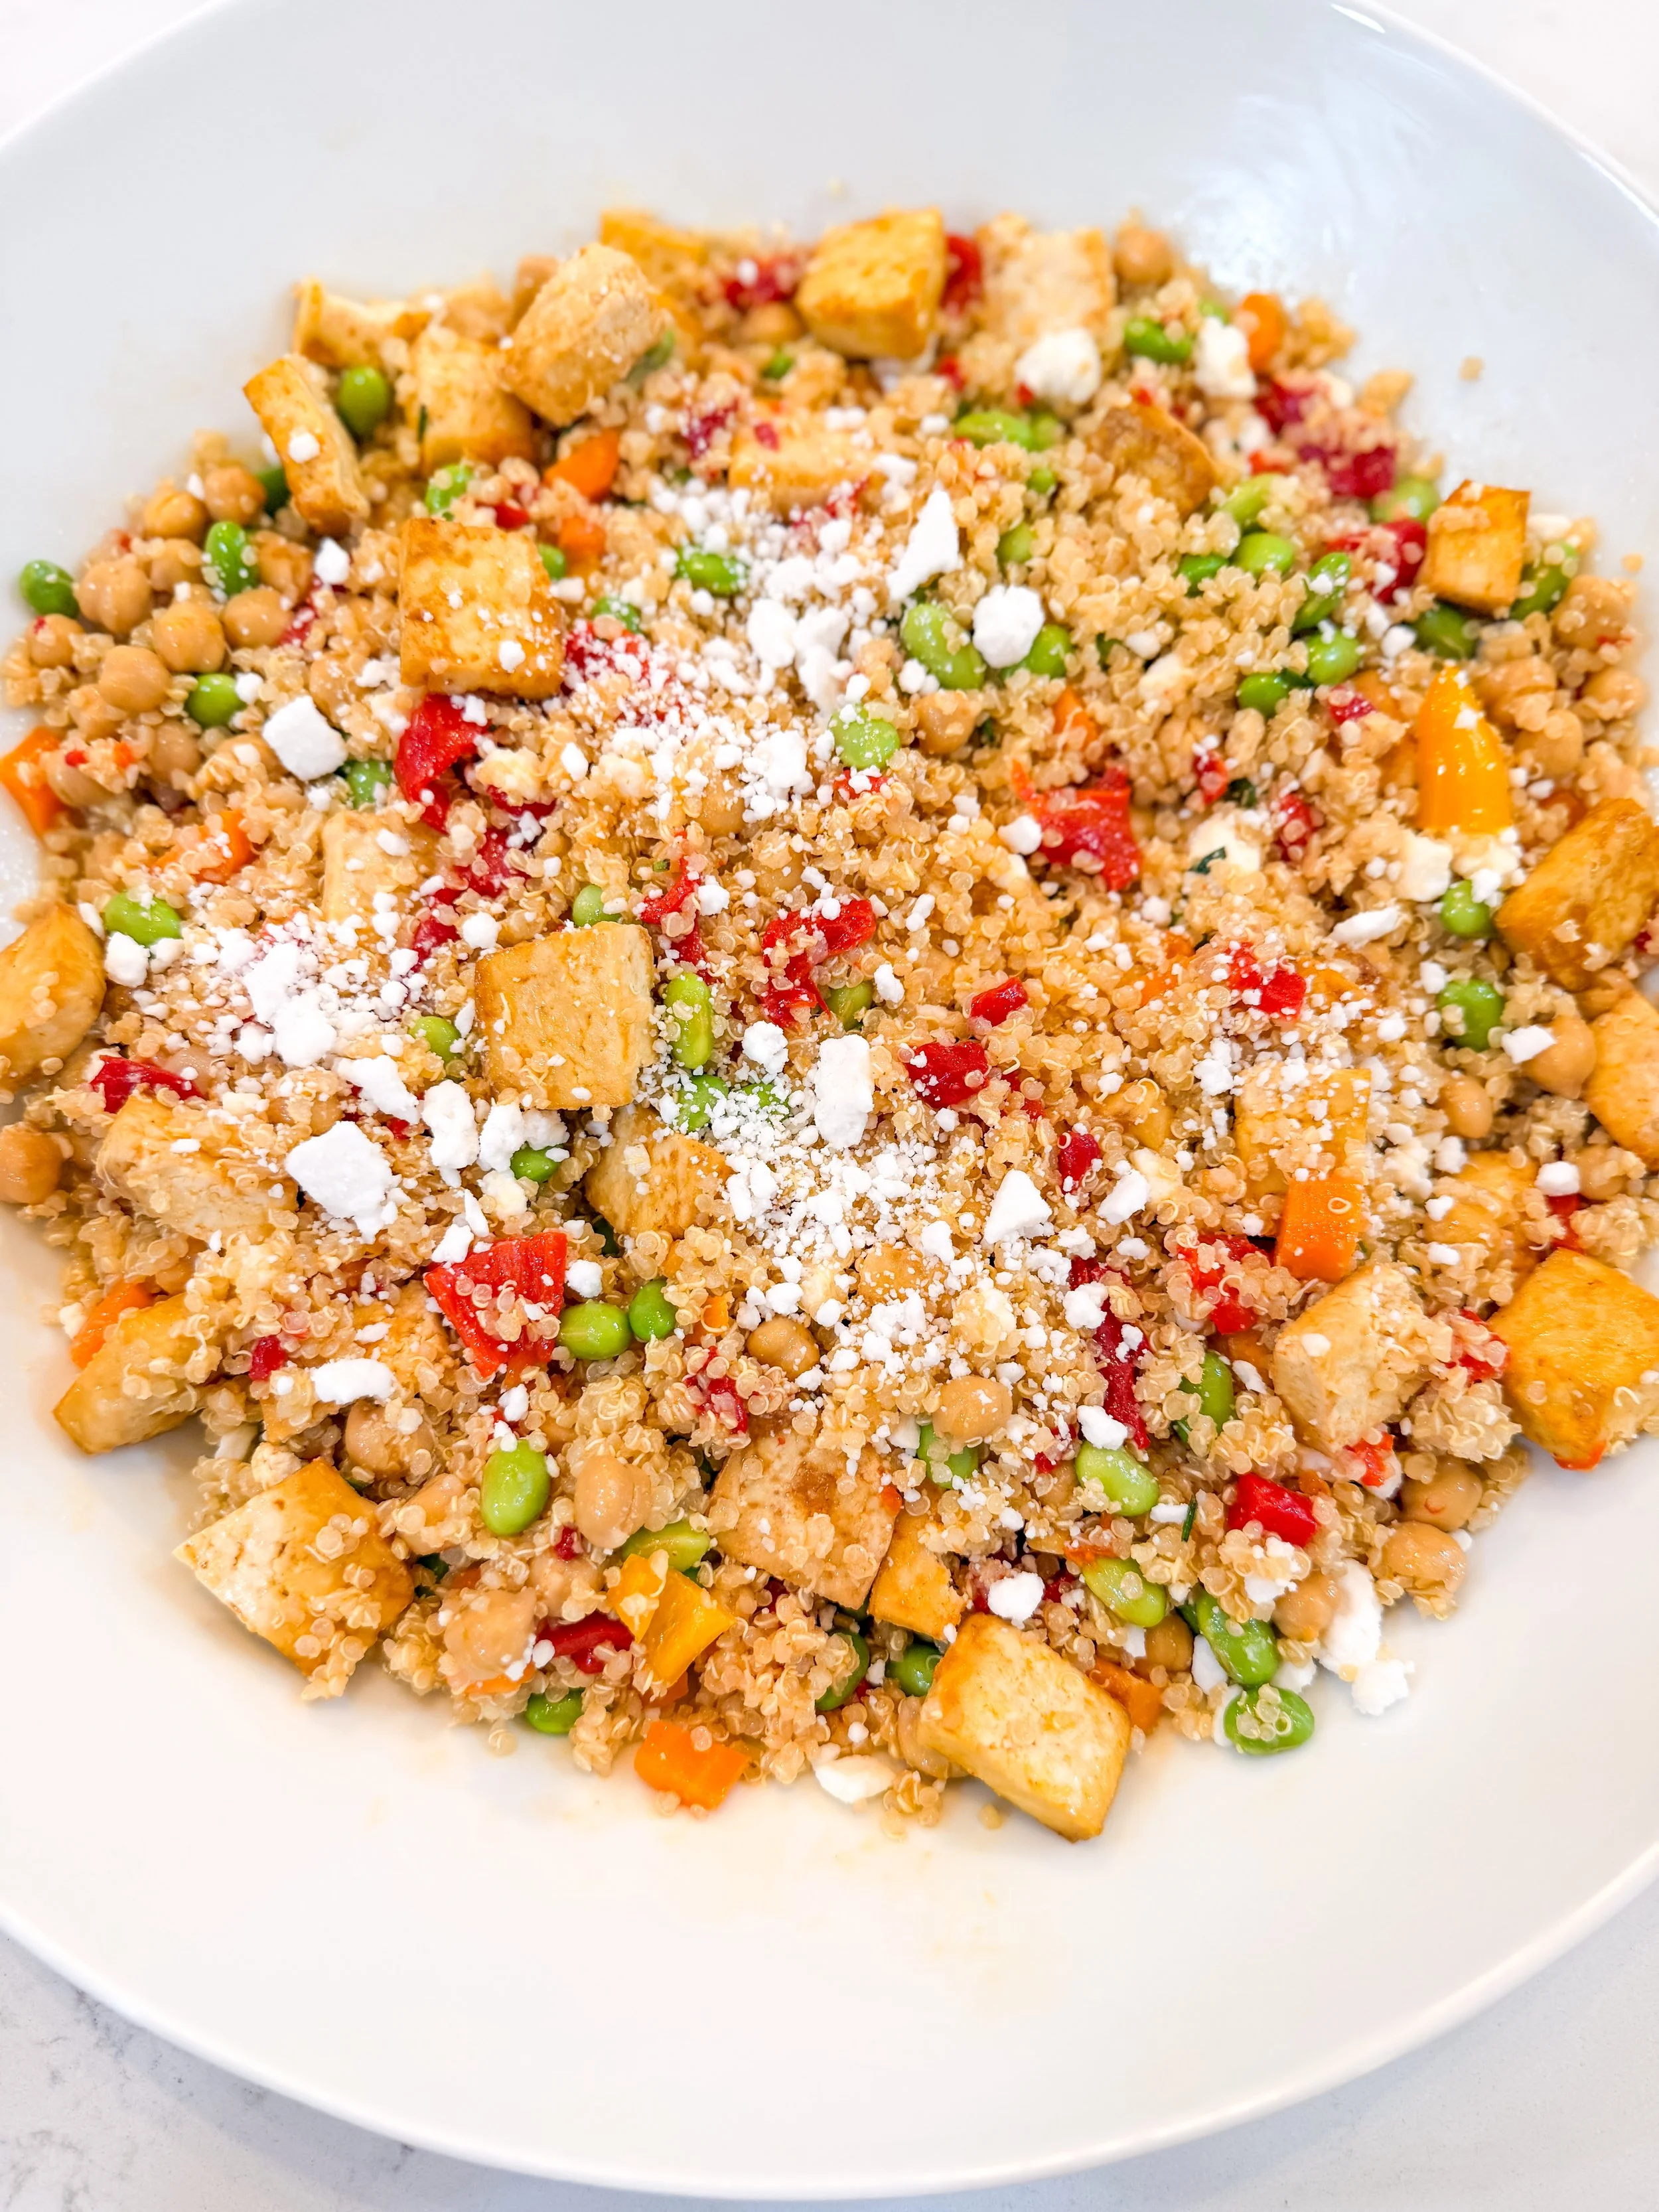
Crispy Tofu Quinoa Bowl
Crispy tofu is one of those things that instantly makes a bowl feel like a full meal. Pair it with roasted veggies and a lemon rosemary dressing, and you've got a weeknight staple on repeat.

Ingredients
1 cup quinoa, cooked
1 block extra-firm tofu, cubed and pan-fried or air-fried until crispy
1 cup carrots, roasted
1 red pepper, roasted and sliced
1 cup edamame, shelled
1 cup chickpeas, drained and rinsed
Lemon Rosemary Dressing
Juice of 1 lemon
1 tsp fresh rosemary, minced
3 tbsp olive oil
Salt and pepper to taste
Instructions
Whisk lemon juice, rosemary, olive oil, salt, and pepper together.
Arrange quinoa in bowls and top with roasted carrots, red pepper, edamame, and chickpeas.
Add crispy tofu on top.
Drizzle with lemon rosemary dressing and serve.
Crispy, citrusy, and endlessly customizable — swap in whatever veggies you have on hand. This is the kind of bowl that makes meal prep feel exciting again.
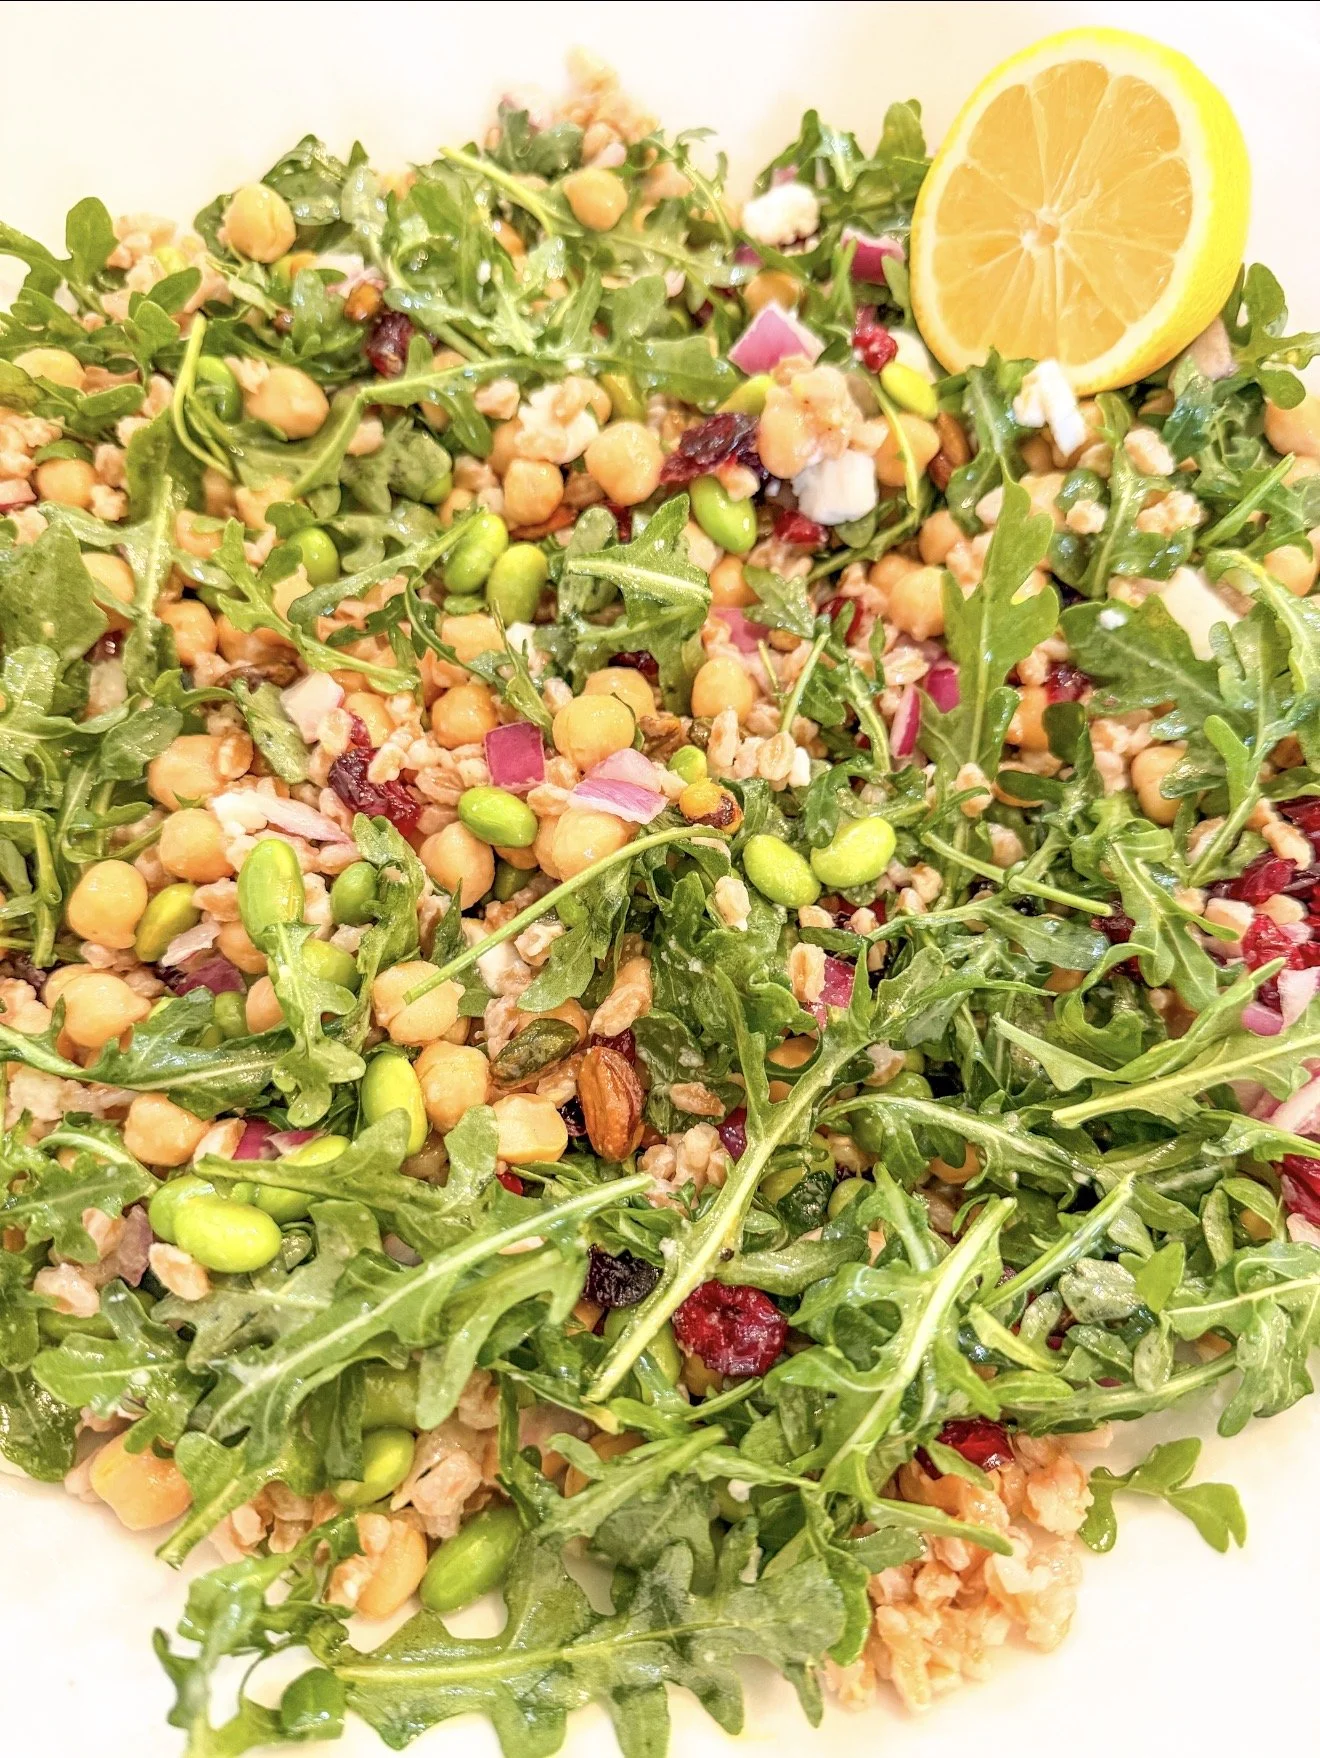
Garden Party Farro Bowl
It's been a minute since I posted a new recipe here, and this one felt like the right way back in — bright, hearty, and made for warm-weather gatherings. Think of it as a salad that can actually hold its own as a meal.

Ingredients
1 cup farro, cooked
1 cup chickpeas, drained and rinsed
1 cup edamame, shelled
2 cups arugula
1/4 cup red onion, thinly sliced
1/4 cup dried cranberries
1/4 cup toasted pistachios, chopped
1/2 cup Follow Your Heart dairy-free feta, crumbled
Lemon Dijon Dressing
Juice of 1 lemon
1 tbsp Dijon mustard
3 tbsp olive oil
Salt and pepper to taste
Instructions
Whisk together lemon juice, Dijon, olive oil, salt, and pepper until emulsified.
In a large bowl, combine cooked farro, chickpeas, edamame, arugula, and red onion.
Pour dressing over the bowl and toss to coat.
Top with dried cranberries, toasted pistachios, and dairy-free feta.
Serve chilled or at room temperature.
This one's a garden party in a bowl — pack it for a picnic or serve it as a side at your next backyard hang. Save this one for later and let me know if you make it!