
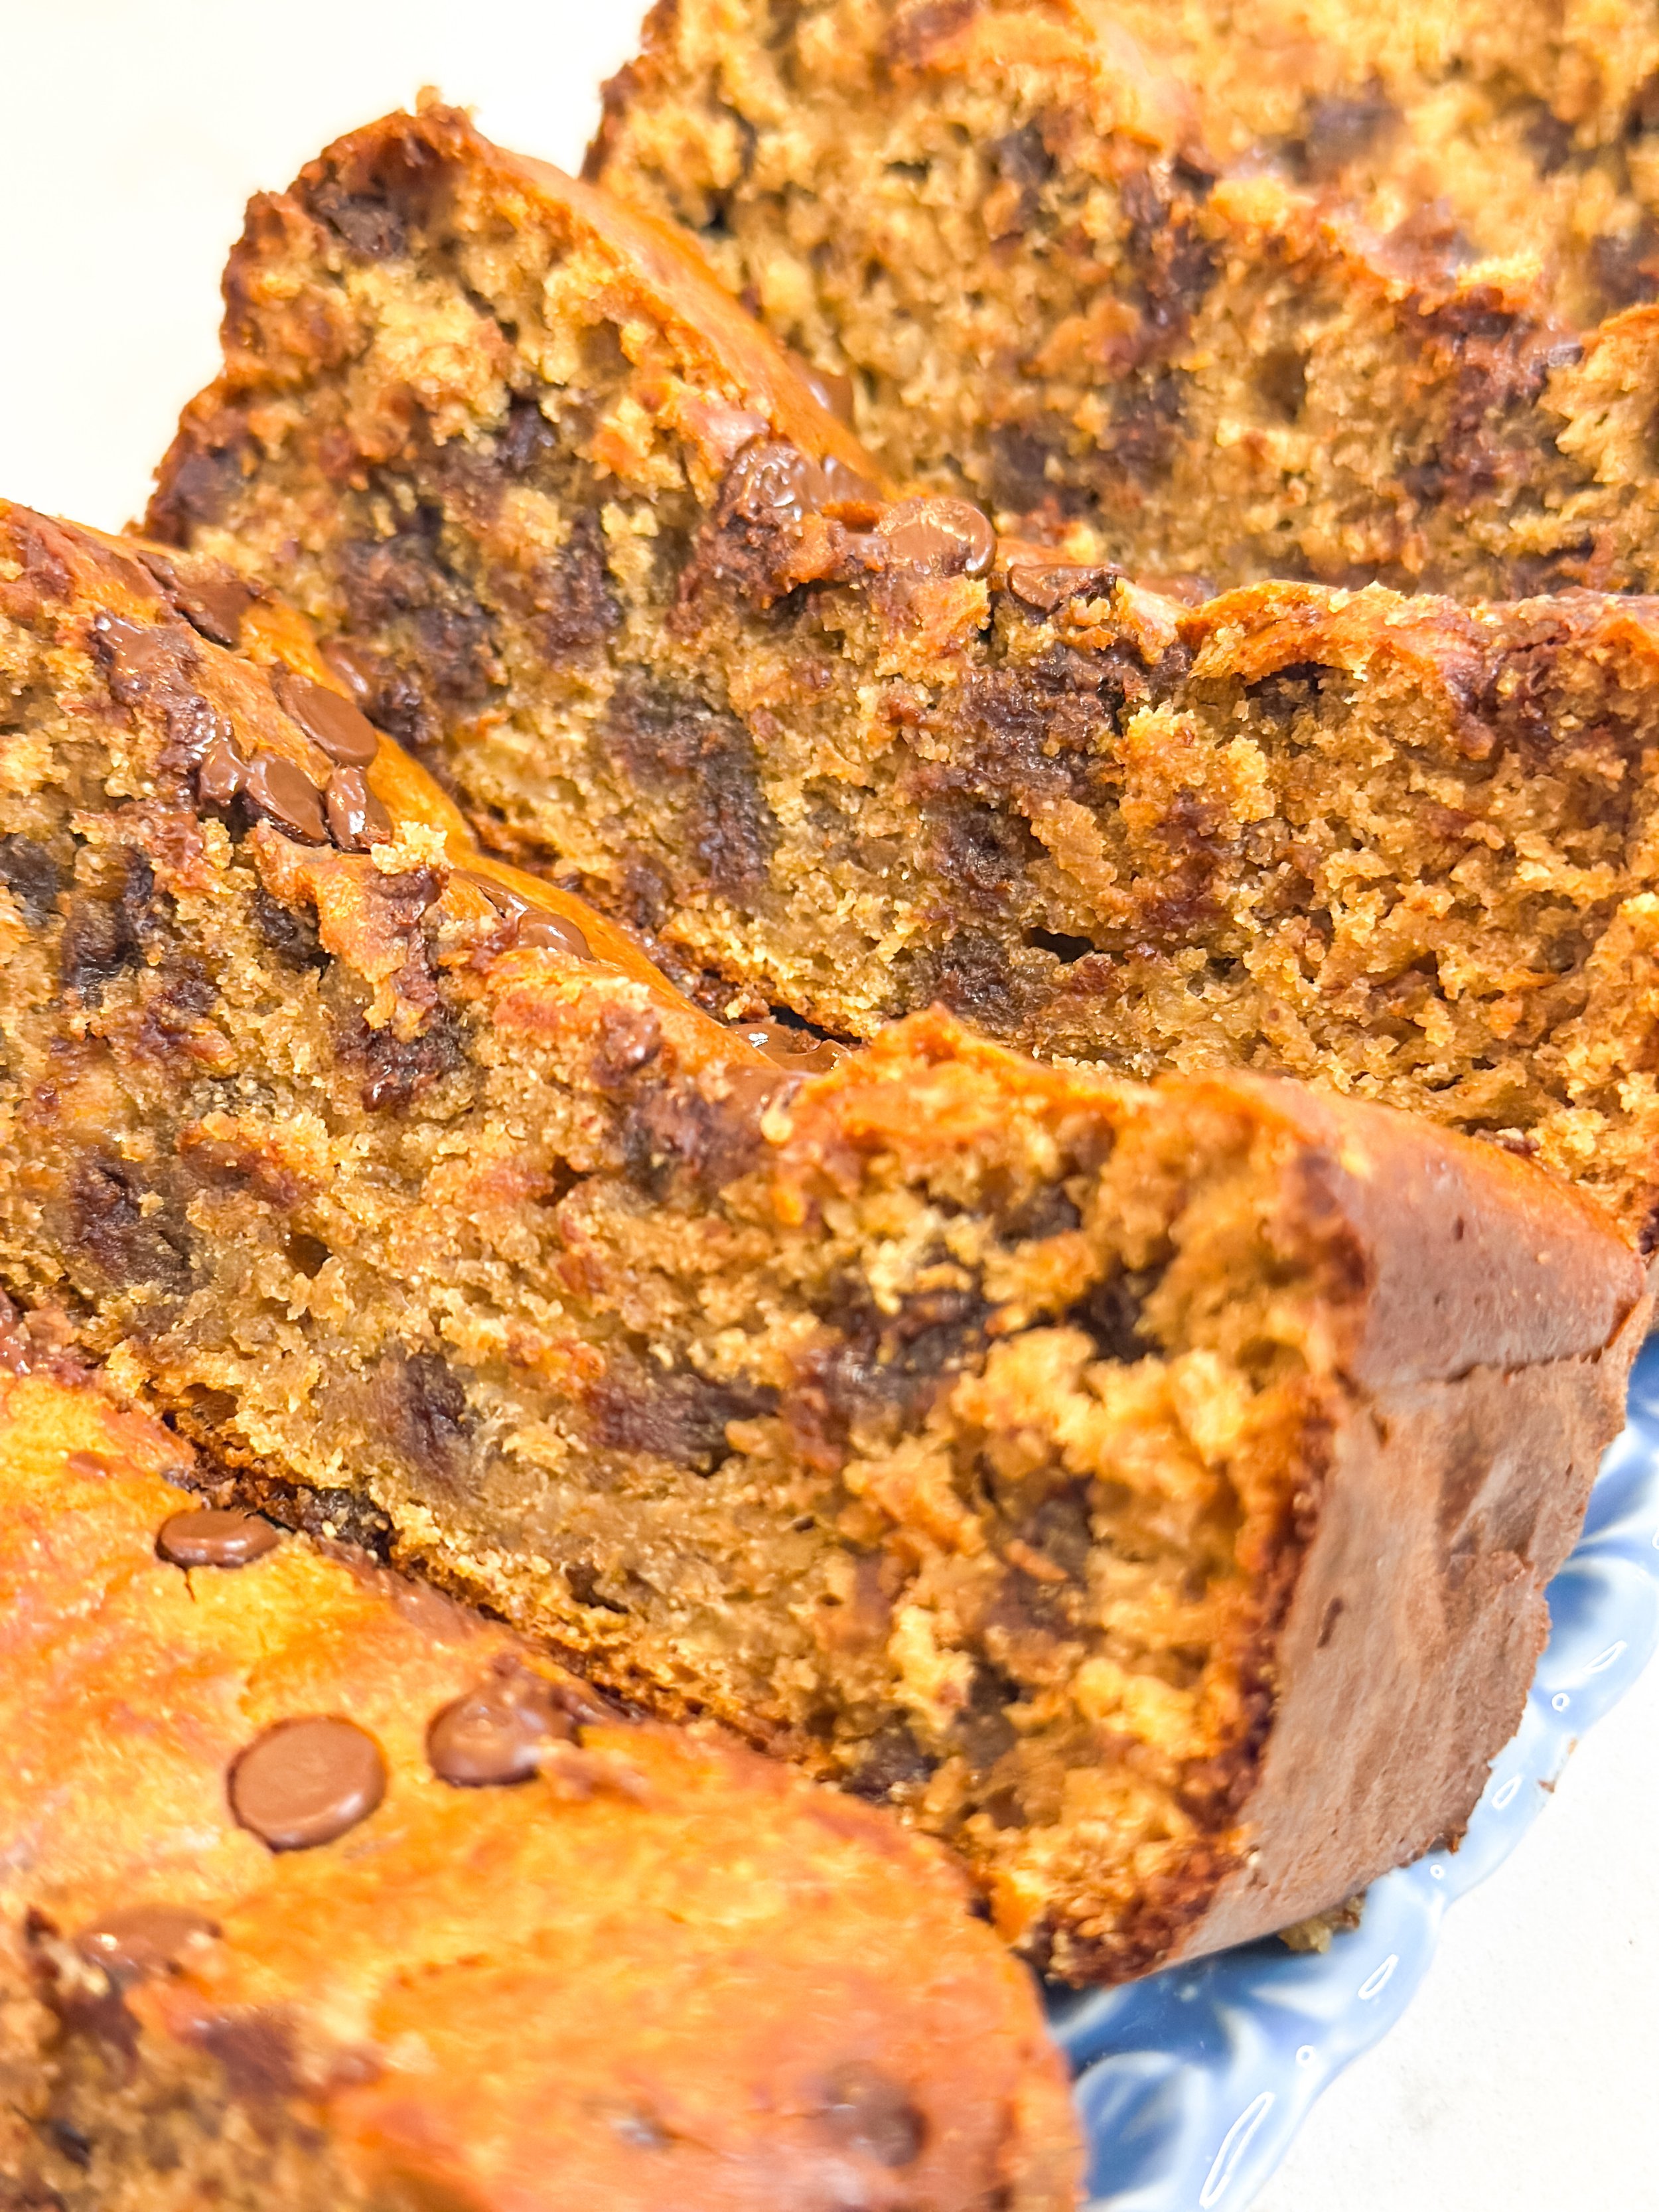
🍌 One-Banana Peanut Butter Chocolate Chip Bread (Vegan + Gluten-Free)

Ever find yourself with just one lonely banana and a craving for banana bread? Same.
This recipe is for those moments — when you want something cozy, chocolatey, nourishing, and ridiculously easy. It comes together in one bowl, uses pantry staples and is perfect for breakfast, snack time, or dessert.
✨ What Makes This Bread Special:
You only need 1 banana
It’s gluten-free, thanks to chickpea flour
Packed with plant-based protein
Rich peanut butter flavor and melty chocolate chips
All made in one bowl
🛒 Ingredients
1 ripe banana, mashed (about ⅓ cup)
½ cup natural peanut butter (creamy or crunchy)
½ cup unsweetened plant-based milk
¼ cup maple syrup
2 tbsp coconut sugar or brown sugar (optional for extra sweetness)
1 tsp vanilla extract
1½ cups chickpea flour (sifted, for best texture)
1 tsp baking soda
½ tsp cinnamon
¼ tsp salt
½ cup vegan chocolate chips (plus extra for topping)
👩🍳 Instructions
Preheat oven to 350°F (175°C). Line a standard loaf pan with parchment paper or lightly grease it.
In a large mixing bowl, mash the banana. Add peanut butter, plant-based milk, maple syrup, coconut sugar, and vanilla. Whisk until smooth.
Add the chickpea flour, baking soda, cinnamon, and salt directly to the bowl. Mix until just combined — don’t overmix. The batter will be thick!
Fold in the chocolate chips.
Transfer the batter to the loaf pan and smooth out the top. Sprinkle with a few extra chocolate chips if desired.
Bake for 40–45 minutes, or until a toothpick inserted in the center comes out clean or with a few moist crumbs.
Let the bread cool in the pan for 10–15 minutes, then transfer to a wire rack to cool completely before slicing.
💡 Tips & Variations
If your banana isn’t super ripe, microwave it for 20–30 seconds to soften and sweeten it up.
Want more texture? Add chopped peanuts or walnuts to the batter.
Store leftovers in an airtight container at room temperature for 2–3 days or refrigerate for up to a week.
📌 Save & Share
If you try this recipe, let me know how it turns out!
Tag me on Instagram @kellysgreenkitchen_ and use the hashtag #kellysgreenkitchen so I can see your cozy creations.
🍌🥜🍫 One banana. One bowl. Pure magic.

🌿Crispy Potato & Rice Bowl with Creamy Dill Ranch
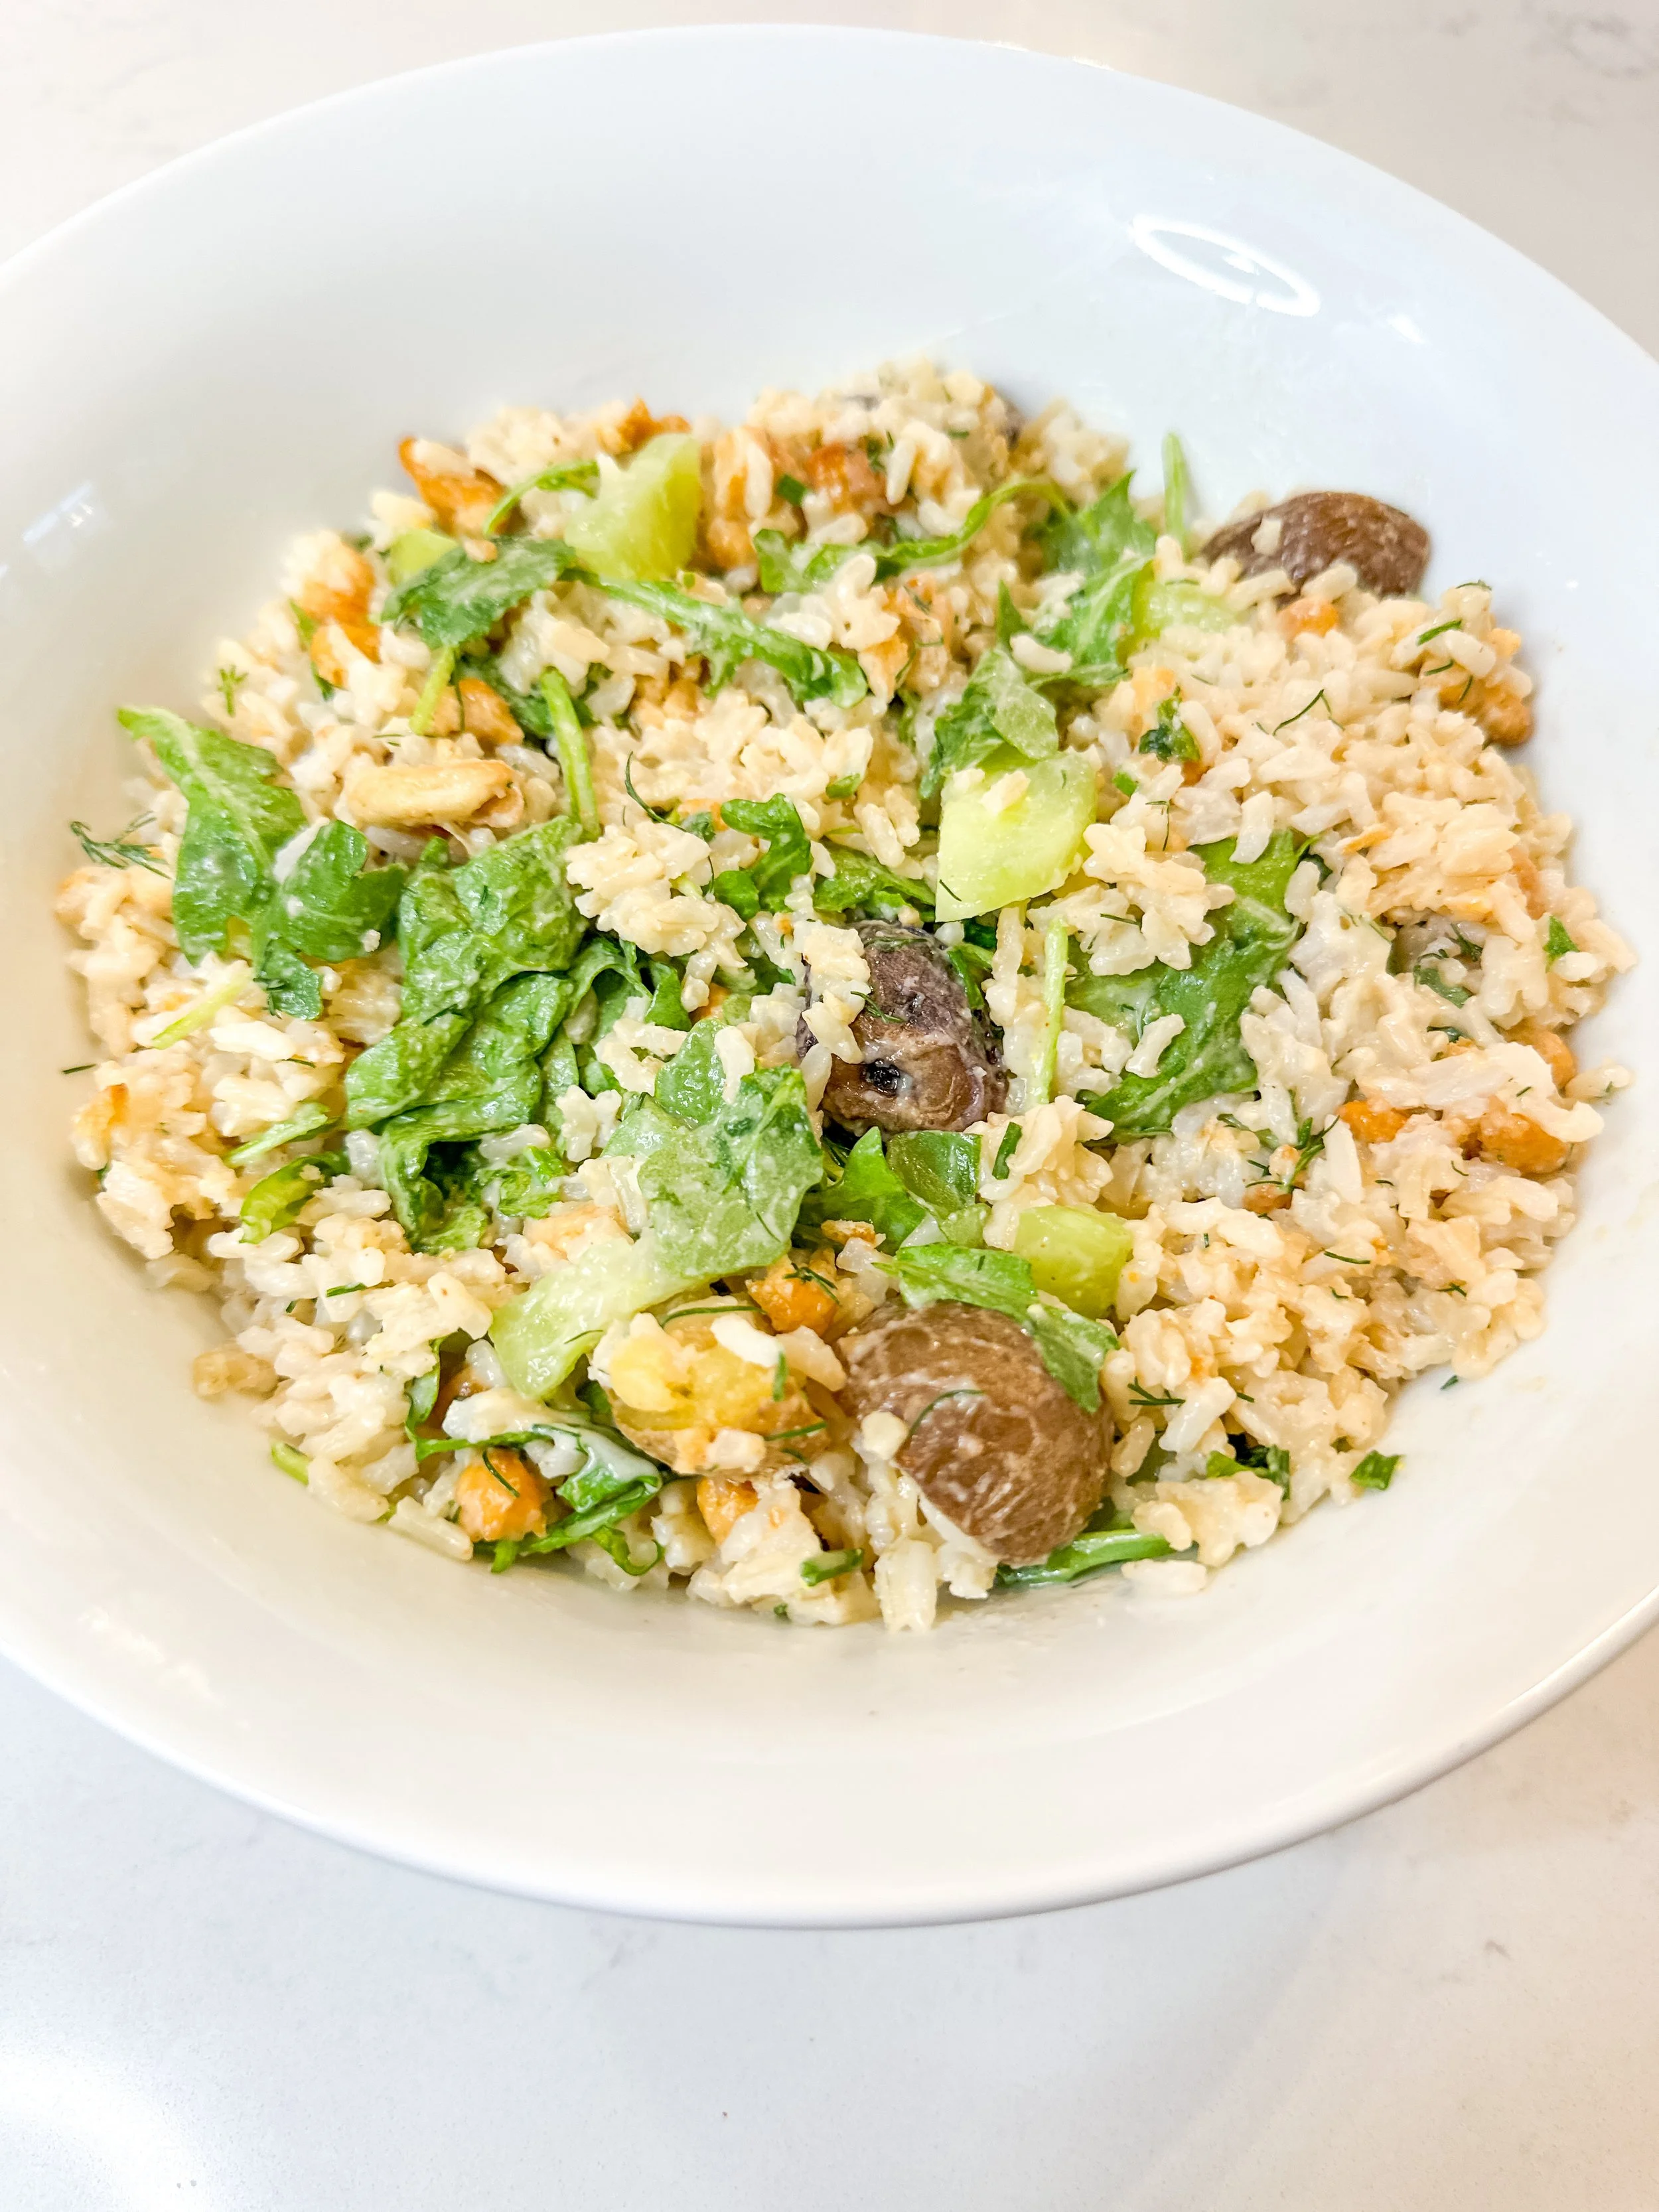
This is one of those easy, feel-good bowls you’ll want on repeat.
It’s cozy and satisfying from the warm whole grain rice and golden roasted potatoes, but still fresh thanks to crunchy cucumber, bright herbs, and a creamy vegan dill ranch that ties it all together. Bonus: it’s completely customizable for the whole family — serve it deconstructed for kids or pair it with another protein for omnivores.
🛒 Ingredients
For the Bowl:
1 cup uncooked whole grain rice (brown rice or wild blend)
1 large Yukon gold or red potato, diced
1 tbsp olive oil (I used Graza)
½ tsp garlic powder
½ tsp smoked paprika (optional)
Salt & pepper to taste
1 cucumber, sliced into half moons
Handful of greens (spinach, arugula, or massaged kale)
Optional: fresh herbs (dill, chives) for garnish
Optional: roasted cannellini beans (see below)
For the Creamy Dill Ranch:
½ cup Follow Your Heart vegan sour cream
1 tsp lemon juice
1 tsp apple cider vinegar
1 tsp dried dill (or 1 tbsp fresh)
½ tsp garlic powder
½ tsp onion powder
Salt & pepper to taste
Optional: 1 tbsp finely chopped fresh chives or parsley
Optional: Crispy Roasted Cannellini Beans
1 can cannellini beans, rinsed and well dried
1 tbsp olive oil
½ tsp garlic powder
½ tsp smoked paprika
Salt & pepper to taste
🔪 Instructions
1. Cook the Rice:
Cook your whole grain rice according to package instructions. Fluff with a fork and set aside.
2. Roast the Potatoes:
Preheat your oven to 425°F. Toss diced potatoes with olive oil, garlic powder, paprika, salt, and pepper. Spread on a baking sheet and roast for 25–30 minutes, flipping once, until crispy and golden.
3. Optional – Roast the Cannellini Beans:
If using, toss dried cannellini beans with olive oil and seasonings. Roast at 400°F for 25–30 minutes, shaking halfway through, until lightly crisped. Cool slightly before serving.
4. Make the Dill Ranch:
In a small bowl, whisk together all dressing ingredients. Adjust seasoning to taste. Thin with a splash of water if needed.
5. Assemble the Bowl:
Layer the cooked rice in a bowl. Add crispy potatoes, cucumbers, greens, and roasted beans (if using). Drizzle with creamy dill ranch and top with fresh herbs.
🌈 Serving Tips:
For kids: serve each element separately (rice, potatoes, cucumbers) with their preferred protein or toppings.
Add-ons: avocado, cherry tomatoes, pickled onions, or tofu.
Leftovers: store all components separately for best texture and build bowls throughout the week.
This meal is proof that plant-based eating can be flavorful, family-friendly, and stress-free.
Voilà — a meal that works for the whole family—in a bowl or deconstructed with their favorite protein.
💚 Follow @kellysgreenkitchen_ for more easy, nourishing recipes that make plant-based eating feel approachable, beautiful, and full of flavor.
📩 Want seasonal meal ideas, kitchen tools I love, and plant-based tips delivered straight to your inbox?
Join the newsletter here — it’s full of fresh inspiration.
🛒 You can also shop my kitchen favorites and table styling finds via my LTK page.

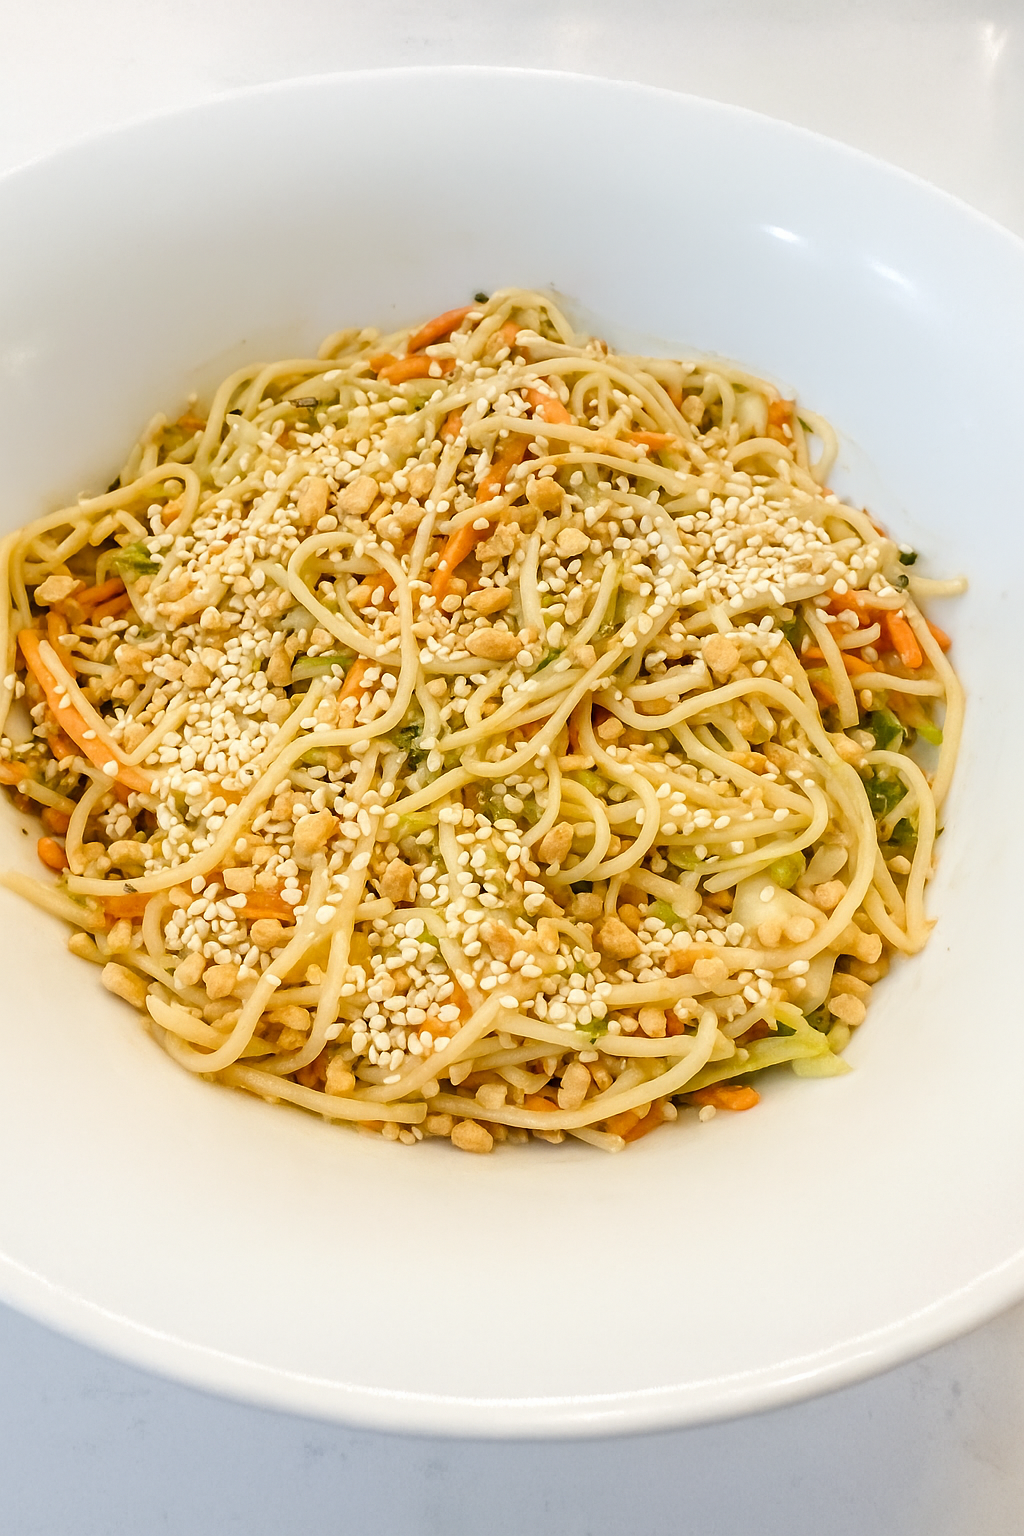
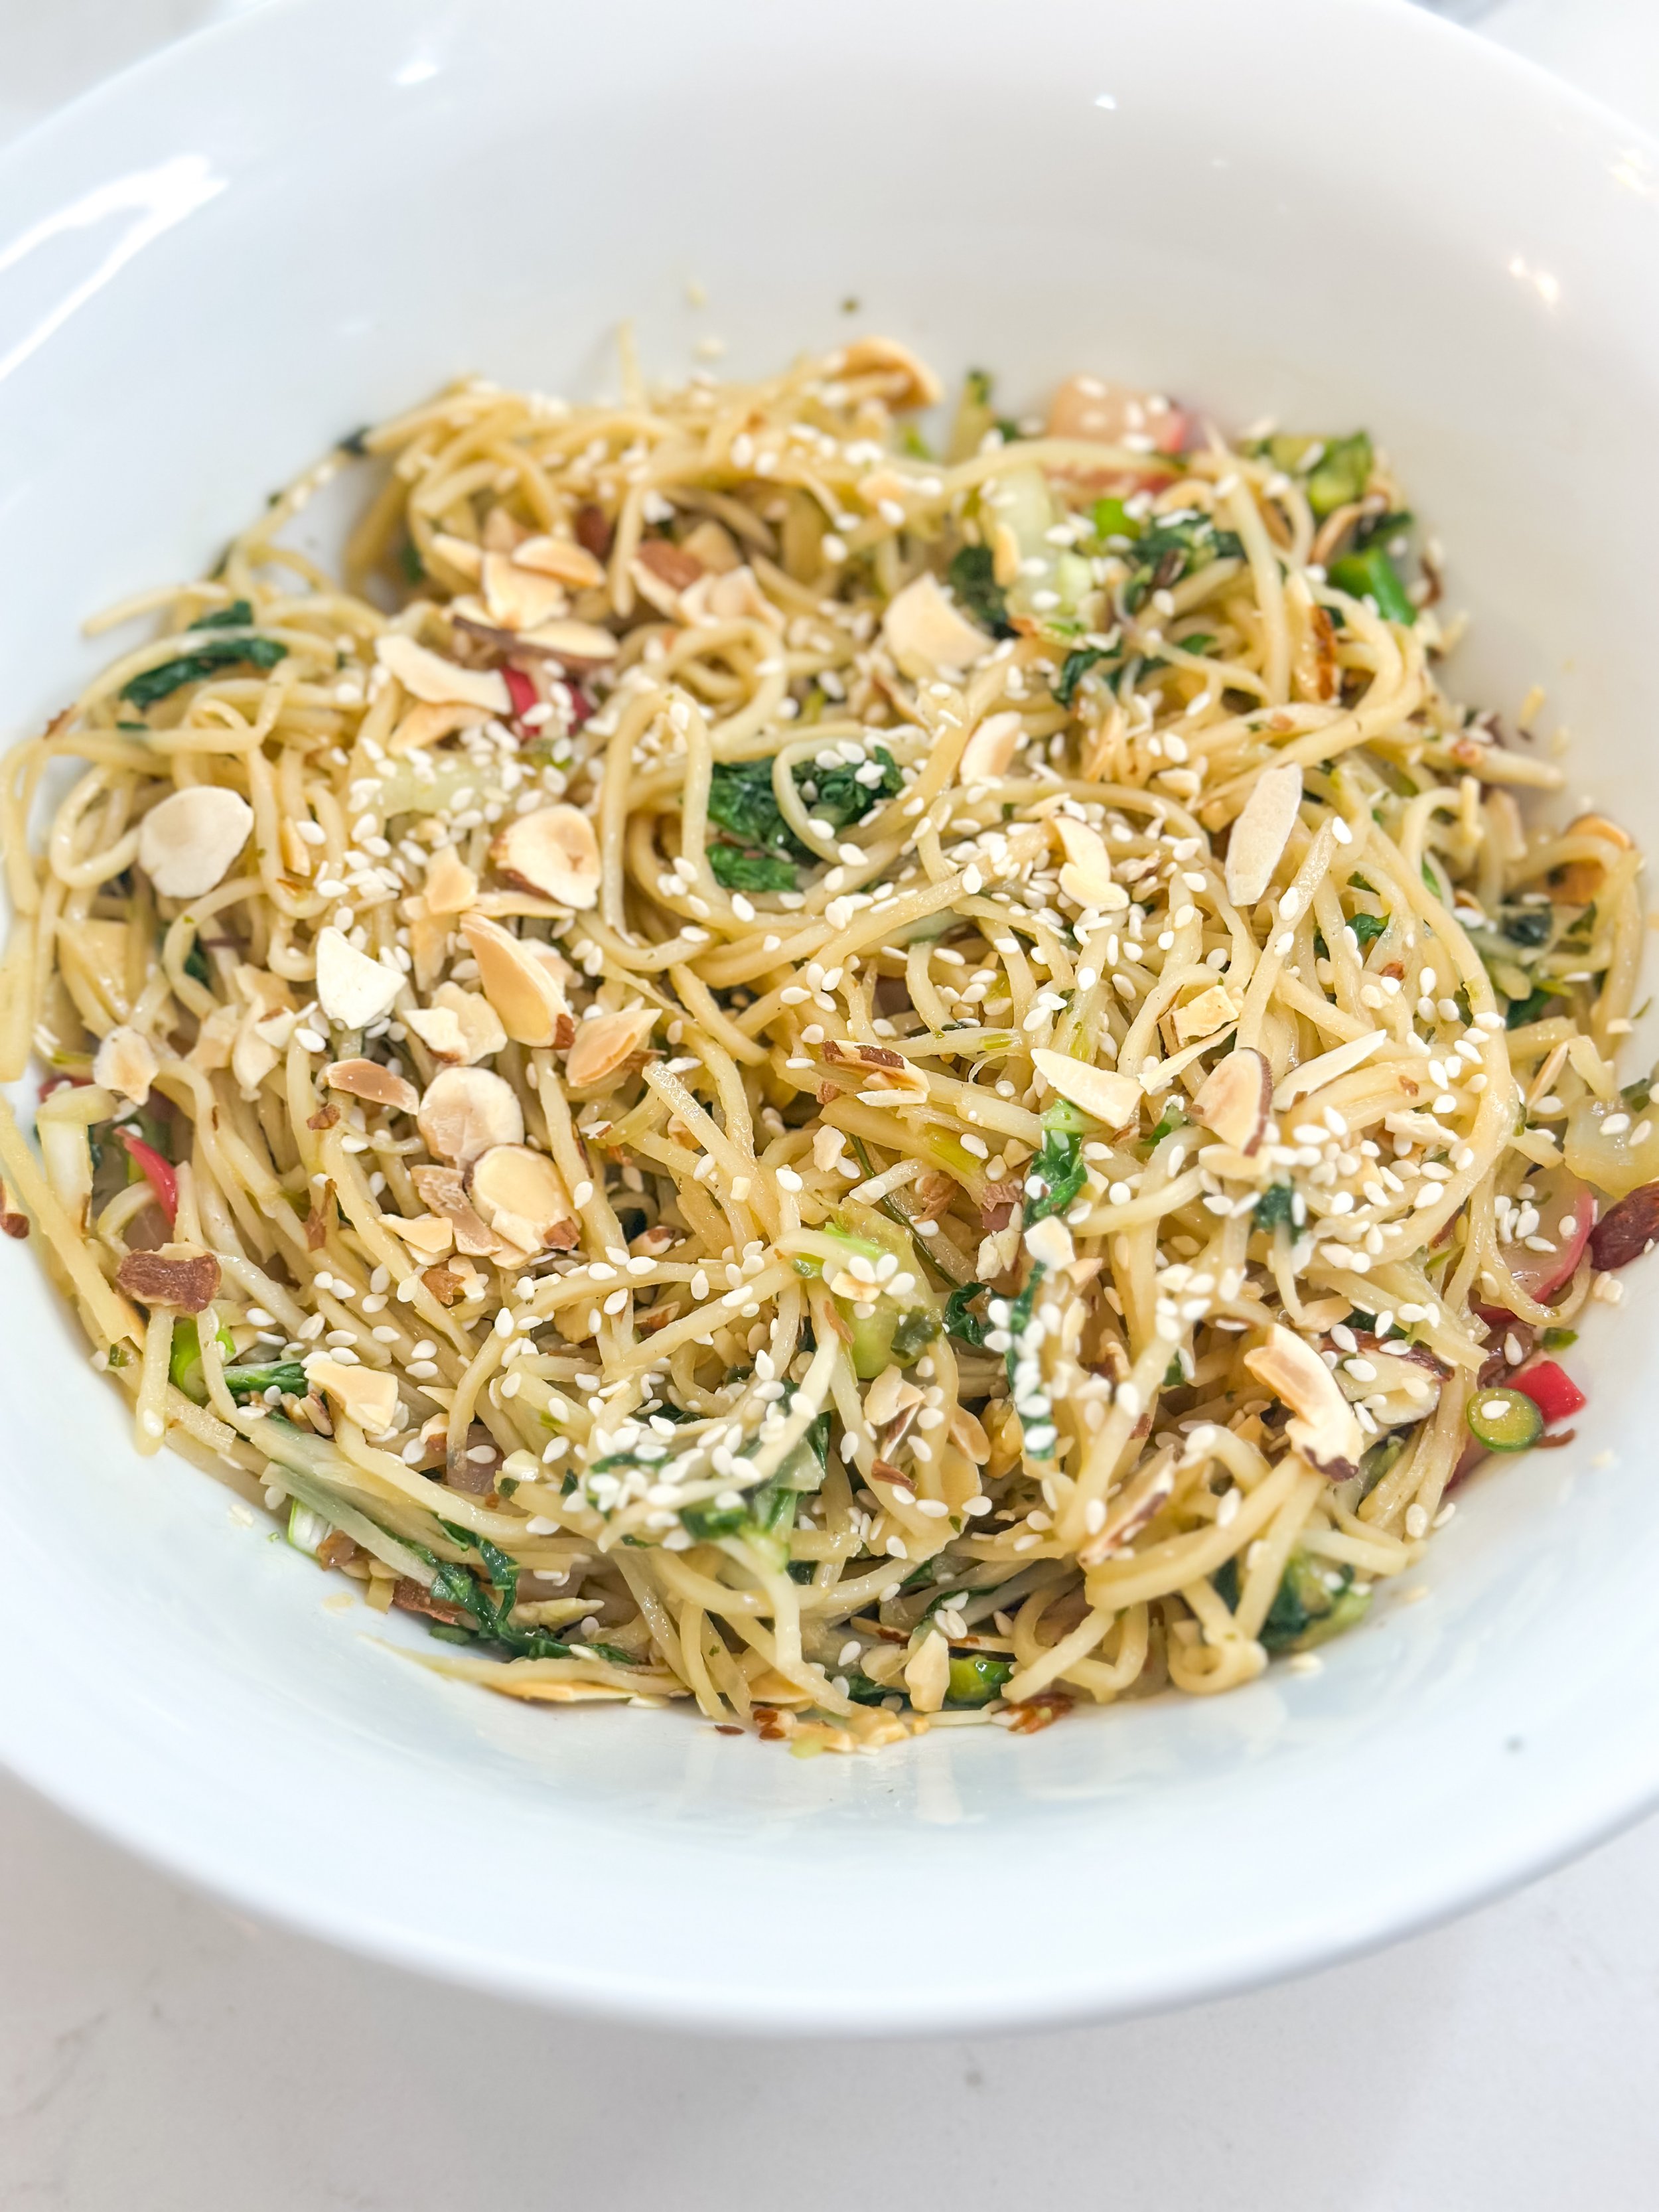
Low-Key Vegan Friday: Peanut Noodle Bowl (Better Than Takeout)
Friday night is usually reserved for takeout, right?
But sometimes, all you really want is something quick, satisfying, and homemade — without a lot of effort.
Enter: Low-Key Vegan Friday.
This peanut noodle bowl comes together in 15 minutes and hits all the same notes as your favorite takeout — but with ingredients you feel good about. It’s colorful, crunchy, cozy, and endlessly adaptable.
Make it once and you’ll start craving this every Friday.
🛒 What You’ll Need
Thin noodles (I like rice noodles or soba — use gluten-free if needed)
Shredded carrots
Scallions, sliced
Red or purple cabbage, thinly sliced
Sesame seeds + chopped cashews (for crunch)
Optional add-ons:
Pan-crisped tofu or edamame for protein
Fresh cilantro or basil for brightness
A squeeze of lime to finish
🥜 Peanut Sauce
3 tbsp creamy peanut butter
1 tbsp tamari or soy sauce
1 tsp rice vinegar or lime juice
1 tsp maple syrup
1–2 tbsp warm water (to thin)
Optional: grated garlic or ginger
Whisk until smooth and pourable.
👩🍳 To Assemble
Cook noodles according to package instructions. Rinse in cool water and set aside.
In a large bowl, combine noodles, shredded veggies, and peanut sauce. Toss until everything is coated.
Top with sesame seeds, chopped cashews, and anything else you love.
Serve right away — or chill it and enjoy cold later.
💫 Why You’ll Love It
Ready in 15 minutes
Naturally vegan + gluten-free
Customizable with whatever’s in your fridge
Tastes way better than takeout
🌱 Let Me Know
If you make this, tag me @kellysgreenkitchen — I’d love to see your Low-Key Vegan Friday creations.

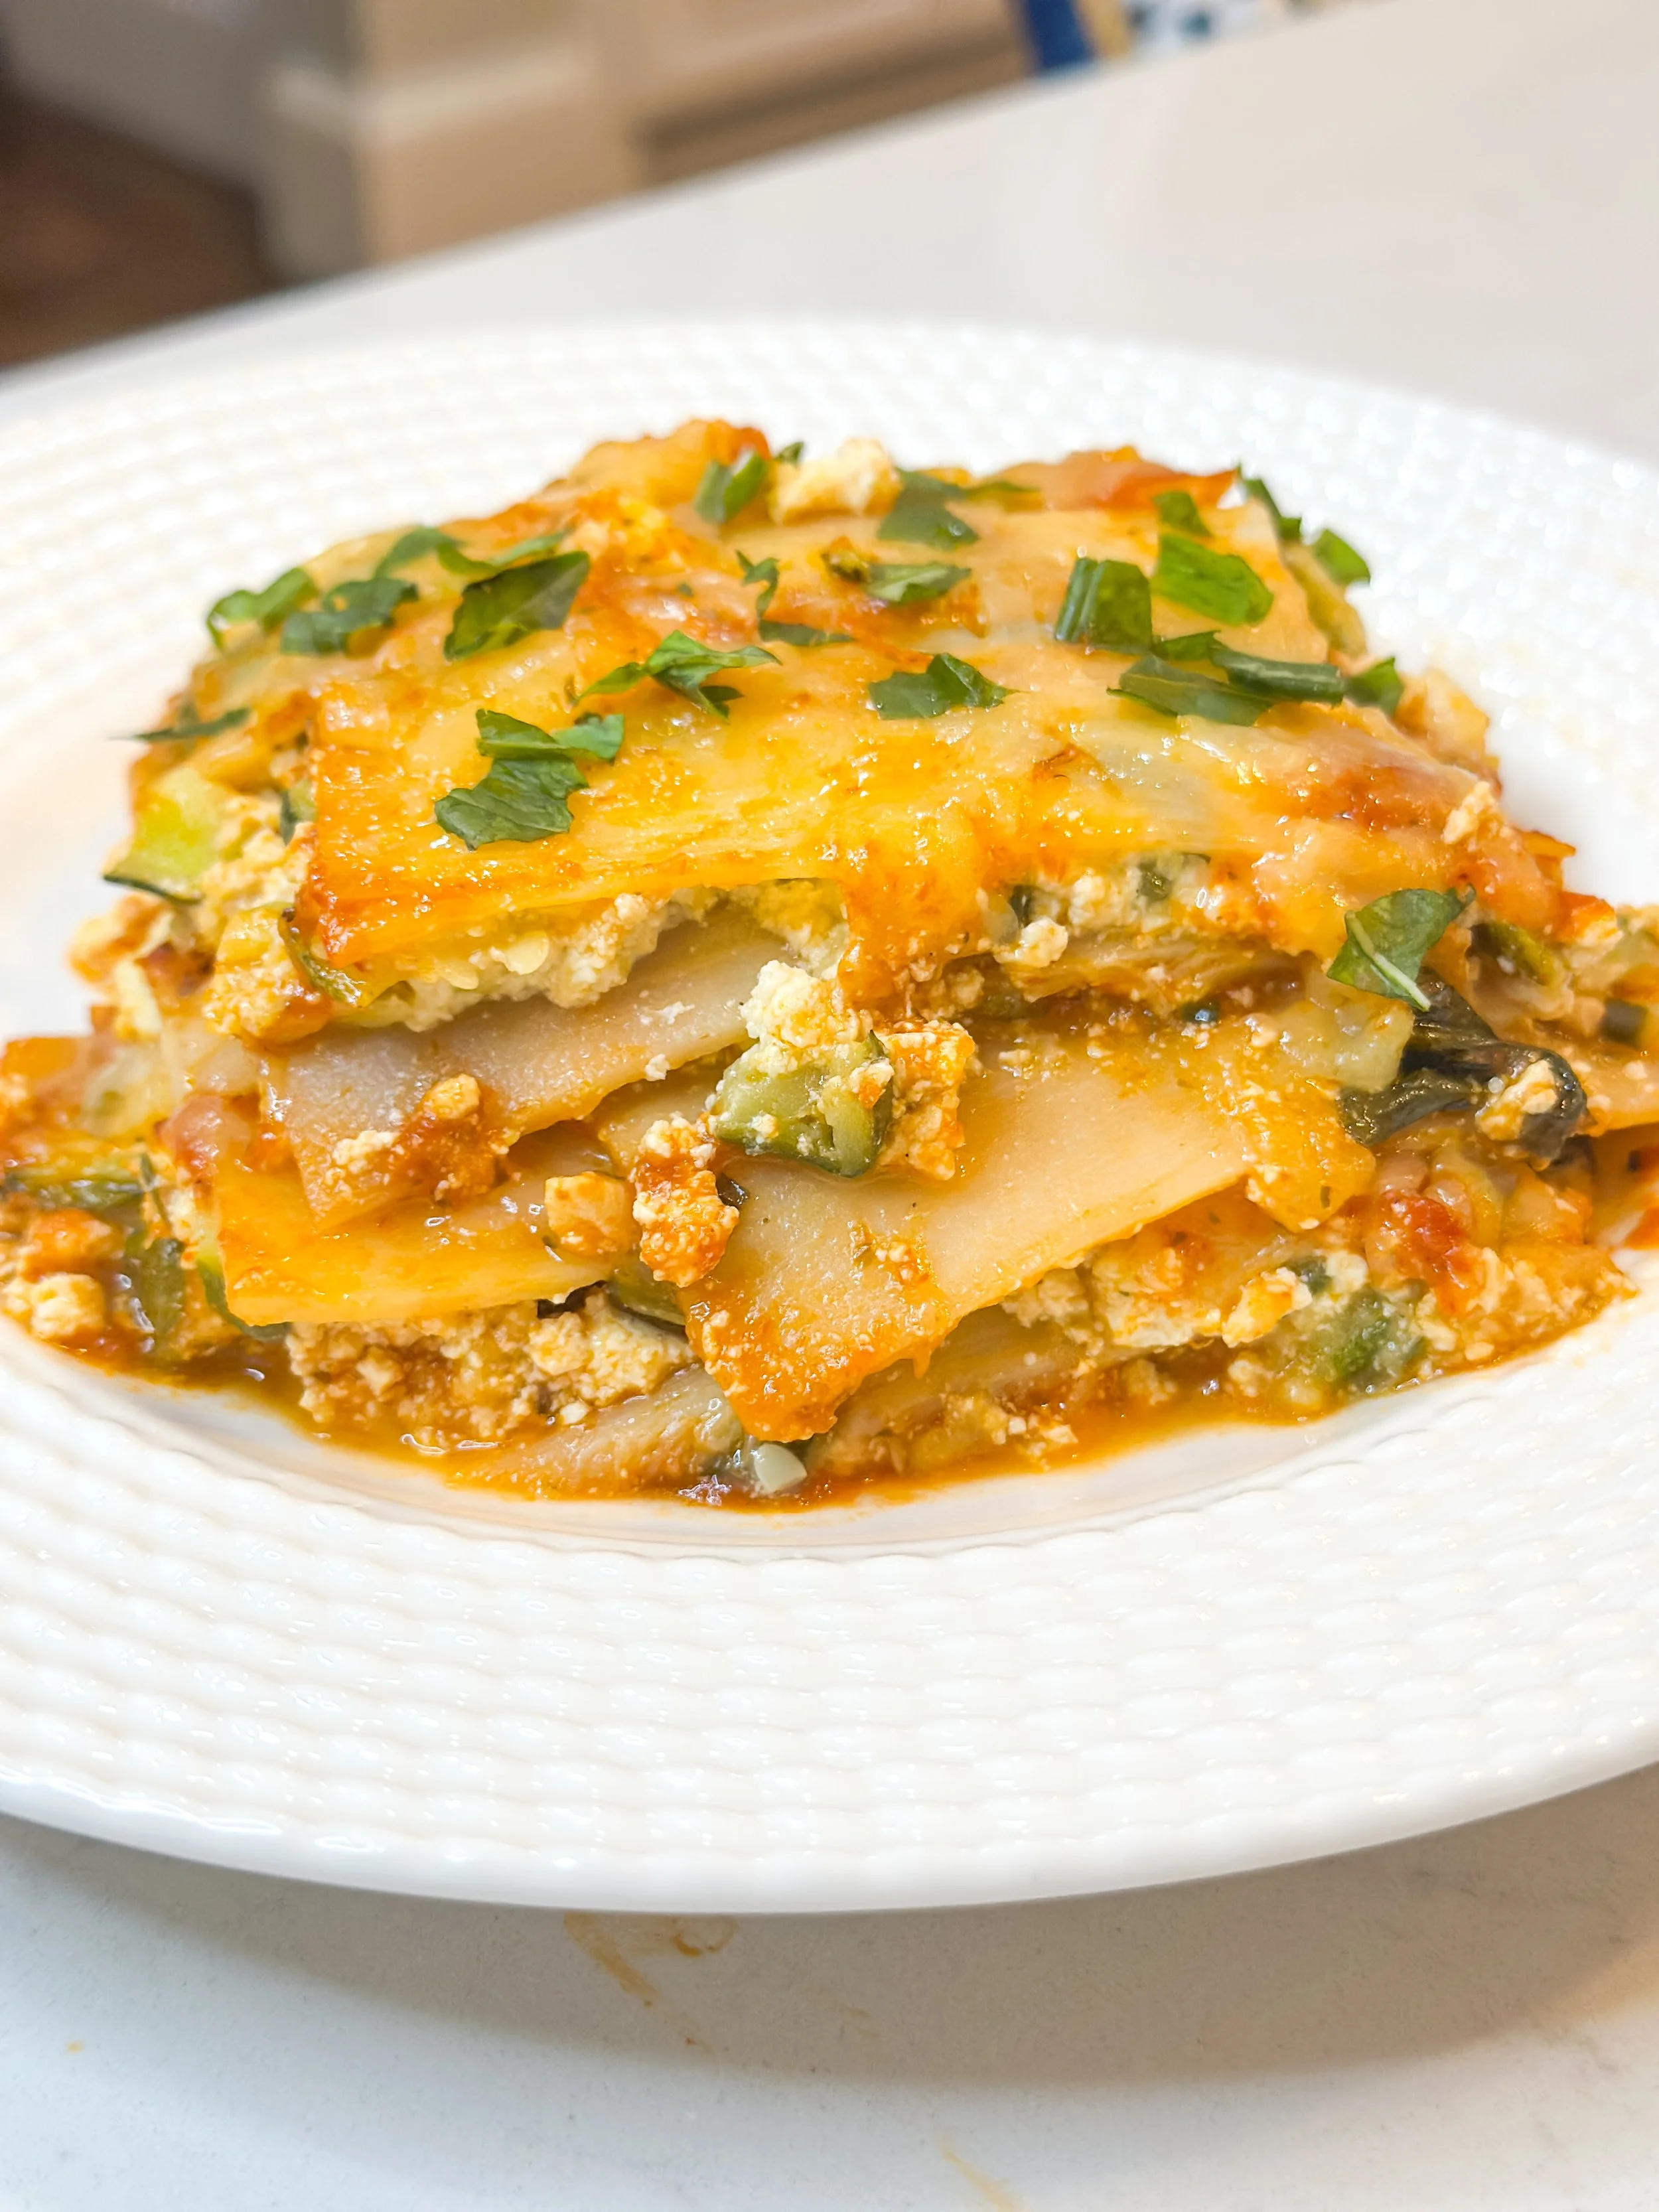
🌿 Vegan Zucchini Lasagna with Palmini
Who decides to make lasagna on the hottest day of the summer?
Me, obviously.
But this one’s different. Instead of traditional pasta, it’s made with Palmini lasagna sheets — which come from hearts of palm — so it’s way lighter and more summer-friendly. I roasted zucchini with garlic, whipped up a creamy tofu ricotta (no food processor needed), and layered it all together with marinara. It’s cozy comfort food, but still bright and veggie-packed enough for July.
🛒 Ingredients
Tofu Ricotta:
1 block (14 oz) firm or extra-firm tofu, pressed
2 tbsp olive oil
1–2 tbsp lemon juice
1 tbsp nutritional yeast
1 tsp garlic powder
½ tsp salt
Optional: 1–2 tbsp fresh chopped basil or parsley
Roasted Zucchini:
2 medium zucchini, diced
2 cloves garlic, minced
1 tbsp olive oil
Salt and pepper, to taste
For Assembly:
Two packages of Palmini lasagna sheets (drained and rinsed)
3–4 cups marinara sauce
Optional: vegan mozzarella (Violife mozzarella is the best for melting)
Fresh basil, to serve
🔪 Instructions
1. Prepare the Palmini:
Drain and rinse Palmini sheets well. For softer texture, soak in warm water or unsweetened plant milk for 15–30 minutes. Pat dry and set aside.
2. Roast the zucchini:
Preheat oven to 400°F. Toss diced zucchini with olive oil, minced garlic, salt, and pepper. Spread on a sheet pan and roast for 20–25 minutes, until golden and tender. Set aside to cool slightly.
3. Make the tofu ricotta:
In a medium bowl, mash the pressed tofu with a fork or potato masher until crumbly. Add olive oil, lemon juice, nutritional yeast, garlic powder, and salt. Mix until creamy and ricotta-like. Stir in fresh herbs if using.
4. Combine the filling:
Stir the roasted zucchini into the tofu ricotta mixture.
5. Assemble the lasagna:
Preheat oven to 375°F. In a baking dish (about 9x9”), spread a thin layer of marinara on the bottom.
Add a layer of Palmini sheets, then spoon on the zucchini-ricotta mixture, and more sauce. Repeat until ingredients are used up, finishing with sauce on top. Add vegan mozzarella if using.
6. Bake:
Cover with foil and bake for 30 minutes. Uncover and bake for 10–15 minutes more, until bubbly and heated through. Let cool for 10 minutes before slicing. Top with fresh basil to serve.
🌱 Recipe Notes:
Palmini tip: Soaking helps mellow the flavor and improve the texture — totally worth the extra few minutes.
No tofu? You could try a store-bought vegan ricotta or make one with cashews if you have a high-speed blender.
Add-ins: Want more greens? Fold chopped spinach or kale into the ricotta mixture.
Storage: Keeps well in the fridge for 4–5 days or freeze individual portions for a quick weeknight meal.
🛍️ Use code KELLYSGREENKITCHEN for 20% off Palmini. It’s truly delicious!

🍫Bakery Chocolate Chip Muffins

Makes: 10–12 muffins | Prep time: 10 minutes | Bake time: 20–22 minutes
These chocolate chip muffins were a total pivot — and honestly, a bit of a parenting Hail Mary.
After a long, hot day of camp pickups and sibling shuffles, my son asked if we could stop at Dunkin’ for a chocolate chip muffin. We didn’t have time — and the disappointment was real. So I did what any food-loving mom might do: I promised I’d make muffins that were even better.
And guess what? I did.
These bakery-style muffins are soft, sweet, and packed with chocolate chips. They’re egg-free (thanks to applesauce), dairy-free, and secretly boosted with a little flaxseed for extra nutrition — perfect for little hands, picky eaters, or anyone who just needs a cozy afternoon treat.
Ingredients:
2 cups all-purpose flour
¾ cup granulated sugar
¼ cup brown sugar (optional)
1 Tbsp baking powder
½ tsp baking soda
¼ tsp salt
1 cup dairy-free milk (or water + 1 Tbsp oil)
⅓ cup neutral oil (avocado, canola, or vegetable)
¼ cup unsweetened applesauce (egg replacement)
1 tsp vanilla extract
1 cup dairy-free chocolate chips (Enjoy Life mini chips!)
Extra sugar for sprinkling (optional, for that bakery top)
Instructions:
Preheat oven to 375°F (190°C). Line a muffin tin or grease well.
Whisk dry ingredients in a large bowl: flour, sugar, baking powder, baking soda, and salt.
In another bowl, mix wet ingredients: milk, oil, applesauce, and vanilla.
Combine wet and dry ingredients. Stir until just combined — don’t overmix.
Fold in chocolate chips.
Scoop batter into muffin cups, filling each ¾ full. Sprinkle tops with extra sugar and a few more chips.
Bake for 20–22 minutes, or until golden and a toothpick comes out clean.
Let cool for 5 minutes in the pan, then transfer to a wire rack.
💡 Tips for Bakery-Style Muffins:
Chill the batter for 15–30 minutes before baking for taller tops
Use a hot oven (375°F–400°F) to get that high dome
Don’t skimp on the chocolate chips 😉
These muffins have quickly become a new favorite in our house — easy to make, easy to freeze, and way more fun than a drive-thru. Whether you’re baking with your kids or just looking for a better-for-you muffin that still feels like a treat, this is the one.
Let me know if you try them! Tag me on Instagram @kellysgreenkitchen and use #KellysGreenKitchen — I love seeing your bakes.
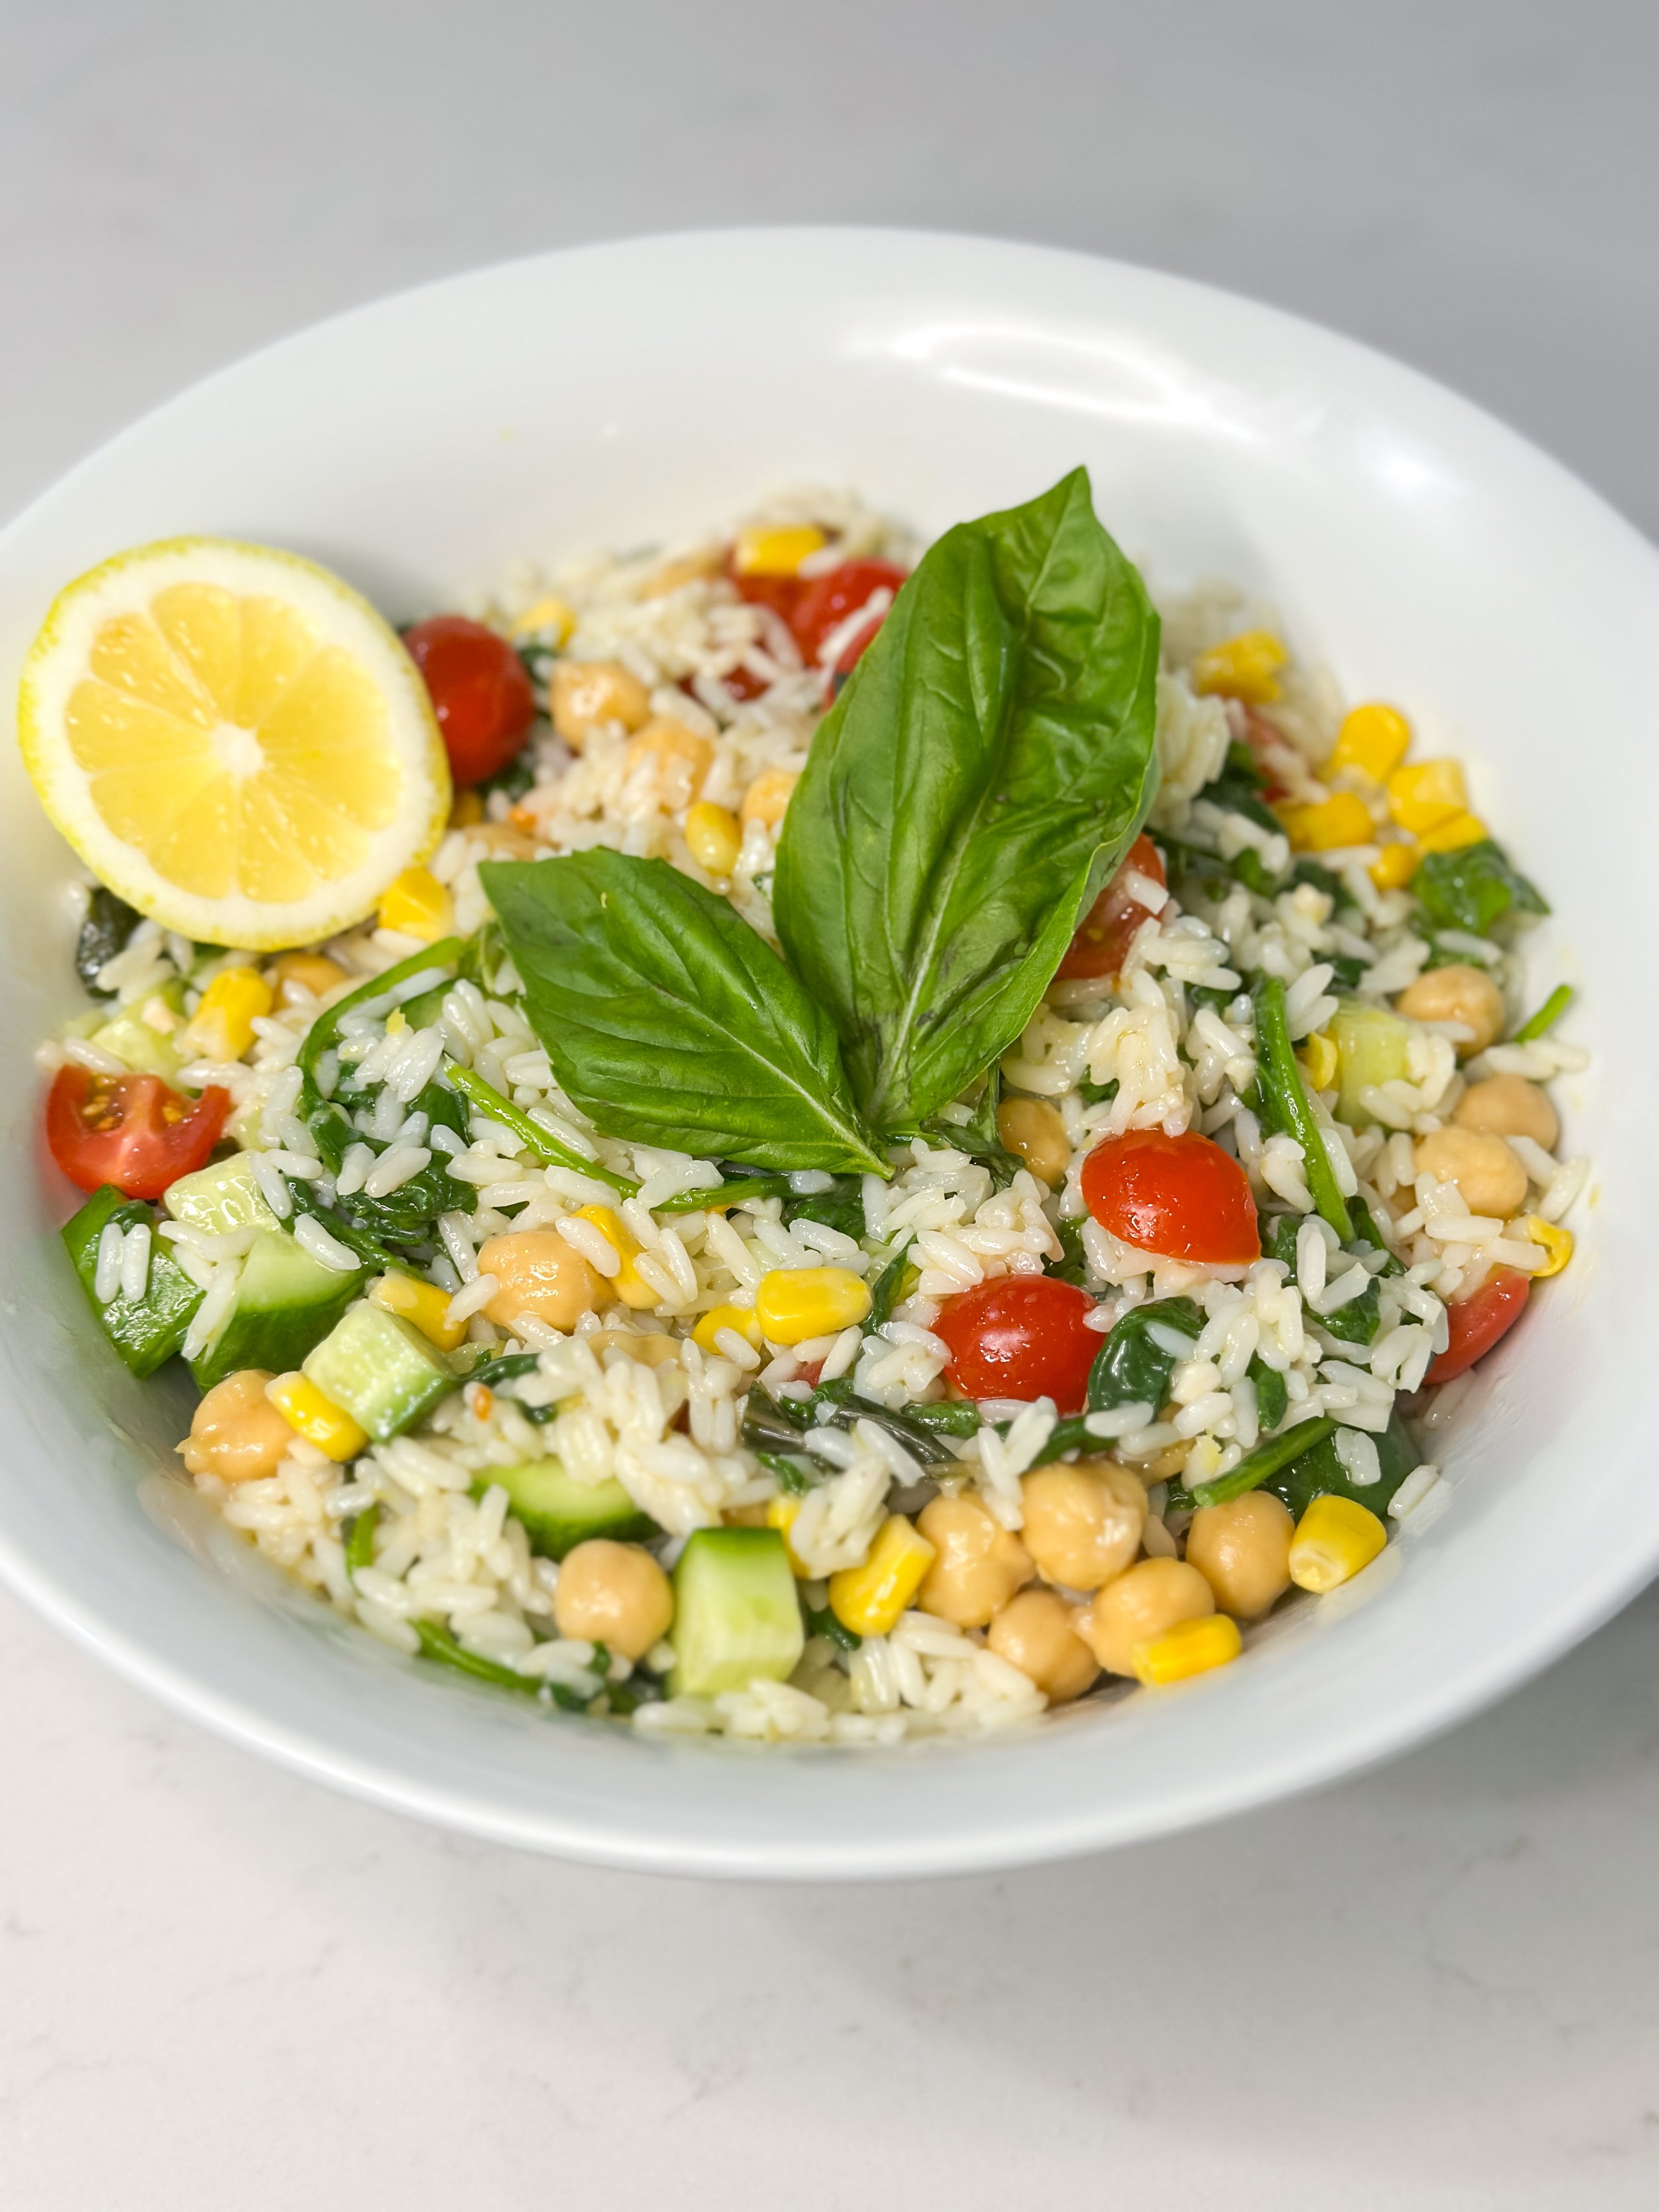
🧺 The Farmers Market Bowl

The Story Behind the Bowl
The other day, a friend asked me:
“What’s the healthiest vegetable?”
It got me thinking… and the answer is actually spinach — one of the most nutrient-dense leafy greens you can eat. So naturally, that’s where this story begins.
This bowl starts with a warm lemon-spinach rice, cooked with fresh basil and olive oil until fragrant. Then it’s layered with chickpeas, corn, tomatoes, cucumbers, crumbled vegan feta (I love Follow Your Heart), and finished with a drizzle of lemon herb dressing.
The result? A bowl that’s colorful, nourishing, and completely craveable — perfect for meal prep, summer picnics, or an easy family dinner.
🛒 Ingredients:
For the Bowl
1–2 cups fresh spinach, chopped
1 cup uncooked rice (white, brown, or jasmine)
Juice of ½ lemon
1 tbsp fresh basil, chopped
½ cup cherry tomatoes, halved
½ cup cucumber, diced
½ cup chickpeas, rinsed and drained
½ cup corn (fresh, frozen, or canned)
¼ cup Follow Your Heart feta, crumbled
For the Lemon Herb Dressing
2 tbsp olive oil (I use drizzle by Graza — you can get 10% off here).
Juice of ½ lemon
1 tsp Dijon mustard
1 tbsp chopped fresh basil
½ tsp maple syrup (optional)
Salt and pepper, to taste
🥗 Instructions:
1. Make the lemon-spinach rice:
Add rice to a pan with water or veggie broth. Bring to a boil, then lower heat, cover, and simmer for 5 minutes.
Add in lemon juice, chopped spinach, basil, a drizzle of olive oil, and a pinch of salt. Cover and cook for another 8 minutes, or until the liquid is absorbed and the rice is tender. Fluff and let cool slightly.
2. Whisk the dressing:
In a small bowl or jar, combine olive oil, lemon juice, Dijon mustard, chopped basil, maple syrup (if using), and salt and pepper. Whisk or shake until fully combined.
3. Assemble the bowl:
Spoon the lemon-spinach rice into your bowl. Top with chickpeas, corn, cherry tomatoes, and cucumber.
4. Finish it off:
Add a crumble of Follow Your Heart feta and drizzle generously with lemon herb dressing.
5. Serve & store:
Enjoy right away or store in the fridge for up to 2 days. Great for lunch on-the-go or a quick weeknight dinner.
👨👩👧👦 Make It Family Friendly:
Cooking plant-based for yourself but feeding a mixed household? This bowl is super easy to adapt:
For omnivores: Serve grilled chicken or shrimp on the side for others to mix in.
For picky eaters: Keep ingredients separate for a DIY build-your-own-bowl night.
Dairy-eaters: Offer regular feta or mozzarella balls alongside the Follow Your Heart version.
You can even prep the rice and toppings in bulk and let everyone create their own variation.
💛 New to Plant-Based Eating?
I created a Starter Pack just for you — whether you're curious about eating more plants or need simple ways to make it work with your family.
It includes:
✔️ Pantry swaps for your favorite comfort meals
✔️ 10-minute meal ideas
✔️ Easy ways to modify recipes for mixed households (like this one!)
🔗 Grab it here! — or find it in my Instagram bio and under the “Start Here” highlight

🥢 Crispy Air Fryer Tofu Egg Rolls (Vegan + Better Than Takeout)

Crispy on the outside, packed with flavorful veggies and tofu on the inside—these air fryer tofu egg rolls are a plant-based spin on a takeout favorite. Made with Nasoya tofu and egg-free wrappers, they’re 100% vegan and irresistibly good. Plus, they’re air fried (not deep fried) and ready in under 30 minutes!
🛒 Ingredients:
For the filling:
1 block (14 oz) Nasoya extra-firm tofu, pressed and crumbled
1 tbsp sesame oil (or avocado oil)
1 cup shredded green cabbage
1 cup shredded carrots
3 scallions, thinly sliced
2 tbsp chopped fresh cilantro
1 tbsp tamari or soy sauce
1 tsp rice vinegar
1/2 tsp garlic powder
1/2 tsp ground ginger
For the egg rolls:
8–10 Nasoya egg roll wrappers (egg-free!)
Small bowl of water for sealing edges
Cooking spray or neutral oil
Peanut Dipping Sauce:
3 tbsp creamy peanut butter
1 tbsp tamari or soy sauce
1 tbsp maple syrup
1 tsp rice vinegar or lime juice
1 tsp sriracha (optional)
1–2 tbsp warm water to thin
🔪 Instructions:
1. Prepare the filling: Heat sesame oil in a skillet over medium heat. Add crumbled tofu and cook for 5–7 minutes until lightly golden. Add cabbage, carrots, scallions, garlic powder, ginger, tamari, and rice vinegar. Cook 2–3 more minutes until slightly softened. Stir in chopped cilantro and let cool.
2. Wrap the egg rolls: Place an egg roll wrapper on a clean surface in a diamond shape. Spoon about 1/4 cup filling in the center. Fold bottom corner over the filling, then fold in sides, and roll up tightly. Seal the top edge with a bit of water.
3. Air fry: Preheat air fryer to 375°F. Lightly spray both sides of the rolls with oil. Place in air fryer basket (don’t overcrowd). Air fry for 10 minutes, flipping halfway through, until golden and crispy.
4. Make the peanut sauce: Whisk all sauce ingredients until smooth. Add warm water 1 tbsp at a time until desired consistency is reached.
5. Serve: Serve hot egg rolls with peanut sauce for dipping. Garnish with extra scallions, cilantro, or sesame seeds if desired.
💡 Tips & Notes:
Nasoya egg roll wraps are egg-free, making this recipe 100% plant-based!
Use Vailnd air fryer liners to prevent sticking and make cleanup a breeze.
These are best served fresh but can be reheated in the air fryer at 350°F for 2–3 minutes.
📌 Save This Recipe:
Perfect for weeknight dinners, party appetizers, or anytime you want something crunchy and satisfying without the takeout bill.
✨ Featured Brands:
@nasoya — tofu + egg roll wrappers
@vailnd — nonstick air fryer liners

🌽Creamy Summer Garden Rice
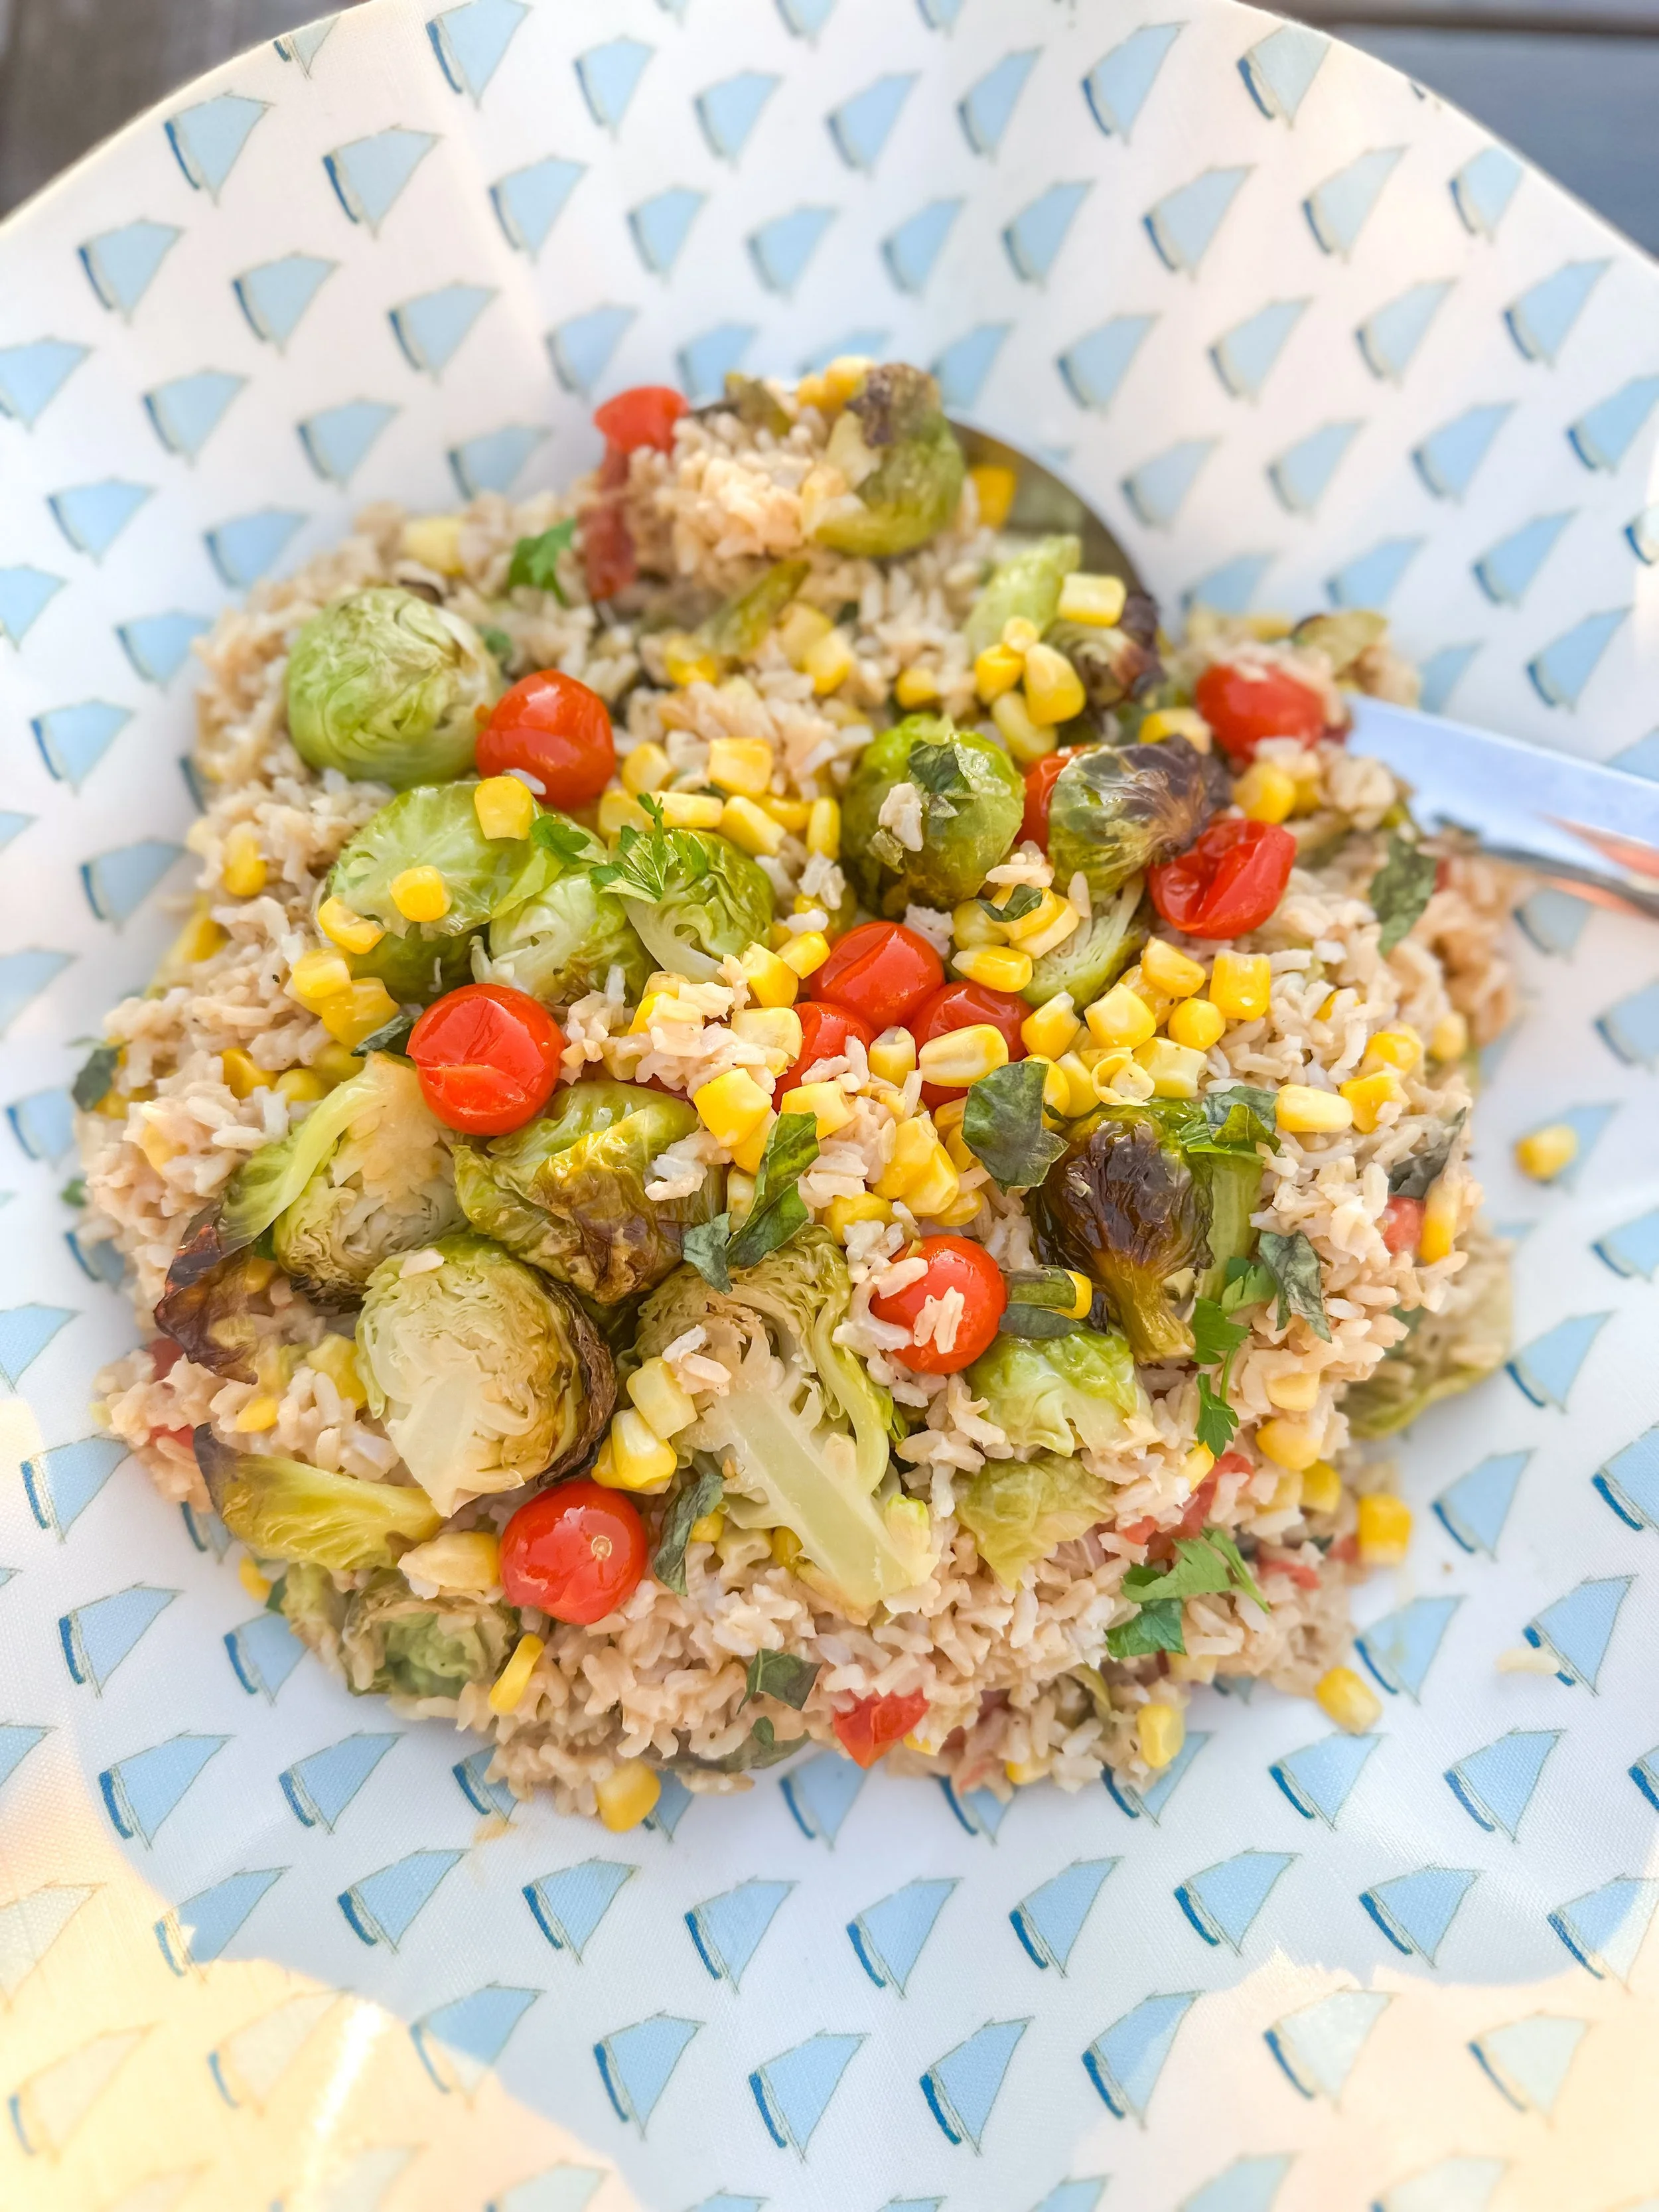
This dish came together while I was at the Cape for a few days with my family. I didn’t have most of my usual pantry staples, and I definitely didn’t have my food processor or half the kitchen tools I normally rely on. But I did have some beautiful summer produce—Brussels sprouts, cherry tomatoes, and corn—and just enough basics to pull together something comforting and flavorful.
So I made do—and honestly, it turned out to be one of those happy accidents that’s going straight into the rotation.
This creamy rice dish feels indulgent but comes together with just a saucepan and a few ingredients you probably already have on hand. No dairy, no blender, no nutritional yeast. Just a cozy bowl of plant-based goodness that’s light, fresh, and totally satisfying.
🛒 Ingredients
🥦 Veggies & Rice
1 cup rice (white, brown, or Arborio)
2 cups Brussels sprouts, halved or quartered
1 cup cherry tomatoes
1 cup fresh or frozen corn
3 cloves garlic, minced
1 tbsp olive oil
Salt & pepper to taste
Optional: chili flakes or lemon zest
🥄 Creamy Sauce (no nuts, no blender, no yeast)
1 tbsp olive oil or vegan butter
1 tbsp flour/cornstarch (or arrowroot powder for GF)
1 1/2 cups unsweetened plant-based milk (soy or oat work best)
2 tsp Dijon mustard
1 1/2 tsp lemon juice
3/4 tsp garlic powder
Salt & pepper to taste
🌿 Optional Herb Toppings
Chopped parsley or dill
Fresh basil (chiffonade)
Snipped chives
A few thyme leaves or a sprinkle of tarragon
🔪 Instructions
1. Roast the Veggies
Preheat oven to 425°F. Toss the Brussels sprouts, cherry tomatoes, corn, and garlic with olive oil, salt, and pepper. Roast for 20–25 minutes until golden, blistered, and slightly caramelized.
2. Cook the Rice
Prepare rice according to package directions. Fluff and set aside.
3. Make the Sauce
In a saucepan, heat oil over medium. Whisk in cornstarch or thickener and cook for 1 minute. Slowly add plant-based milk while whisking to avoid lumps. Stir in Dijon, lemon juice, garlic powder, salt, and pepper. Simmer for 3–5 minutes until smooth, thick, and creamy.
4. Combine
Add the cooked rice and roasted veggies to a large skillet or pot. Pour in the sauce and gently mix everything together. Warm over low heat. Add a splash of extra plant milk if needed to loosen the texture.
5. Serve
Top with fresh herbs, a pinch of chili flakes, or a squeeze of lemon. Serve warm and enjoy!
This is one of those recipes that proves you really don’t need much to make something comforting and nourishing. Whether you’re away from your usual kitchen setup or just craving something cozy without a complicated ingredient list—this one’s for you.
Let me know if you try it! Tag @kellysgreenkitchen_ so I can see your version, and follow along for more plant-based comfort that tastes indulgent but keeps it simple.
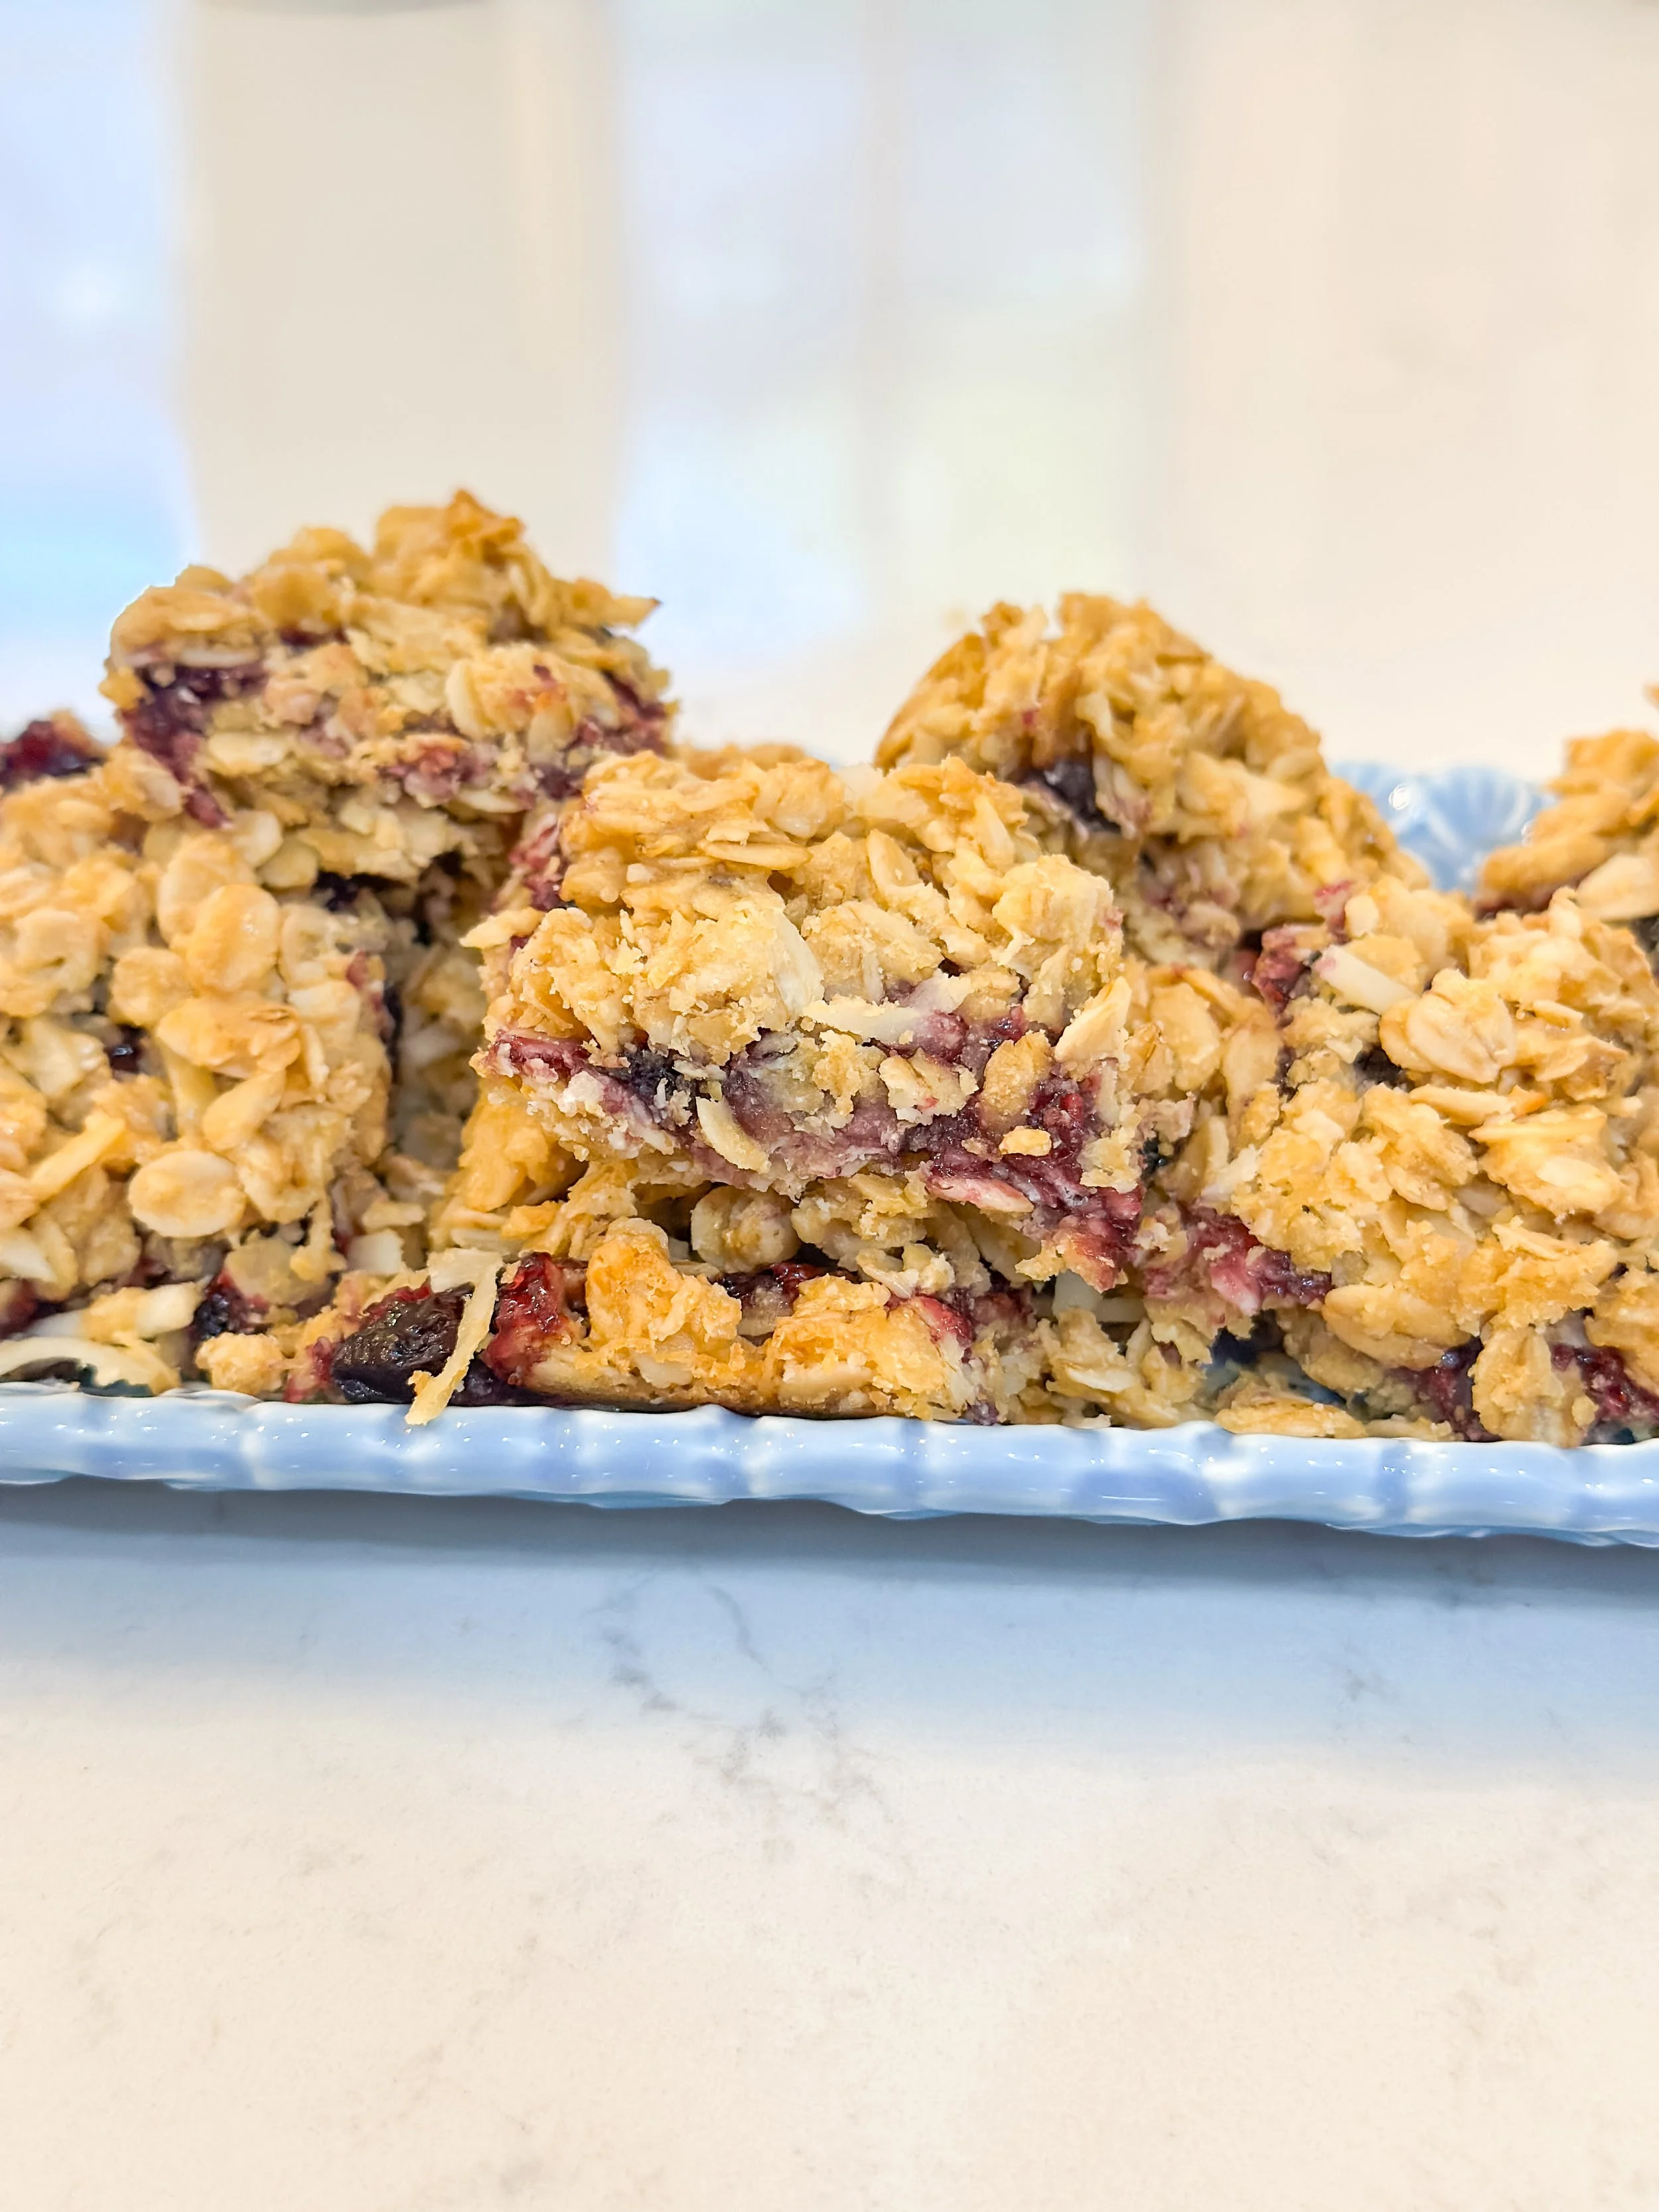
🍋 Lemon Blueberry Oat Bars

Vegan, Gluten-Free, Naturally Sweetened
Bright, jammy, and bursting with citrusy goodness — these lemon blueberry oat bars taste like summer in a slice. They’re made with simple pantry ingredients, packed with juicy berries, and naturally sweetened with maple syrup.
Whether you serve them for breakfast, tuck one into your beach bag for a snack, or enjoy them with a cup of tea, these bars strike that perfect balance between wholesome and indulgent.
And the best part? They're made in one bowl, no mixer needed.
🌾 Ingredients
For the Base + Crumble:
1½ cups rolled oats
½ cup chickpea flour (or sub almond flour)
¼ cup shredded coconut (optional, for texture)
¼ tsp sea salt
Zest of 1 lemon
¼ cup maple syrup
¼ cup coconut oil (melted) or olive oil
1 tsp vanilla extract
For the Blueberry Filling:
1 cup fresh or frozen blueberries
1 tbsp maple syrup
1 tbsp lemon juice
1 tsp lemon zest
1 tsp arrowroot or cornstarch
🍽 Instructions
Preheat oven to 350°F. Line a loaf pan or 8x8 baking dish with parchment.
Make the blueberry filling:
In a small saucepan, combine blueberries, maple syrup, lemon juice, and zest. Cook over medium heat until berries begin to burst. Stir in arrowroot and simmer 3–5 minutes until thick and jammy. Remove from heat.Make the base/crumble:
In a large bowl, stir together oats, chickpea flour, coconut (if using), salt, and lemon zest. Add maple syrup, melted oil, and vanilla. Mix until crumbly.Assemble:
Press ⅔ of the crumble mixture into the bottom of your prepared pan. Spread the blueberry filling evenly over the base. Sprinkle remaining crumble on top and gently press down.Bake for 22–26 minutes or until the top is golden and edges are set.
Let cool completely before slicing. For clean cuts, chill in the fridge before slicing into bars.
✨ Notes & Tips
You can swap chickpea flour for almond flour or oat flour if preferred.
Use frozen blueberries straight from the freezer — no need to thaw.
Store in an airtight container in the fridge for up to 5 days, or freeze for up to 2 months.
Optional but delicious: dust with powdered coconut sugar or drizzle with a lemon glaze.
💌 Try this recipe?
Tag me on Instagram @kellysgreenkitchen_ — I’d love to see your bars! And for more fresh, plant-based recipes like this one, subscribe to my newsletter for exclusive seasonal content.

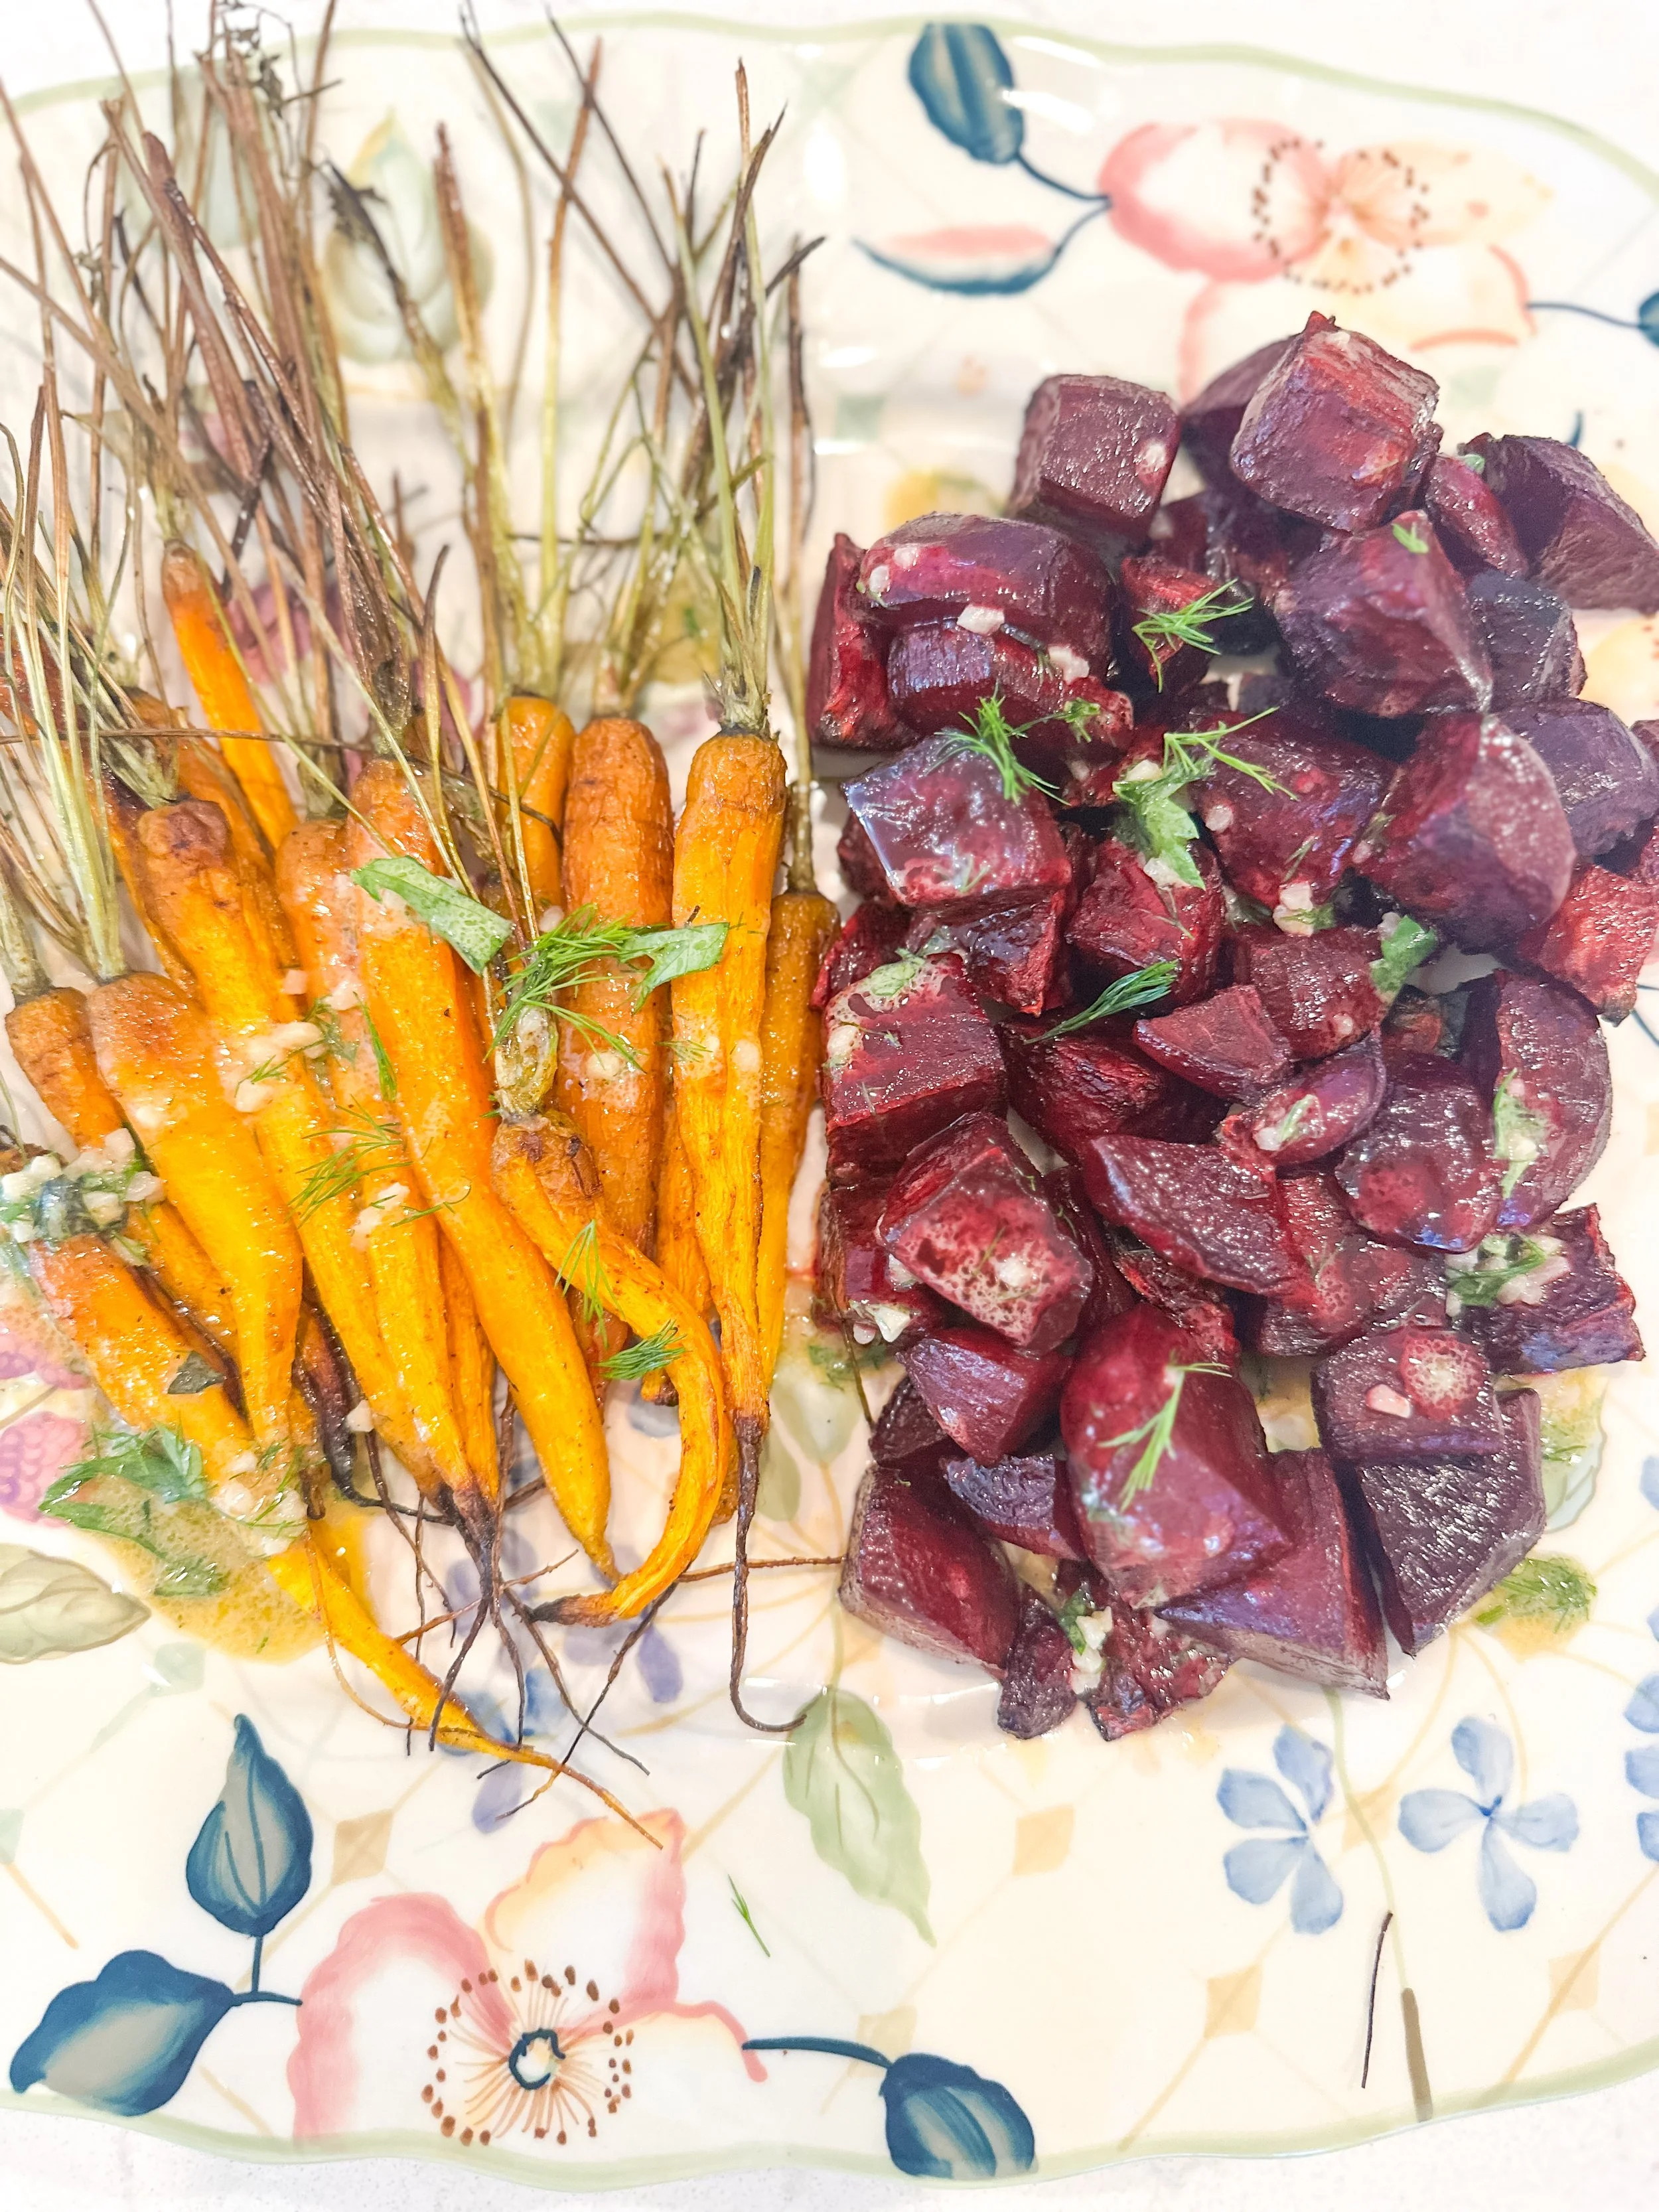
🌿 Garden Roots with Fresh Herbs
A vibrant, seasonal side that’s as beautiful as it is delicious.
There’s something magical about turning a handful of humble veggies into something elegant—especially when they come straight from the farm.
I picked up these gorgeous beets and carrots during my visit to Bartlett’s Farm in Nantucket, and they practically begged to be roasted. The natural sweetness intensifies in the oven, and a touch of paprika and cumin gives them just the right amount of warmth. But the real magic? A lemon herb drizzle made with fresh parsley and dill—it’s zippy, bright, and ties everything together.
Whether you’re planning a backyard dinner party or just want to elevate your weeknight side dish, this one’s a keeper.
🥕 Ingredients
For the Roasted Veggies
3 medium carrots, peeled and sliced on a diagonal
2 medium beets (golden or red), peeled and cubed
1 tbsp olive oil
½ tsp paprika
¼ tsp ground cumin
Salt and pepper, to taste
For the Lemon Herb Drizzle
2 tbsp olive oil
1 tbsp lemon juice
1 tsp lemon zest
1 tsp Dijon mustard
1 tsp maple syrup or agave (optional, but lovely with the beets)
1 tbsp fresh parsley, chopped
1 tbsp fresh dill, chopped
🔪 Instructions
Preheat your oven to 400°F (200°C).
On a lined baking sheet, toss the peeled and chopped carrots and beets with olive oil, paprika, cumin, salt, and pepper.
Roast for 30–35 minutes, flipping once, until tender and golden around the edges.
While the veggies roast, whisk together all ingredients for the lemon herb drizzle in a small bowl.
Once the veggies are done, let them cool slightly. Then drizzle generously with the lemon herb sauce.
Serve warm or at room temp—perfect on its own, or paired with grains, greens, or your favorite protein.
💫 Notes & Serving
This drizzle is very batchable—double it and keep extra in the fridge for grain bowls or salads throughout the week.
The veggies can be prepped a day ahead and roasted just before serving.
Optional add-on: sprinkle with toasted almonds or hemp seeds for a bit of crunch.
💌 More from Kelly’s Green Kitchen
If you loved this dish, check out the other recipes I’ve created from my @bartlettsfarm haul—and subscribe to my newsletter for seasonal menus, sneak peeks, and more behind-the-scenes from the kitchen.
Follow along on Instagram for plant-based recipes that are simple, beautiful, and totally doable 🌿
🥢 Sesame Tamari Crunch Noodles by Palmini

This recipe started when my friend brought over extra veggies from her farm share (I’m her go-to, obviously 😉). I had bok choy and radishes on hand, and knew right away I wanted to make something quick, light, and a little cozy.
Enter: this simple stir-fry with Palmini linguini — noodles made from hearts of palm. They soak up a salty-sweet sesame tamari glaze and come together with the crisp-tender veggies in just about 15 minutes. Perfect for a weeknight dinner or a veggie rescue mission.
🛒 Ingredients:
Main:
1 pack of Palmini linguini, rinsed and patted dry
1 tbsp sesame oil (or neutral oil)
1 bunch baby bok choy, halved or quartered lengthwise
4–5 radishes, thinly sliced
2 scallions, sliced
1 tsp sesame seeds (optional garnish)
1 tsp toasted almonds (optional garnish)
Sesame Tamari Glaze:
2 tbsp tamari (or soy sauce)
1 tbsp rice vinegar
1 tbsp maple syrup
1 tsp toasted sesame oil
1 clove garlic, grated
1 tsp fresh ginger, grated
Optional: pinch of red pepper flakes or a drizzle of sriracha for heat
🥢Instructions:
Make the sauce:
In a small bowl, whisk together all ingredients for the sesame tamari glaze. Set aside.Sauté the veggies:
In a large skillet or wok, heat sesame oil over medium heat. Add bok choy and radishes and cook for 4–5 minutes until tender but still crisp. Add chopped scallions.Add the noodles:
Stir in the rinsed and dried Palmini linguini and sauté for another 2 minutes to warm through.Toss with sauce:
Pour in the sesame tamari glaze and toss everything together until evenly coated and glossy. Let cook for another minute.Serve:
Plate the noodles and veggies. Top with sesame seeds and toasted almonds. Enjoy warm!
✨ Notes:
Protein boost? Add tofu, edamame, or tempeh for extra staying power.
Don’t skip drying the Palmini! It helps the sauce cling better.
This dish is great served fresh but also makes an excellent next-day lunch.
There’s something so satisfying about turning a handful of gifted veggies into a beautiful, nourishing meal. This recipe is proof that with a few simple ingredients—and a little help from Palmini—you can whip up something flavorful, comforting, and totally plant-based in under 20 minutes. Whether you’re working through your farm share, clearing out the fridge, or just craving a cozy noodle bowl without the heaviness, this one’s worth saving.
✨ Want to try Palmini for yourself? You can grab it on Amazon and use code KELLYSGREENKITCHEN20 for 20% off. Let me know if you make it—I’d love to see your version!

🌿 Summer Garden Crostini
The ultimate July snack: ripe tomatoes, fresh basil, vegan feta, and balsamic glaze on toasted baguette slices. Simple, beautiful, and always a crowd-pleaser.
These crostini were born from my latest Pick-Your-Own veggie haul at Bartlett’s Farm — and honestly, this might be my favorite way to honor peak tomato season. With juicy heirloom tomatoes, fresh basil, and a generous smear of vegan feta, these little bites are summer in every sense.
Whether you're having friends over for a casual get-together or just craving a late-night snack that feels a little fancy, this recipe is a go-to. You don’t need much — just good bread, ripe tomatoes, and a drizzle of balsamic glaze to pull it all together. Summer Garden Crostini is exactly what it sounds like: fresh, seasonal, and just a little addictive.
🍅 Ingredients
1 French baguette, sliced into ½-inch rounds
Extra virgin olive oil, for brushing
2–3 ripe heirloom or cherry tomatoes, chopped or thinly sliced
½ cup vegan feta — Follow Your Heart or my homemade herb ricotta work great if you have more time
Fresh basil leaves
Balsamic glaze, for drizzling
Sea salt + black pepper, to taste
🔪 Instructions
Toast the bread:
Preheat your oven to 375°F. Arrange baguette slices on a baking sheet and lightly brush each with olive oil. Toast for 8–10 minutes, or until golden and crisp.Prep the tomatoes:
While the bread toasts, slice or chop your tomatoes and season with a pinch of salt and pepper.Assemble the crostini:
Once cooled slightly, spread a spoonful of vegan feta onto each toast. Top with tomato slices and tuck in a fresh basil leaf.Finish with flair:
Drizzle with balsamic glaze just before serving. Enjoy immediately!
💡 Tips & Variations
Try multicolored cherry tomatoes for extra beauty
Use a grill instead of the oven for extra char and flavor
Swap vegan feta for almond ricotta or herbed cashew cheese
✨ Why You'll Love It
This one’s a love letter to peak-season tomatoes. It’s elegant enough for a summer party, easy enough for a weeknight snack, and endlessly customizable. Save this for every time tomatoes are too good to pass up.
📌 Save this recipe, share it with a friend, and follow @kellysgreenkitchen_ for more plant-based summer recipes!

🍪 Cookie Glow Bites (Vegan, Gluten-Free)

Vegan • Gluten-Free • No Bake • Naturally Sweetened
When it’s too hot to bake but you’re still craving something sweet... these Cookie Glow Bites have your back.
They’re soft, chewy, and taste just like cookie dough — but they’re also packed with nourishing ingredients like ground flax for fiber + omega-3s and a little plant-based protein to give you a satisfying snack that actually fuels you.
Plus, they’re made with Enjoy Life mini chocolate chips — the perfect dairy-free chips that make every bite feel a little indulgent.
These are always in my fridge during the summer. Keep a stash for post-workout, after-dinner, or whenever you need something sweet and smart.
✨ Ingredients:
1 cup almond flour
2 tbsp ground flaxseed
1/4 cup creamy almond butter
2–3 tbsp maple syrup
1 tsp vanilla extract
Pinch of sea salt
1–2 tbsp plant milk (as needed)
2–3 tbsp Enjoy Life mini chocolate chips
🥣 Instructions:
In a bowl, mix almond flour and ground flaxseed.
Stir in almond butter, maple syrup, vanilla, and salt until a dough forms.
Add plant milk a tablespoon at a time, only if the dough feels dry.
Fold in chocolate chips.
Roll into 1-inch balls and place on a parchment-lined plate or container.
Chill in the fridge for 30 minutes until firm. Enjoy cold!
🧊 Store in the fridge for up to a week or freeze for longer.
💡 Why You’ll Love Them:
No oven = perfect hot weather snack
Balanced with fiber, protein, and healthy fats
Totally crave-worthy (and kid-approved!)
Ready in 10 minutes with just a bowl and a spoon
📸 Final Notes:
Whether you need a quick snack, a healthy dessert, or something to sneak from the fridge late at night (no judgment), Chill Dough Bites are here for you.
Let me know if you make them by tagging @kellysgreenkitchen_ — I love seeing your creations!
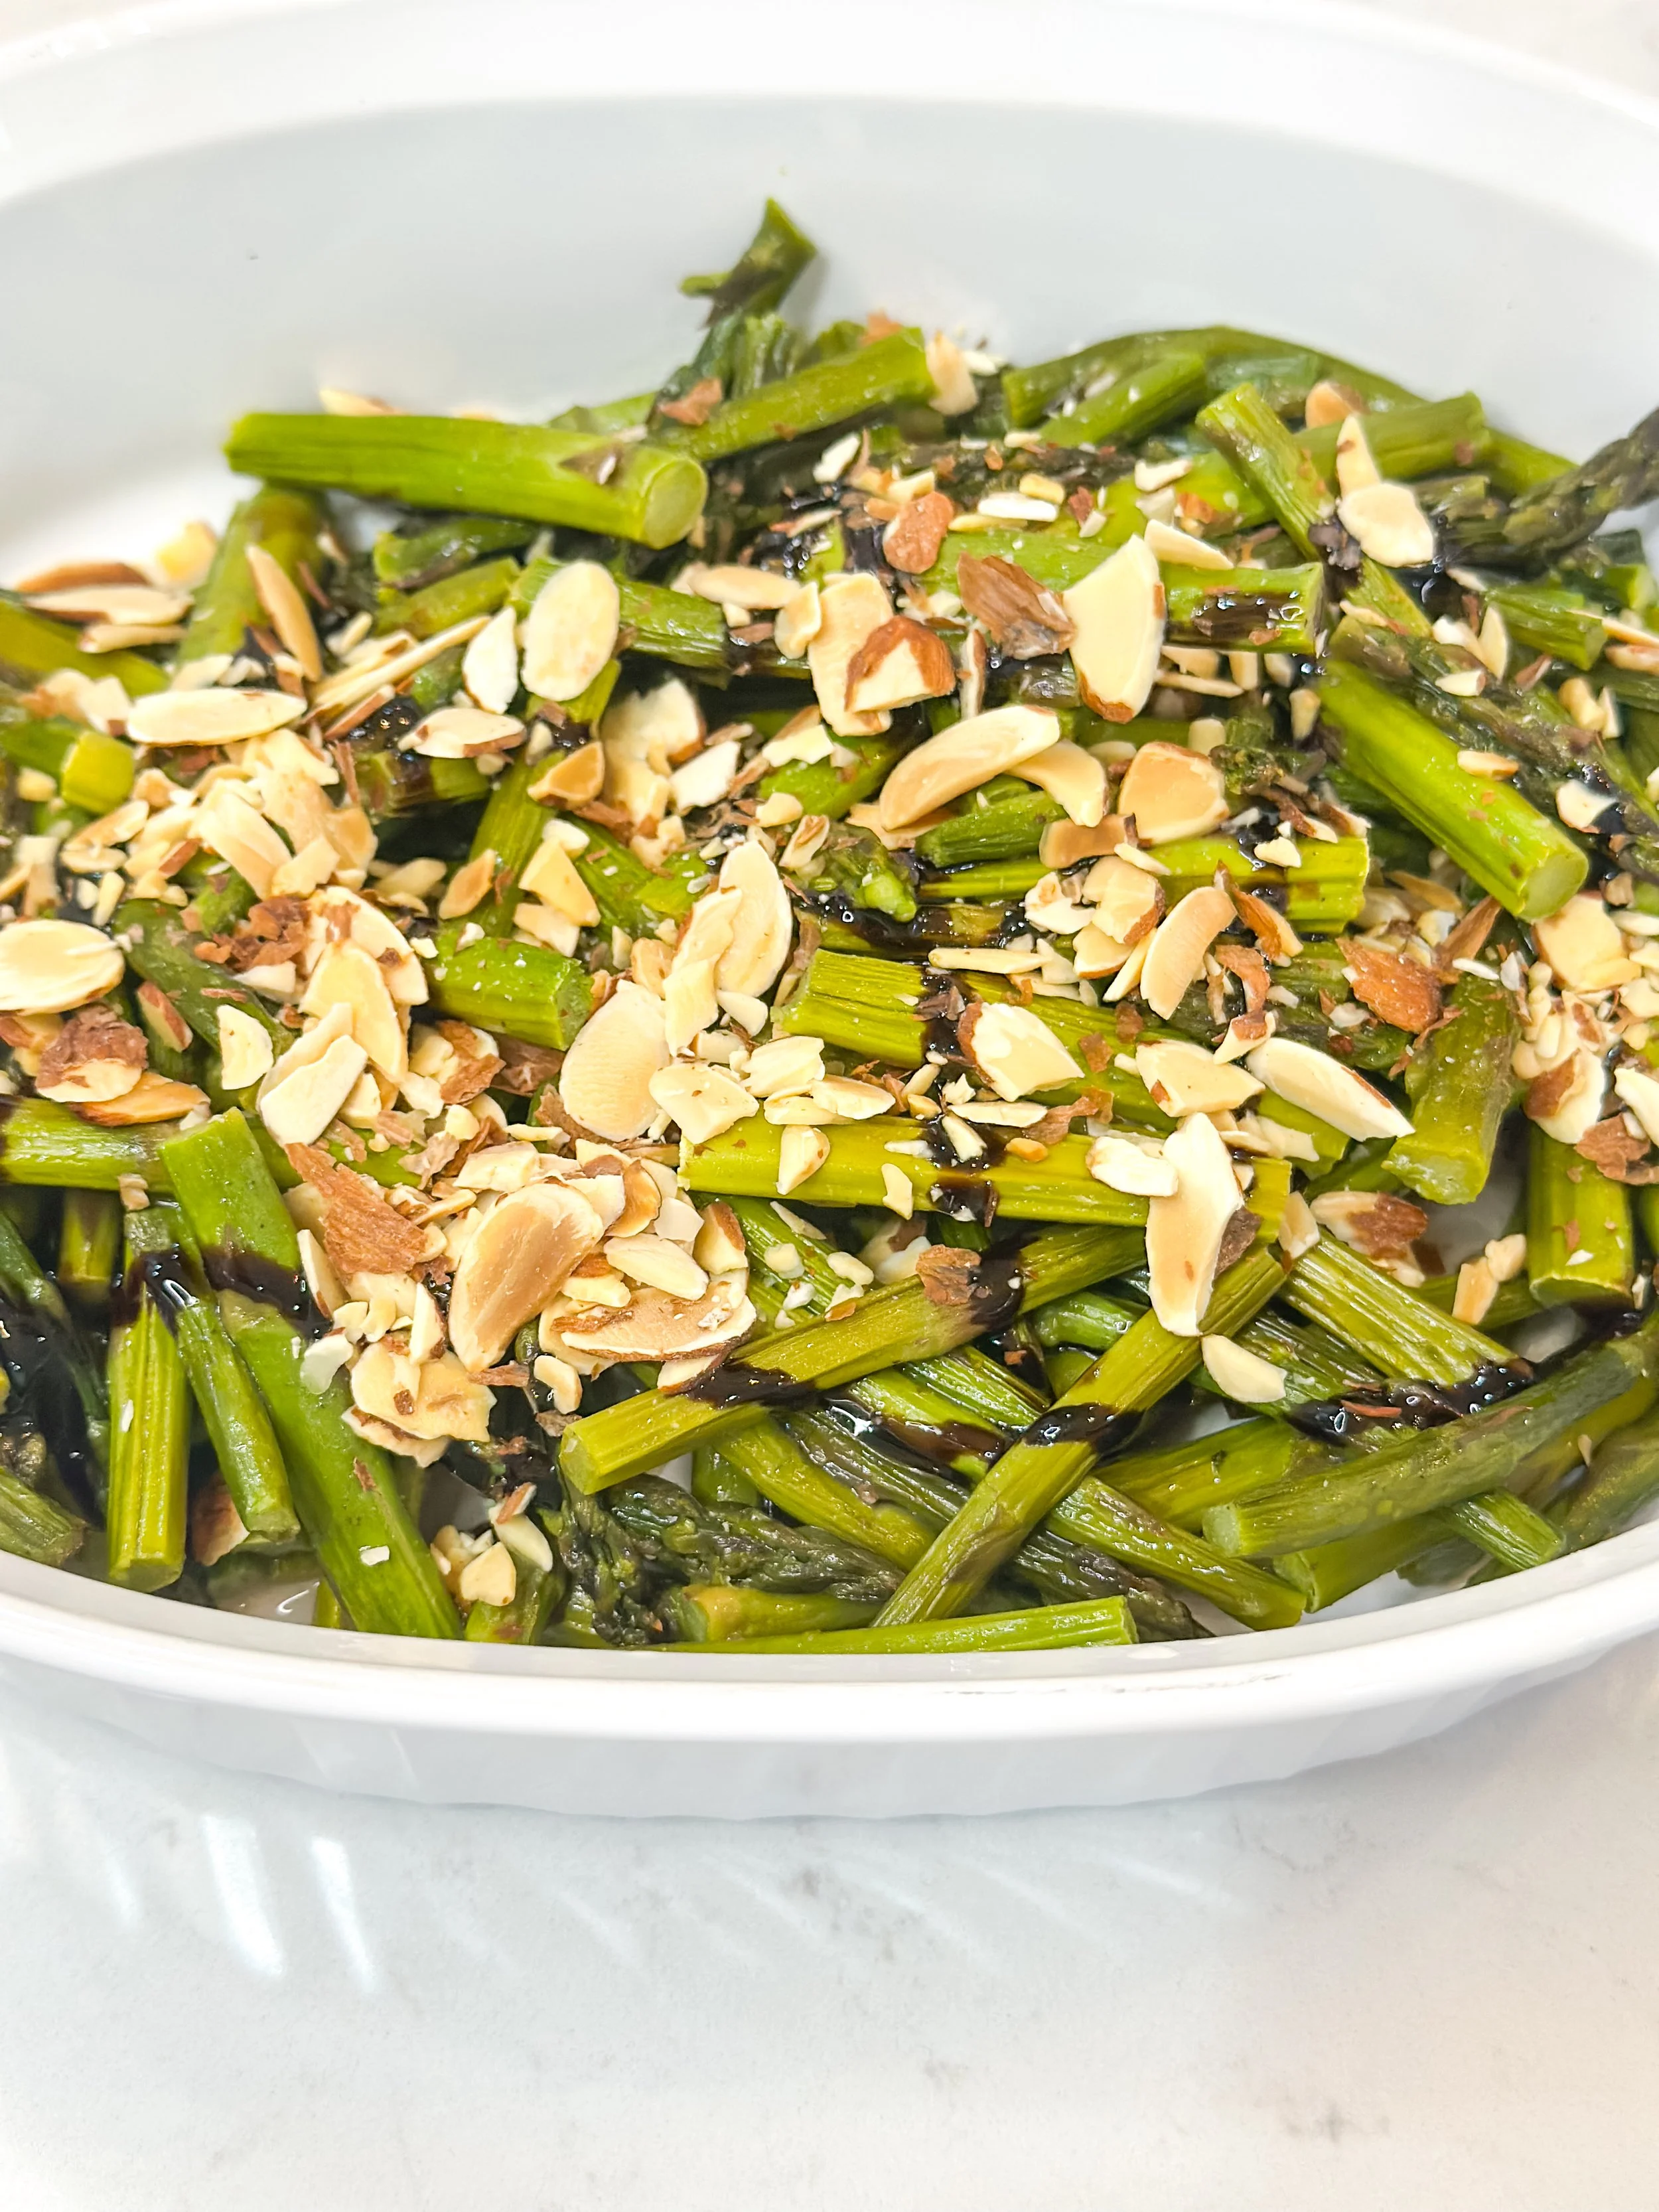
🌿 Caramelized Asparagus with Maple Balsamic Glaze

I made this dish for my dad’s birthday dinner back in June — and while it was a hit that night, I somehow forgot to post it! This is one of those recipes that looks restaurant-worthy but comes together in minutes. Roast asparagus (or green beans!) until perfectly tender, drizzle with maple balsamic glaze, and finish with toasted sliced almonds.
💫 It’s the perfect side for a summer garden dinner party or a cozy dinner at home.
Simple, elegant, and the flavors are perfect together.
Save this one for when you want to impress someone.
🛒 Ingredients
🥬 1 bunch asparagus, trimmed and cut into 1-inch pieces
🫒 1 tbsp Graza sizzle olive oil
🧂 Salt & pepper, to taste
🌰 2–3 tbsp sliced almonds
🍇 1 tbsp balsamic vinegar
🍁 1–2 tsp pure maple syrup
Optional toppings: 🍋 Lemon zest, 🧀 vegan feta, or ✨ nutritional yeast
👩🍳 Instructions
🔥 Preheat oven to 425°F and line a baking sheet with parchment paper.
🥄 Toss asparagus with olive oil, salt, and pepper. Spread in an even layer.
⏱️ Roast for 12–15 minutes, until tender and caramelized.
🍳 Toast almonds in a dry skillet over medium heat for 2–3 minutes until golden.
🥣 Whisk together balsamic vinegar and maple syrup to make the glaze.
🍽️ Drizzle glaze over warm asparagus and top with toasted almonds.
✨ Optional: Add lemon zest or vegan feta for extra flavor.
🌿 Serve immediately and enjoy!
🌼 Closing Thoughts
This dish brings a touch of elegance to any table. Whether you’re serving it to guests or just treating yourself, it’s simple, seasonal, and beautifully balanced.
💚 Save this one for when you want to impress someone.
Follow @kellysgreenkitchen_ for more simple plant-based sides that will impress everyone at your table.
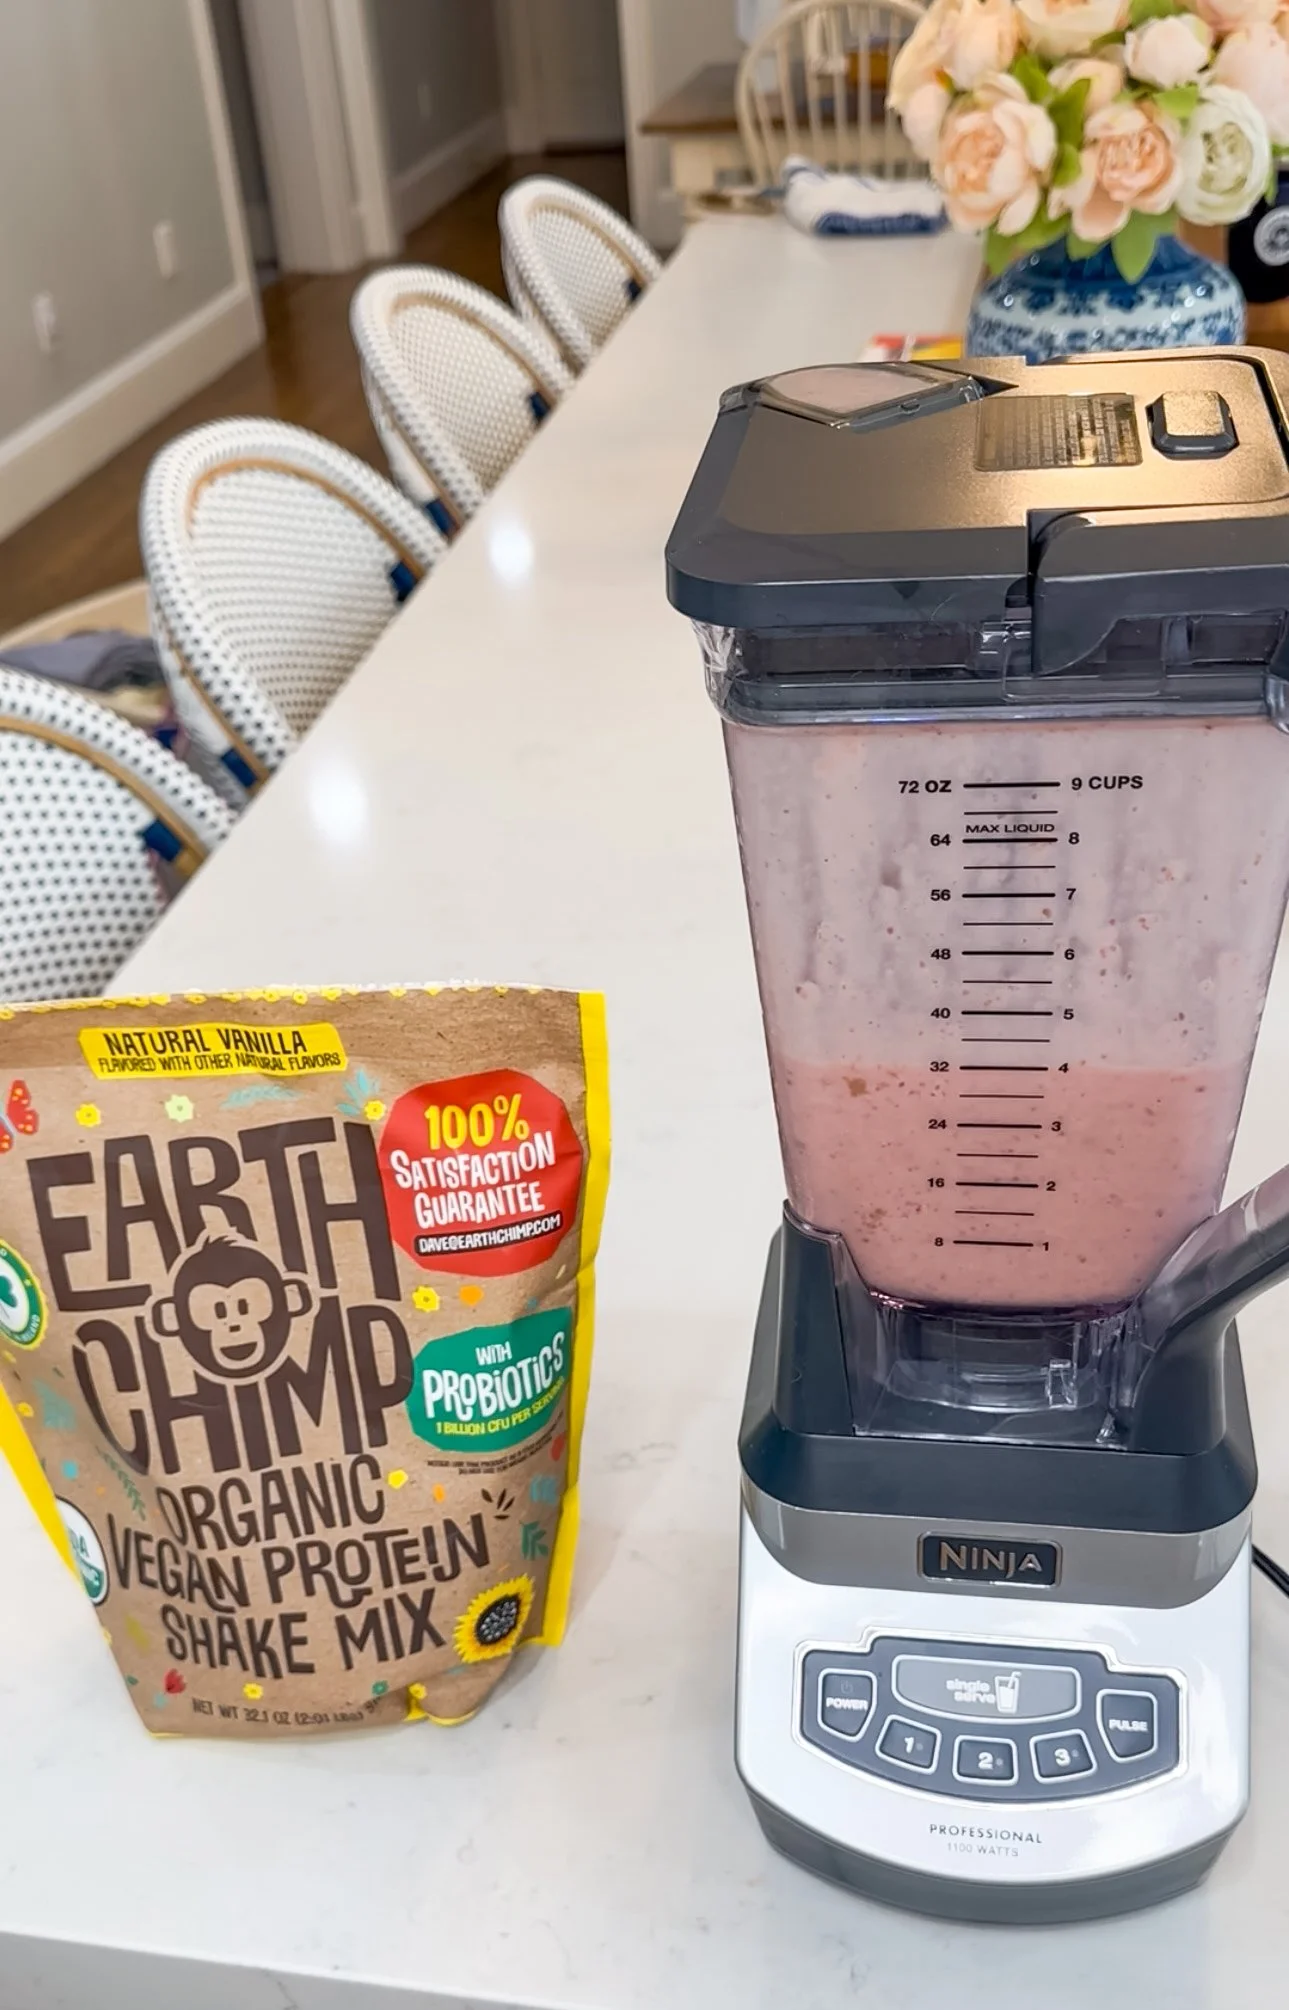
🥤 PB & J Protein Shake

Creamy | Plant-Based | Protein-Packed
This smoothie has all the cozy, nostalgic flavors of a PB&J sandwich… in a creamy, nourishing shake. It’s one of my go-to blends when I want something fast, filling, and totally plant-powered.
The combo of banana, strawberries, peanut butter, and cinnamon is chef’s kiss, and EarthChimp Vanilla Protein Powder takes it to the next level with extra creaminess and 20g of plant-based protein. Plus, it’s free of gums, fillers, or weird stuff.
Great for breakfast, post-workout, or as a midday pick-me-up—this one’s always on repeat.
🛒 Ingredients:
1 frozen banana
1/2 cup frozen strawberries
1 scoop EarthChimp Vanilla Protein Powder
1–2 Medjool dates, pitted
1 tbsp peanut butter
1 tbsp ground flaxseed
1/2 tsp cinnamon
1 cup plant-based milk (almond, oat, etc.)
Optional: 2–3 ice cubes to thicken
🌀 Instructions:
Add all ingredients to a high-speed blender.
Blend until smooth and creamy.
Taste and adjust sweetness or consistency as needed.
Pour into a glass and enjoy immediately.
✨ Why I Love It:
Tastes like dessert but packed with real, nourishing ingredients
Naturally sweetened with dates and fruit
Loaded with protein, fiber, and healthy fats
Ready in under 5 minutes
Kid-approved!
You can find EarthChimp on Amazon — use code 10COLDCHIMP to get 10% off!
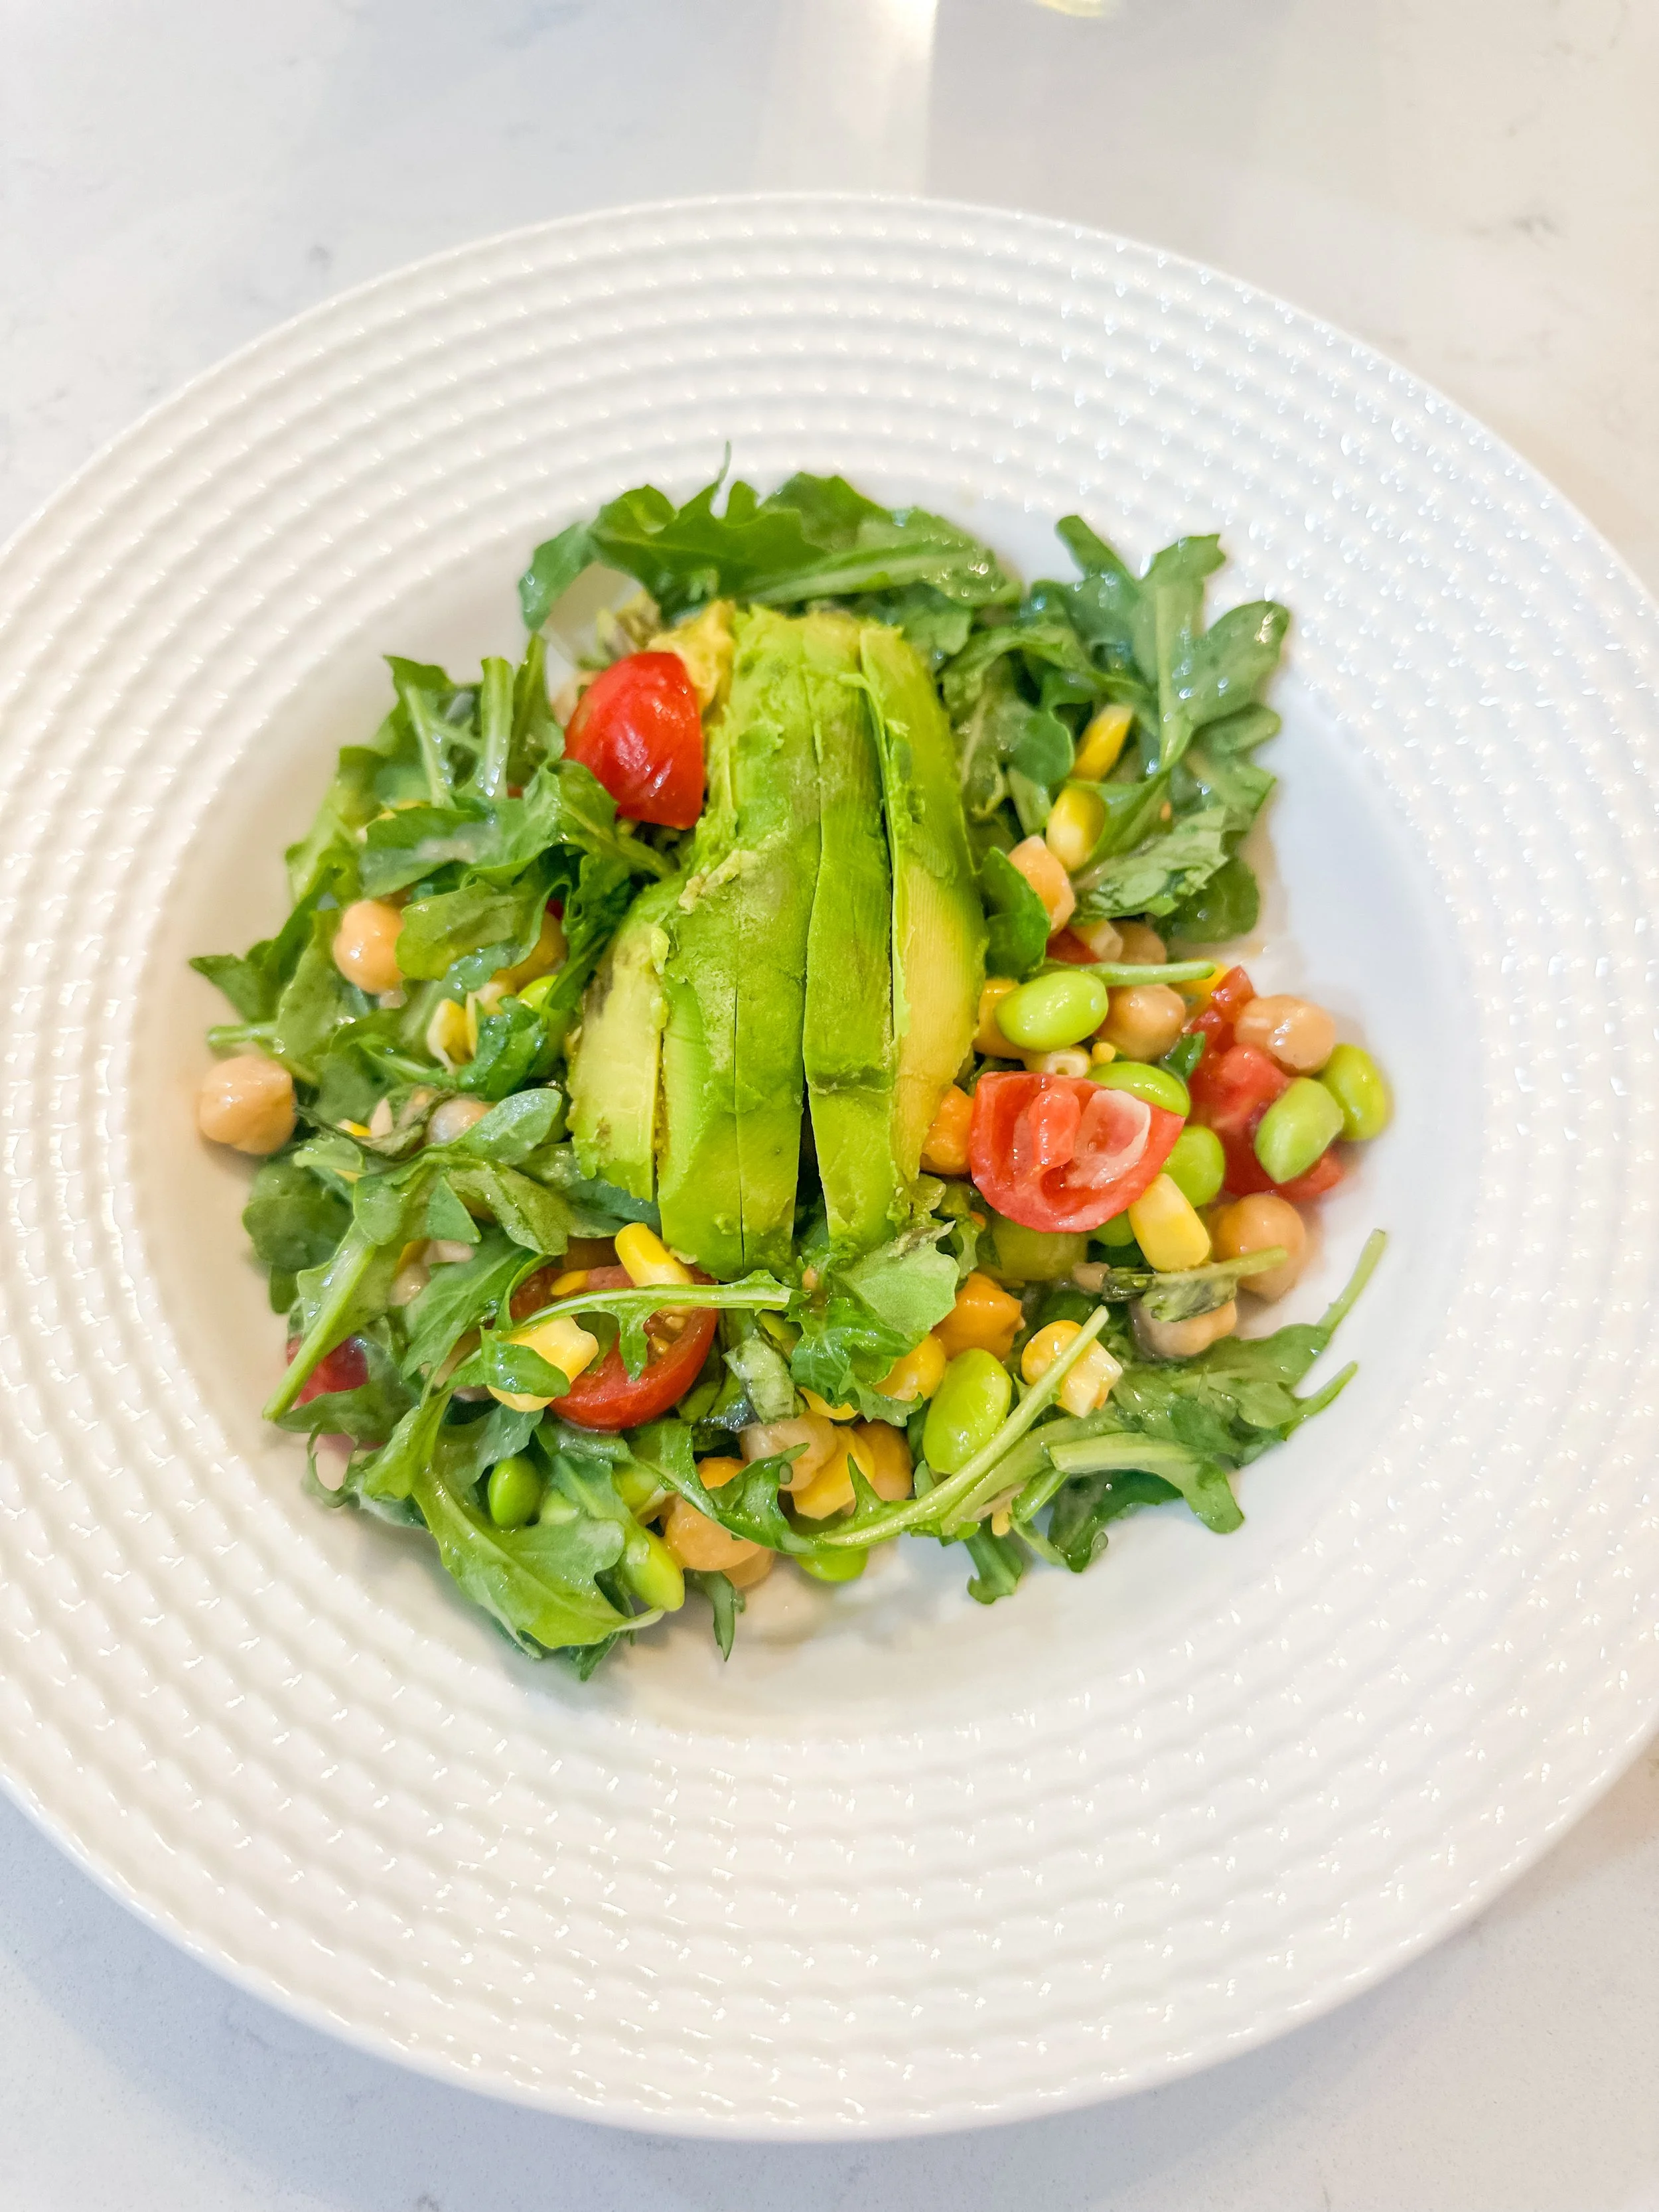
Arugula, Sweet Corn & Avocado Salad with Maple Dijon

There’s something about a simple, fresh salad that hits just right—especially when it’s packed with vibrant flavors and plant-powered ingredients. This arugula salad has become a go-to in my summer rotation. It’s quick to throw together, loaded with texture and color, and finished with a sweet and tangy maple dijon dressing that pulls everything together.
Whether you’re meal-prepping for the week or making a light lunch to enjoy on the porch, this bowl delivers.
Recipe:
🕒 Ready in 10 minutes
🥗 Serves 2 as a main, 4 as a side
📋Ingredients
For the salad:
2 cups arugula
1/2 cup cherry tomatoes, halved
1/2 cup corn (fresh, grilled, or frozen & thawed)
1/2 cup chickpeas, drained and rinsed
1/2 cup shelled edamame
1/2 avocado, diced
Optional: fresh basil, hemp seeds, or toasted pepitas for topping
For the maple dijon dressing:
2 tbsp olive oil
1 tbsp Dijon mustard
1 tbsp maple syrup
1 tbsp lemon juice (or apple cider vinegar)
Salt & pepper, to taste
👩🍳Instructions
In a large mixing bowl, combine arugula, tomatoes, corn, chickpeas, edamame, and avocado.
In a small bowl or jar, whisk (or shake) together the dressing ingredients until emulsified.
Drizzle dressing over the salad and toss gently to coat.
Top with any extras you like—hemp seeds, herbs, or a sprinkle of flaky salt. Serve immediately.
This salad is the kind of effortless meal that feels good to eat and just as good to look at. It’s packed with plant-based protein, fiber, and healthy fats—and you can easily make it your own by swapping in whatever’s in your fridge.
✨ If you try it, I’d love to see! Tag @kellysgreenkitchen_ so I can share your version.
💌 Don’t forget to save this recipe or pin it for later!

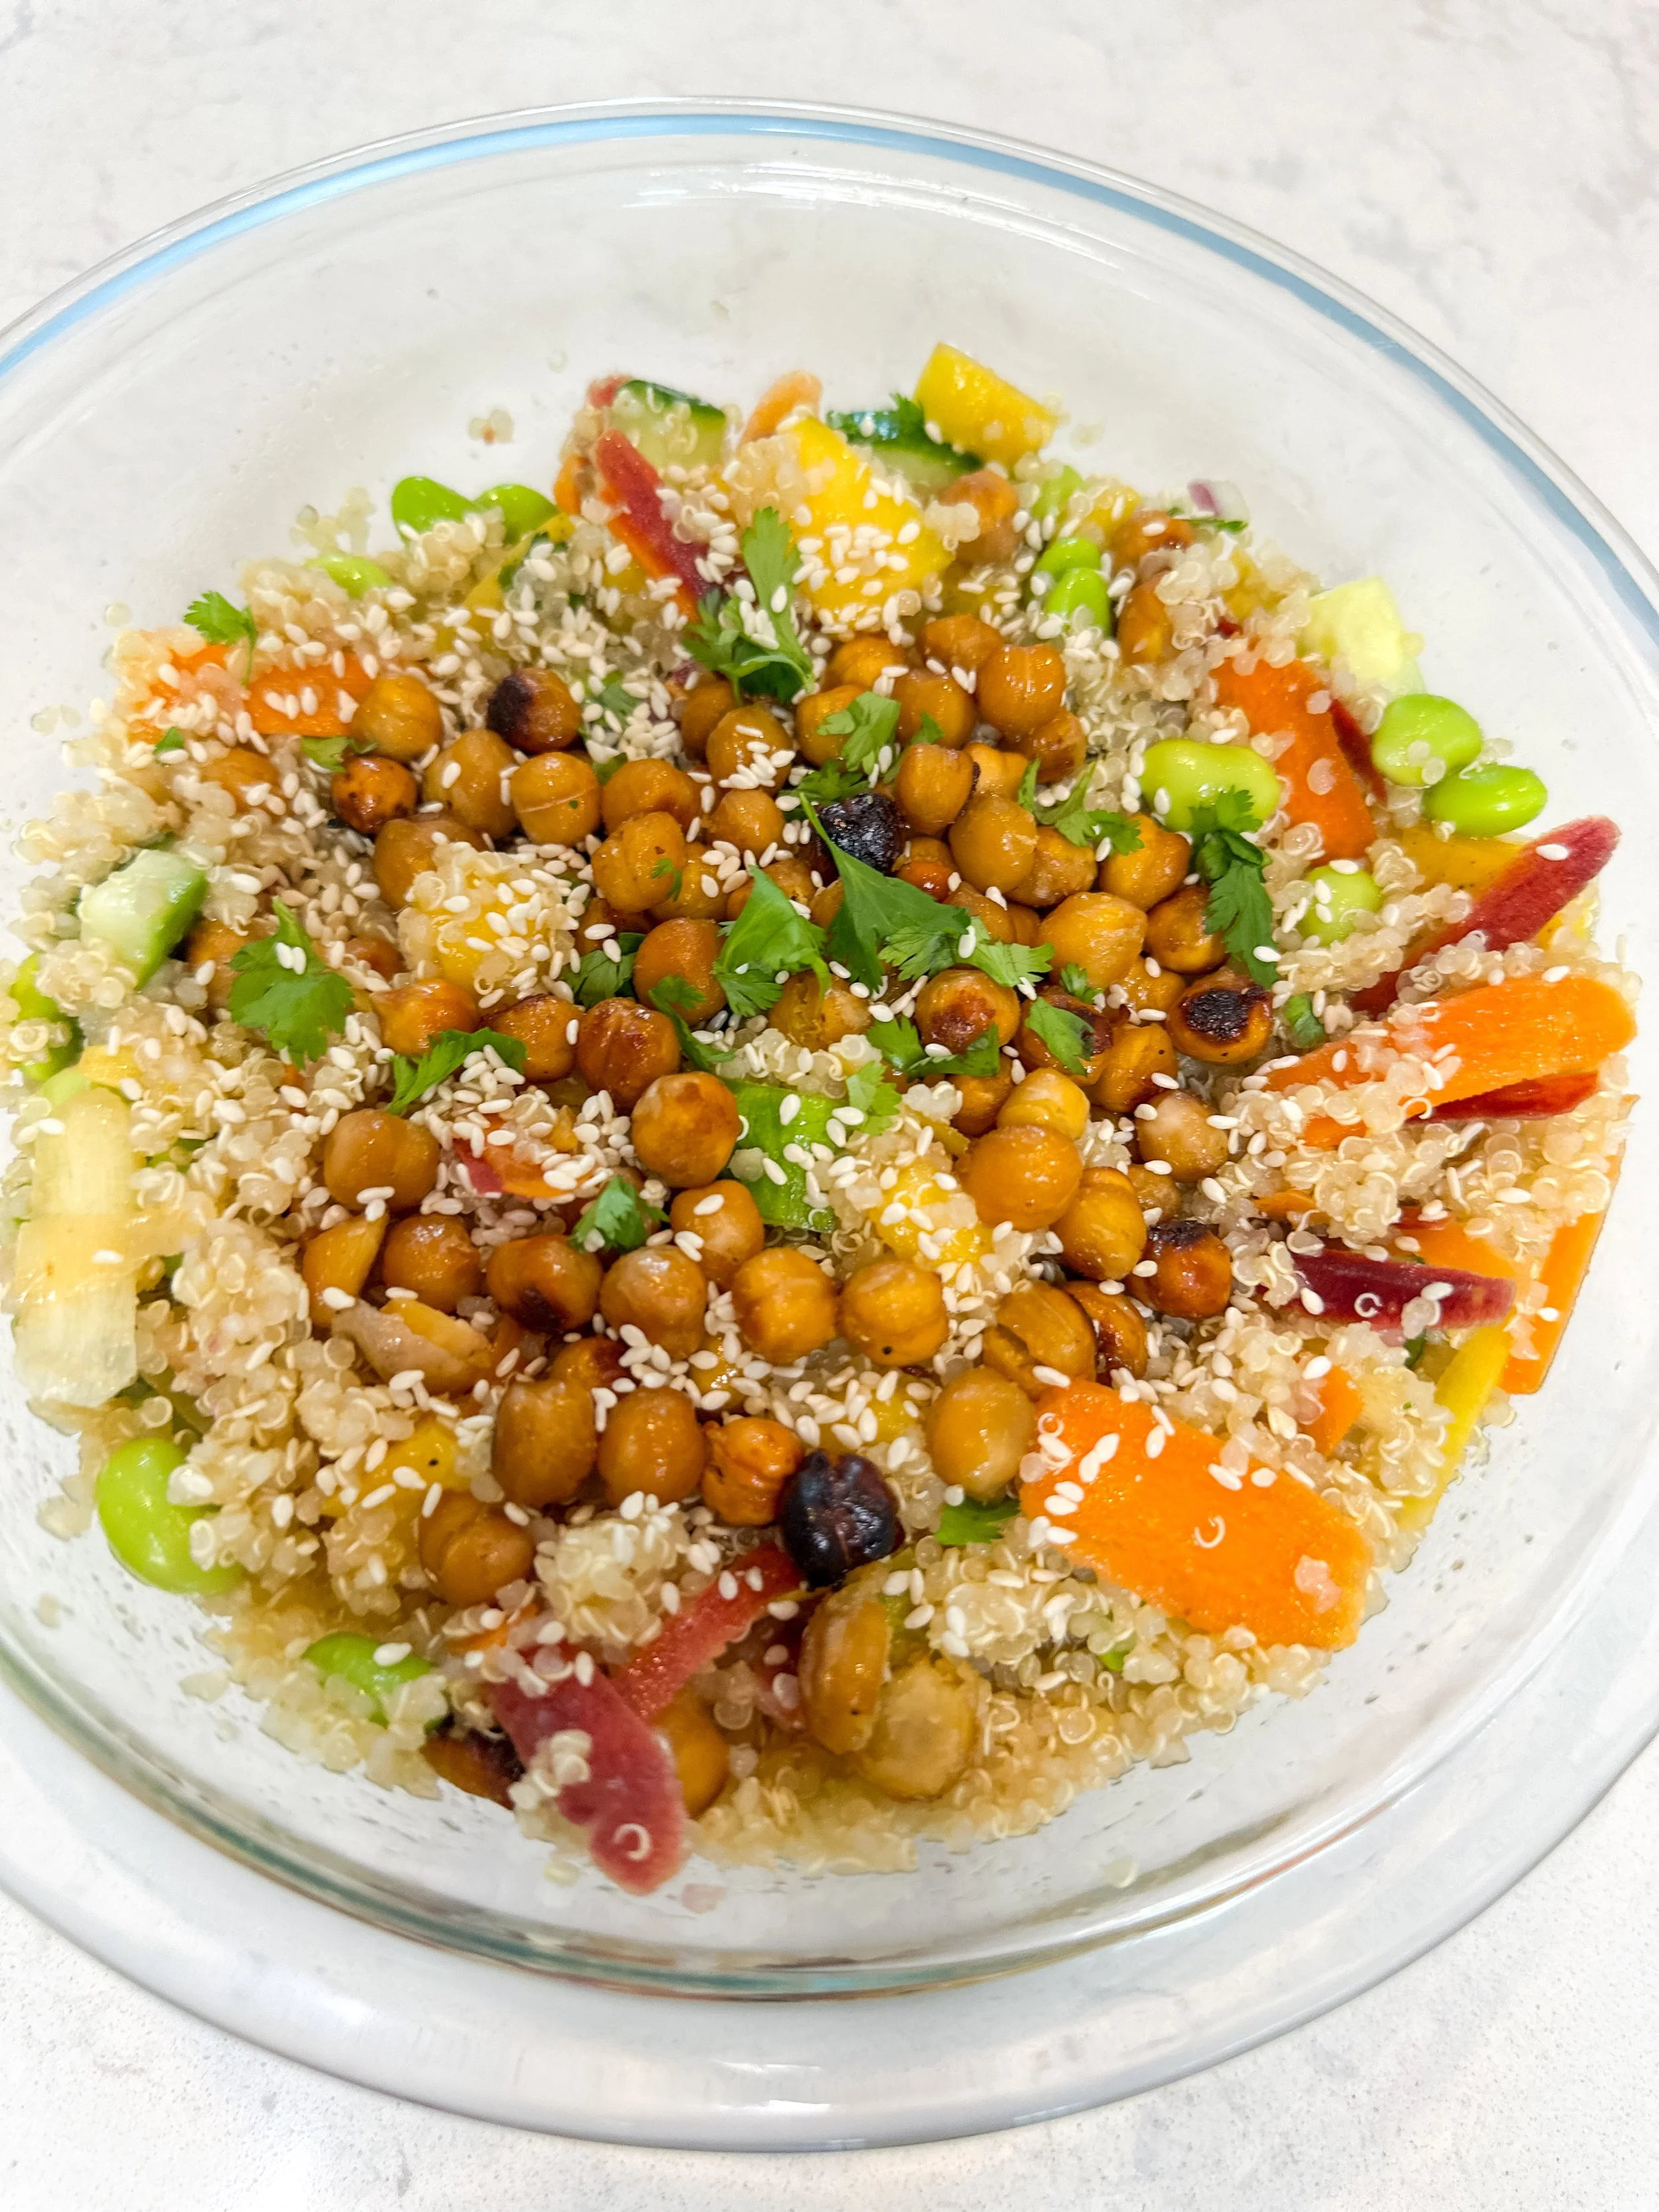
🥭Mango Crunch Power Bowl
A vibrant, satisfying plant-based bowl loaded with sweet, savory, and crunchy goodness.
If summer could be served in a bowl, this might be it.
This Mango Power Crunch Bowl is everything I want in a warm-weather meal — fresh mango, crisp veggies, protein-packed quinoa and edamame, plus the dreamiest ginger-sesame dressing. It’s light but satisfying, sweet with a little tang, and full of texture thanks to those crunchy chickpeas.
Whether you’re packing it for lunch, serving it at a backyard dinner, or making it ahead for the week, this one checks all the boxes.
🛒 Ingredients
For the Quinoa Base
1 cup dry quinoa, rinsed
2 cups vegetable broth or water
1 cup shelled edamame (thawed if frozen)
1 cup rainbow carrot ribbons (use a veggie peeler to shave)
Crispy Soy-Ginger Chickpeas
1 can chickpeas, drained, rinsed, and patted dry
1 Tbsp olive or avocado oil
1 Tbsp soy sauce or coconut aminos
1 tsp toasted sesame oil
1 tsp maple syrup
½ tsp garlic powder
½ tsp ground ginger
Black pepper, to taste
Mango-Cucumber Salsa
1 ripe mango, diced
½ English cucumber, diced
¼ red onion, finely chopped
1 small jalapeño, minced
Juice of 1 lime or 2 tsp red wine vinegar
2 Tbsp fresh cilantro or mint
Pinch of salt
Sesame-Ginger Dressing
3 Tbsp rice vinegar or lime juice
2 Tbsp soy sauce or tamari
1 Tbsp toasted sesame oil
1 Tbsp neutral oil
2 tsp maple syrup
1 tsp grated fresh ginger
1 clove garlic, minced
Optional: pinch of chili flakes
🥣 Instructions
Cook the Quinoa
Bring broth to a boil, stir in quinoa, reduce heat, and simmer for 15 minutes. Fluff and cool slightly.Make the Crispy Chickpeas
Preheat oven to 425°F. Toss chickpeas with oil, soy sauce, sesame oil, maple syrup, garlic powder, ginger, and pepper.
Roast 20–25 minutes, shaking halfway, until golden and crisp.Mix the Mango Salsa
Combine all salsa ingredients in a bowl. Let sit for 10 minutes.Whisk the Dressing
Shake or whisk all dressing ingredients in a jar or bowl.Assemble the Bowl
In each bowl, layer quinoa, rainbow carrot ribbons, edamame, and mango salsa.
Top with crispy chickpeas and drizzle generously with dressing. Garnish with scallions or sesame seeds if desired.
💚 Make It Yours
Swap quinoa for another grain
Add avocado or fresh herbs
Bulk it up with tofu or tempeh
Store components separately for 3–4 days of meal prep
Every bite of this bowl is a little celebration — of flavor, color, and all the good-for-you ingredients that make plant-based eating feel exciting.
If you make it, tag @kellysgreenkitchen_ so I can see your version!
And trust me: this is one of those meals that gets even better the next day.
🔥 Crispy BBQ Red Potatoes with Garlic, Onion & Cilantro

Let’s talk about potatoes.
Specifically, crispy red potatoes tossed in smoky BBQ sauce, garlic and onion powder, and finished with fresh cilantro. These are everything a summer side should be: golden and crisp on the outside, soft on the inside, packed with flavor, and totally addictive.
I used to think of potatoes as the background singers of a meal—always there, never the star. But this recipe? It’s a headliner. Serve it with veggie burgers, tacos, grain bowls, or honestly… just grab a fork and eat them straight off the pan. No judgment here.
🥔 Ingredients (Serves 4)
For the potatoes:
1½ lbs red potatoes, halved or quartered
2 tbsp Graza sizzle olive oil
½ tsp smoked paprika
½ tsp garlic powder
½ tsp onion powder
Salt and black pepper to taste
To finish:
¼ cup BBQ sauce (use your favorite)
¼ cup fresh cilantro, chopped
Optional: lime wedges, for serving
👩🍳 Instructions
Preheat your oven to 425°F (220°C) and line a baking sheet with parchment paper.
In a large bowl, toss the potatoes with olive oil, smoked paprika, garlic powder, onion powder, salt, and pepper until well coated.
Spread the potatoes on the baking sheet in a single layer, cut side down for max crispiness.
Roast for 35–40 minutes, flipping once halfway through, until golden brown and crispy on the edges.
Remove from the oven and toss the hot potatoes with BBQ sauce until lightly glazed.
Sprinkle with chopped cilantro, add a squeeze of lime if desired, and serve immediately.
💡 Tips & Variations
Want them crispier? Make sure your potatoes are completely dry before roasting and don’t crowd the pan.
Make it spicy: Add a pinch of cayenne or chipotle powder for a little heat.
Grill option: Par-boil the potatoes for 8 minutes, then grill until crisp and charred, brushing with BBQ sauce in the last few minutes.
These potatoes are officially on summer repeat over here. They’re easy, satisfying, and kind of impossible to stop eating.
If you make them, tag me on Instagram @kellysgreenkitchen_ — I love seeing your recreations! And hey, if you eat them all straight from the pan before dinner starts… I fully support that decision.
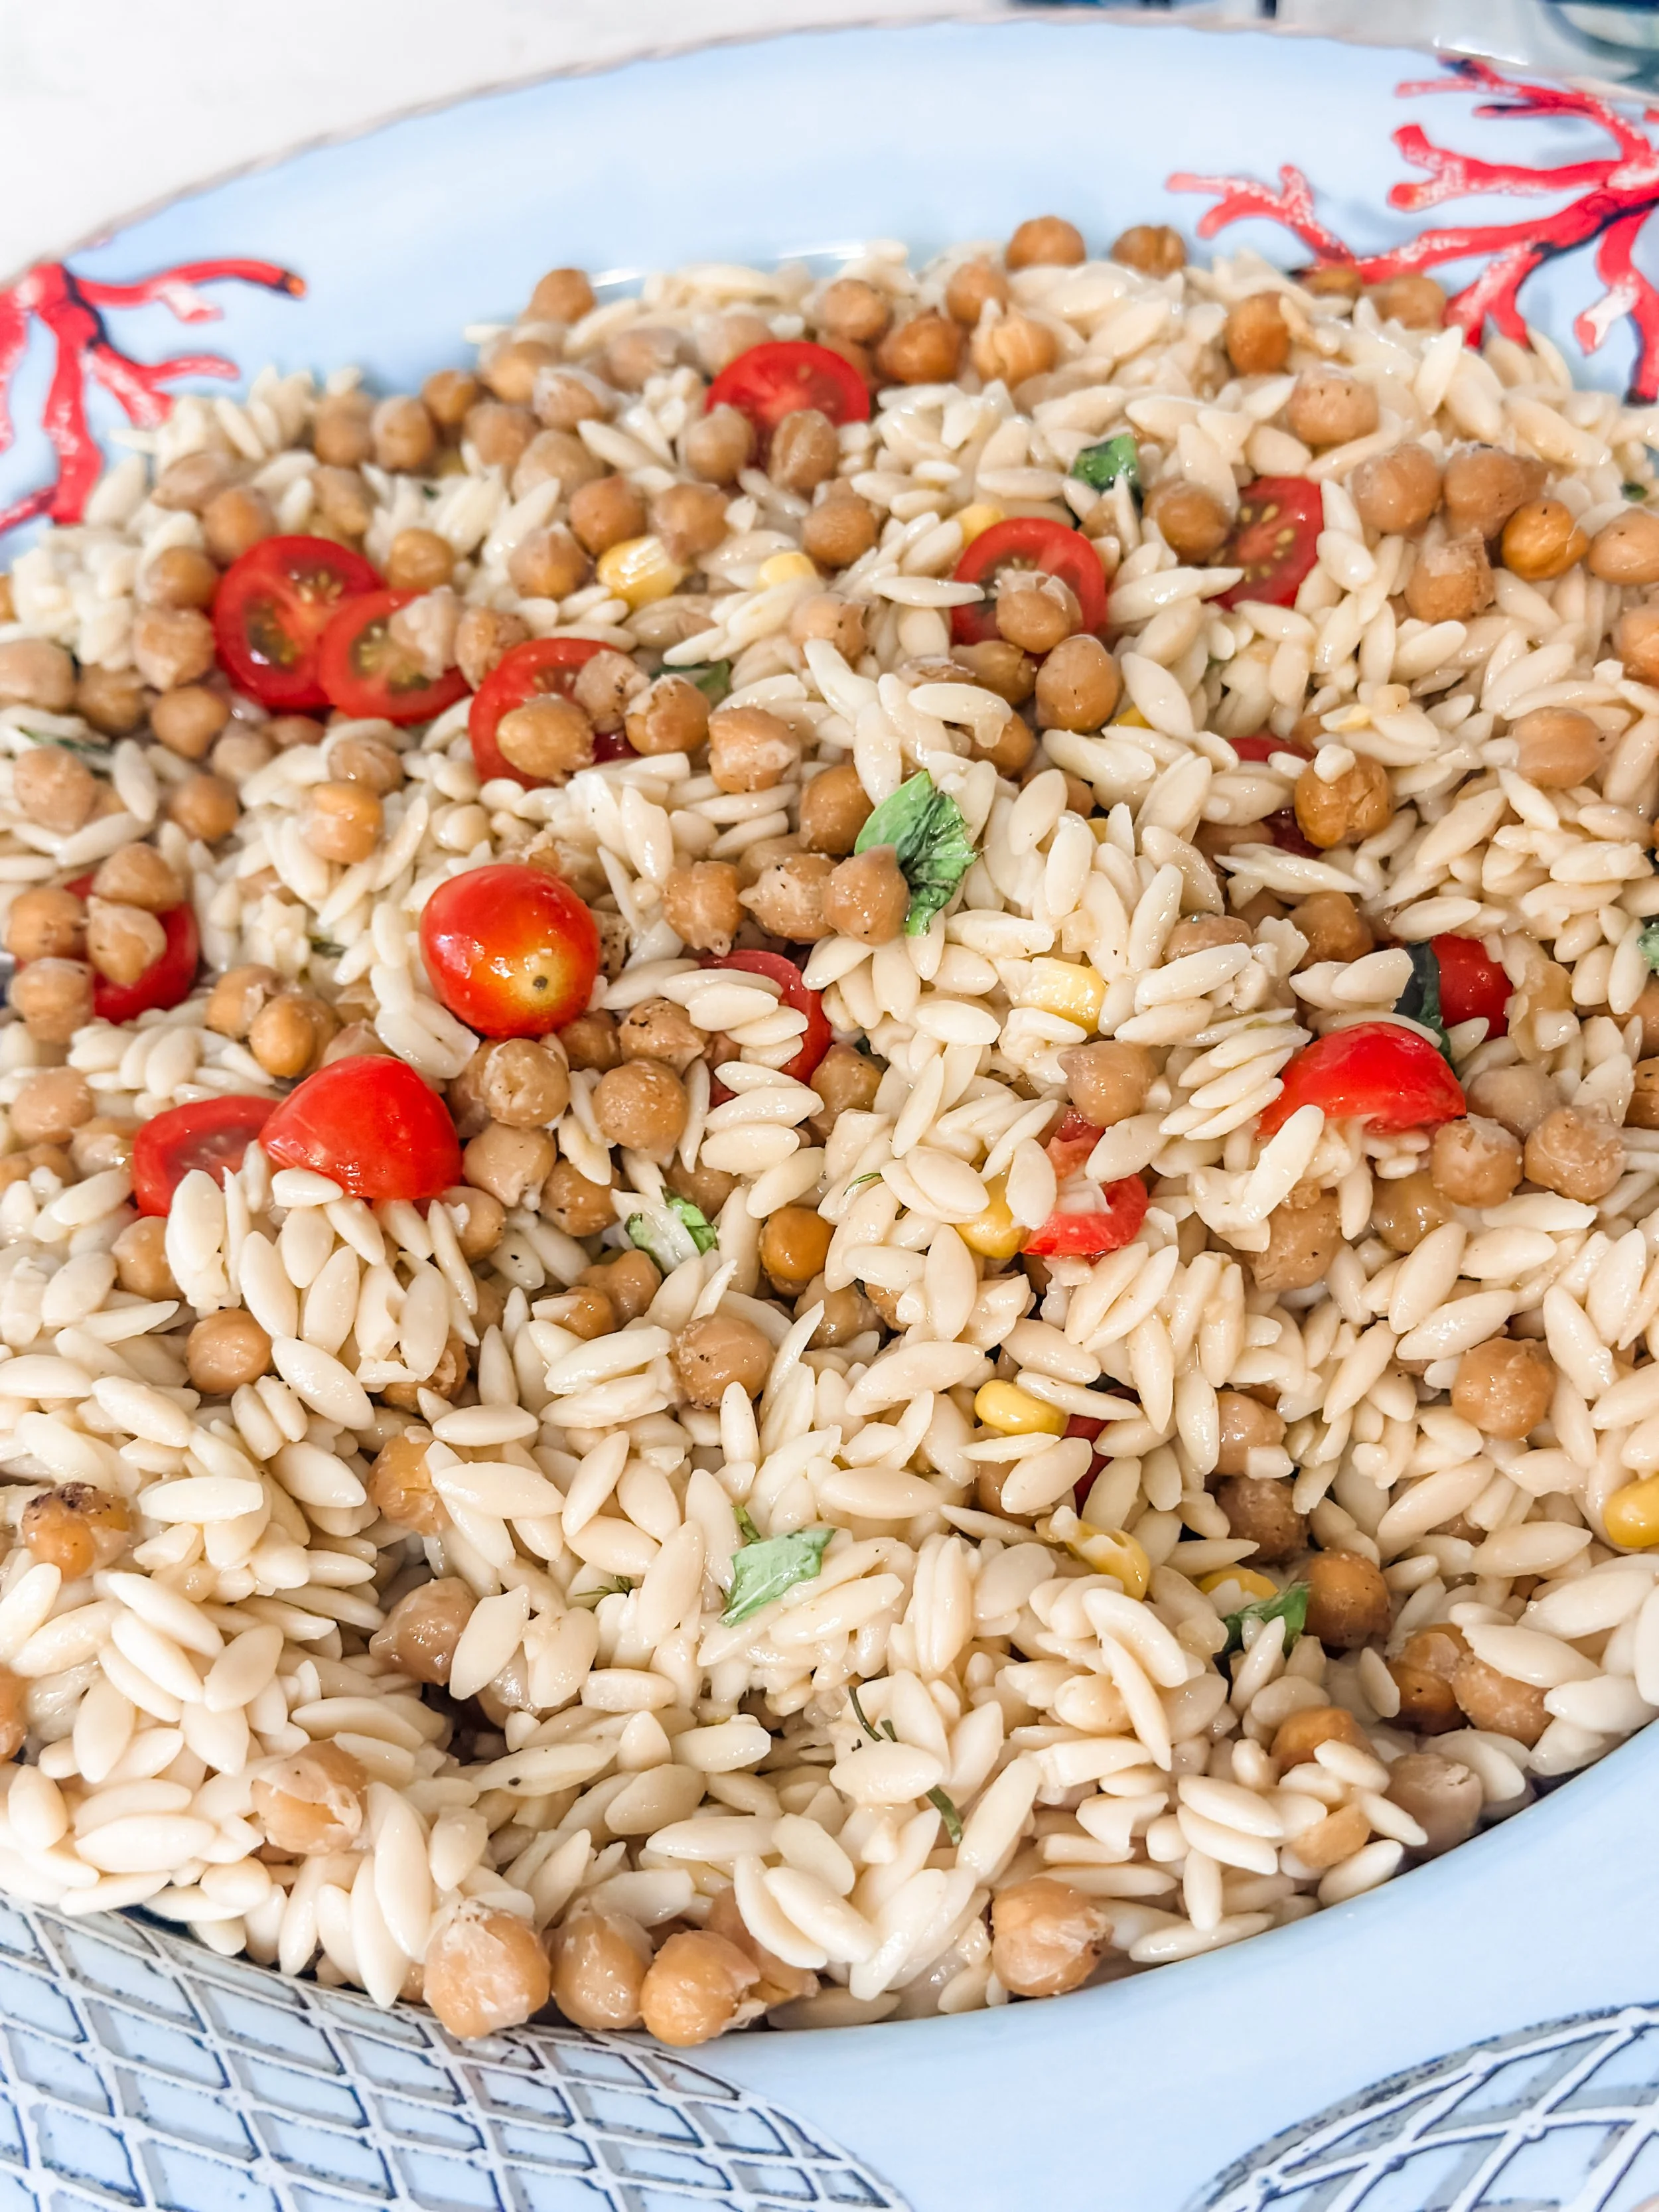
🌞 Summer Glow-Up Orzo Salad

There was always that salad at every summer cookout growing up — you know the one. Elbow macaroni, bottled dressing, maybe a rogue black olive. We didn’t question it. We just ate it (and maybe avoided the olives).
This is my grown-up version. A summer glow-up, if you will. It’s bright, lemony, packed with fresh basil and sweet corn, and topped with crispy chickpeas for the ultimate crunch. Served cold or room temp, it’s the kind of pasta salad that actually gets better as it sits — perfect for beach days, picnics, or poolside spreads with a chilled drink in hand.
📝 Ingredients
For the Salad:
1 ½ cups dry orzo (about 8 oz)
1 cup cherry tomatoes, halved
1 cup corn kernels (fresh or thawed from frozen)
½ cup crispy chickpeas (homemade or store-bought)
½ cup fresh basil, thinly sliced
Zest of ½ lemon (optional)
Salt + pepper to taste
For the Lemon Dijon Dressing:
3 tbsp olive oil
2 tbsp fresh lemon juice
1 tbsp Dijon mustard
1 tsp maple syrup (optional)
1 small garlic clove, finely grated
¼ tsp salt + cracked black pepper
👩🍳 Instructions
Cook the orzo:
Bring a pot of salted water to a boil. Add orzo and cook until al dente (about 8–10 minutes). Drain and rinse under cool water. Add to a large bowl.Make the dressing:
In a small jar or bowl, whisk (or shake) together olive oil, lemon juice, Dijon, maple syrup, garlic, salt, and pepper until well combined.Toss the base:
While the orzo is still slightly warm, toss it with half the dressing to soak up the flavor.Add the good stuff:
Stir in tomatoes, corn, basil, lemon zest, and most of the crispy chickpeas (save a few for topping).Finish and serve:
Add the rest of the dressing and toss again. Taste and adjust salt and lemon as needed. Top with remaining crispy chickpeas.Serve chilled or at room temp:
It’s perfect for picnics, beach days, and backyard BBQs.
🛍 Tips + Variations
Crispy chickpeas:
Toss drained chickpeas with olive oil, salt, pepper, and roast at 425°F for 20–25 minutes, or use your favorite brand.Make it gluten-free:
Use gluten-free orzo or a small gluten-free pasta shape.Mix up the herbs:
Try adding mint or parsley for a twist.Add protein:
Add white beans, marinated tofu, or grilled tempeh for a heartier version.
📦 Storage
Store in an airtight container in the fridge for up to 3 days. Add a squeeze of lemon or a drizzle of olive oil to refresh before serving leftovers.
💚 More Summer Favorites
This salad is light enough for lunch, satisfying enough for dinner, and pretty enough to bring to your next summer gathering. It’s one of those recipes that feels easy but impressive — and somehow tastes even better when eaten outside.
If you make it, I’d love to see! Tag me @kellysgreenkitchen_ and let me know how you served it — by the beach, on the patio, or straight from the mixing bowl (no judgment here). 💚
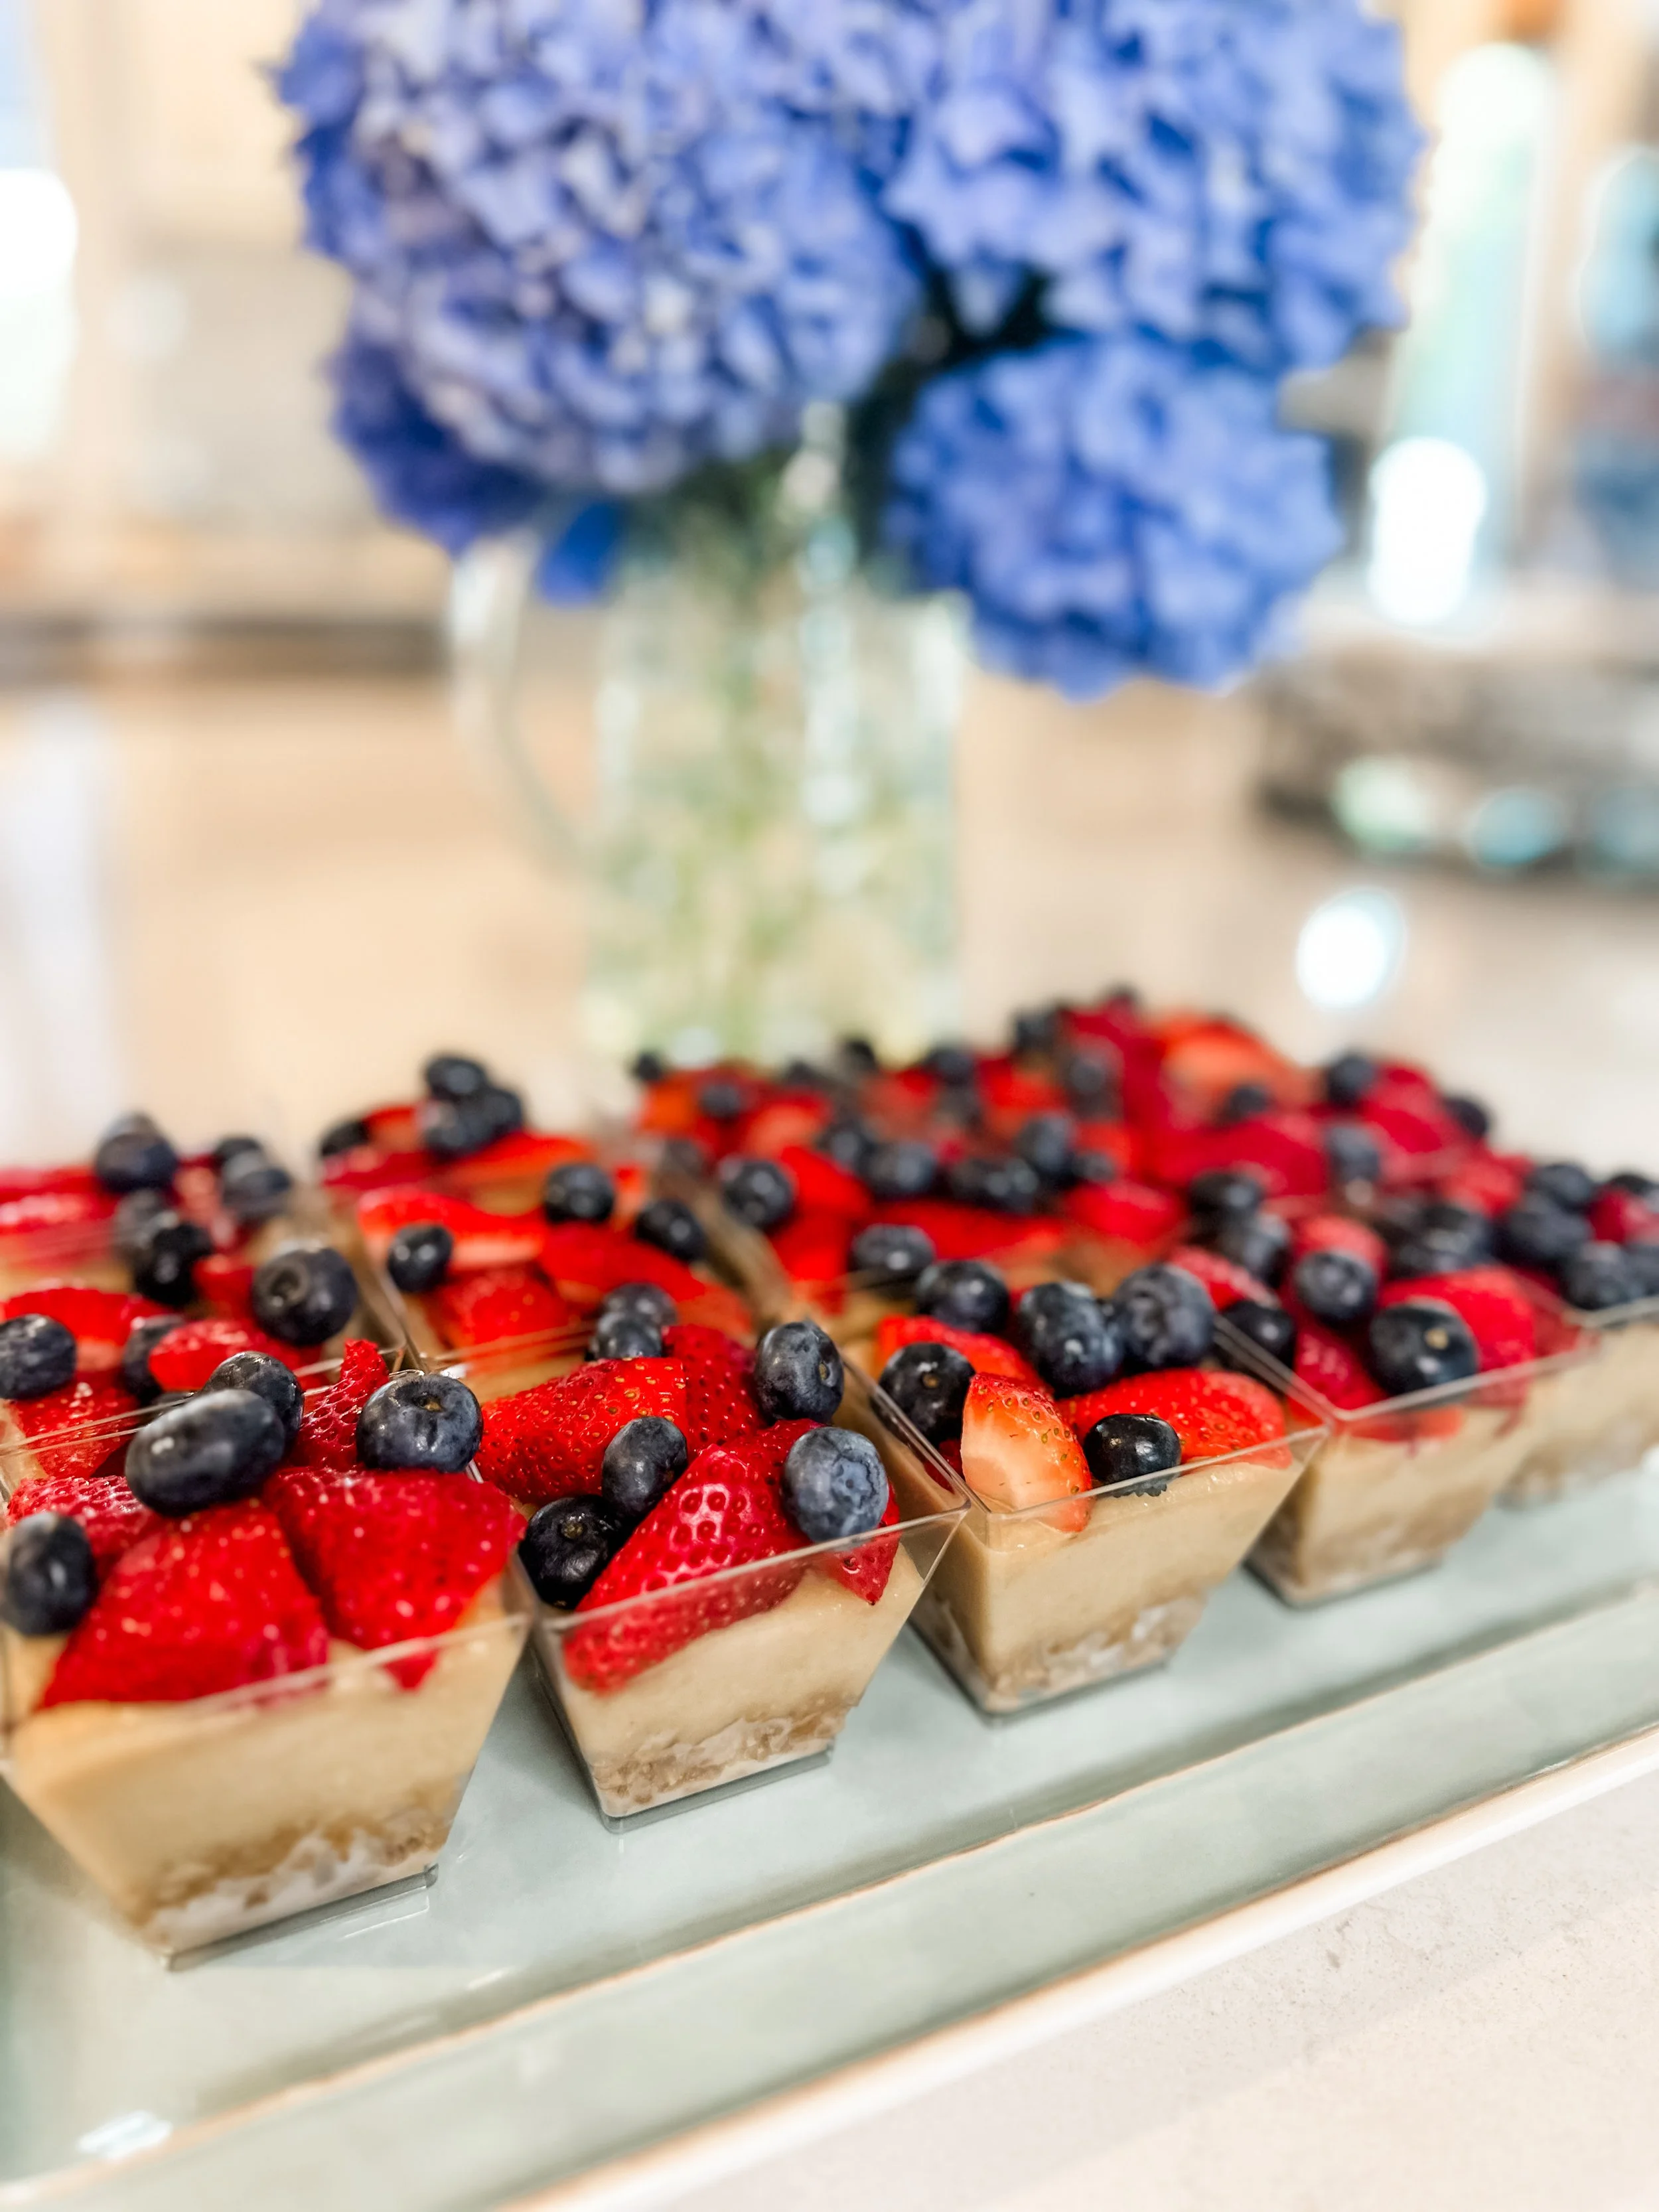
🫐 No-Bake Berry Cheesecake Cups (Vegan & Gluten-Free)

Category: Dessert | No-Bake | Summer Treats
Servings: 6–8 cups
Prep Time: 20 min • Chill Time: 2–4 hours
🌿 About This Recipe
These vegan and gluten-free cheesecake cups are a no-bake summer dream. They’re made with a buttery graham cracker crust, a creamy cashew cheesecake filling, and topped with a simple homemade strawberry compote and fresh berries. Festive enough for the 4th, but easy enough to make anytime you want something sweet, cool, and no-stress.
Perfect for prepping ahead and storing in the fridge for your next BBQ, picnic, or cozy night in.
🥞 Ingredients
For the crust:
1 cup vegan graham cracker crumbs
2 tbsp melted coconut oil or vegan butter
1 tbsp maple syrup
Pinch of salt
For the cheesecake filling:
1 cup raw cashews (soaked 4–6 hours or quick-soaked in boiling water for 15 min)
1/2 cup full-fat coconut cream (scoop from top of a chilled can)
1/4 cup maple syrup
2 tbsp lemon juice
1 tsp vanilla extract
Pinch of salt
For the strawberry topping:
1 cup chopped strawberries
1 tbsp lemon juice
1–2 tsp maple syrup (adjust to taste)
To finish:
Fresh strawberries + blueberries
Optional: lemon zest or coconut flakes
🔧 Instructions
Make the crust: Mix graham cracker crumbs, melted coconut oil, maple syrup, and a pinch of salt until it resembles wet sand. Press into the bottoms of jars or cups. Set aside.
Make the filling: Blend soaked cashews, coconut cream, maple syrup, lemon juice, vanilla, and salt in a high-speed blender until smooth. Spoon or pipe over crust.
Make the topping: In a small saucepan, cook strawberries, lemon juice, and maple syrup over medium heat for 5–7 minutes until softened and jammy. Cool slightly.
Assemble: Spoon the strawberry topping over the cheesecake layer. Add fresh strawberries and blueberries on top.
Chill: Refrigerate for at least 2 hours (or overnight) to set.
🌟 Tips & Notes
Can be made up to 2 days in advance
Use mini mason jars or small glasses for easy presentation
Great with raspberries, blackberries, or a swirl of jam if you're short on fresh berries
🌝 Closing
These berry cheesecake cups are one of my favorite summer desserts—they feel special, but come together quickly with whole-food ingredients and no baking required. If you make them, tag @kellysgreenkitchen_ so I can see your sweet creations!