

🍓Strawberry Fields Bowl with Maple Balsamic

The prettiest summer salad — sweet, herby, hearty, and 100% plant-based.
If you’re looking for a salad that feels like sunshine in a bowl, this is it. Made with fresh strawberries from Verrill Farm, fluffy quinoa, baby spinach, creamy avocado, toasted walnuts, and torn basil, it’s tossed in a maple balsamic vinaigrette that ties it all together.
It’s my go-to for picnics, poolside lunches, or any day that calls for something sweet, savory, and satisfying. And yes — I made it in the longest salad bowl I own, because this one deserves a little drama.
📝 Ingredients
For the salad:
1 cup cooked quinoa, cooled
1 heaping cup sliced fresh strawberries (I used Verrill Farm 🍓)
2 cups baby spinach
1/2 avocado, sliced or cubed
1/4 cup chopped toasted walnuts
2–3 tbsp fresh basil, torn
2–3 tbsp vegan feta (optional but delicious)
For the maple balsamic dressing:
2 tbsp balsamic vinegar
1 tbsp pure maple syrup
1 tsp Dijon mustard
2 tbsp olive oil
Salt + pepper to taste
🥣 Instructions
Make the dressing: In a small jar or bowl, whisk together balsamic vinegar, maple syrup, Dijon mustard, olive oil, salt, and pepper until smooth.
Assemble the salad: In a large bowl, combine the quinoa, strawberries, spinach, basil, walnuts, and avocado.
Dress and serve: Drizzle the maple balsamic over the salad and gently toss to coat. Sprinkle with vegan feta if using. Serve immediately or chill for 15–20 minutes to let the flavors mingle.
💚 Why You’ll Love It
Sweet and savory
Packed with fiber, healthy fats, and plant-based protein
15-minute recipe
Perfect for gatherings, meal prep, or solo lunches
Naturally vegan and gluten-free
🌿 Pro Tips:
Use local, in-season berries for the best flavor
Add chickpeas or lentils to bulk it up even more
Leftovers keep well for 1–2 days in the fridge
Follow @kellysgreenkitchen for more plant-based recipes made with fresh, seasonal ingredients and New England charm 💚

Whipped Herb “Ricotta" with Tofu & Cauliflower

A creamy, dreamy vegan spread you’ll want to put on everything.
If you’ve been looking for a dairy-free ricotta that’s rich, herby, and seriously versatile—this is it. Made with tofu and steamed cauliflower, this whipped ricotta is silky smooth and bursting with flavor from fresh herbs, lemon, garlic, and olive oil. It’s perfect as a dip, a sandwich spread, or dolloped onto roasted veggies and grain bowls.
Bonus? It’s protein-packed, totally vegan, and easy enough for a weeknight prep session.
📝 Ingredients:
1/2 block (about 7 oz) firm tofu, drained and patted dry
1 heaping cup steamed cauliflower florets
2 tbsp olive oil
2 tbsp lemon juice
1 small clove garlic
2 tbsp nutritional yeast
1/2 tsp sea salt (or to taste)
Handful of fresh herbs (basil, chives, parsley, dill — mix your faves!)
Optional: splash of plant milk for extra creaminess
🧄 Instructions:
Steam cauliflower florets until fork-tender (about 5–7 minutes). Let cool slightly.
In a food processor, combine tofu, cauliflower, olive oil, lemon juice, garlic, nutritional yeast, and salt.
Blend until smooth and creamy, scraping down sides as needed. Add a splash of plant milk if needed to loosen.
Pulse in fresh herbs just until incorporated—don’t overblend, you want those flecks of green!
Taste and adjust seasoning if needed.
🌱 How to Serve:
As a dip with crackers or veggies
On toast or crostini with cherry tomatoes and a balsamic glaze
In grain bowls or pasta dishes
As a creamy layer in wraps or sandwiches
This is one of those recipes that makes your meals feel a little more special—with minimal effort. It stores beautifully in the fridge for up to 5 days, so make a batch and thank yourself later 💚
✨ Follow @kellysgreenkitchen_ for more feel-good plant-based recipes made with seasonal, simple ingredients.

💙 Blueberry Peanut Butter Date Night Ice Cream (Vegan, No-Churn)

🍦 A Frozen Treat That Feels Cozy & Fun
Let’s set the scene: it’s warm out, you’re craving something cold and sweet, but don’t want to bake or fuss. This Blueberry Peanut Butter Date Night Ice Cream is creamy, fruity, and nostalgic—with a feel-good twist.
It’s made from frozen bananas, wild blueberries, peanut butter, and dates. That’s it.
No dairy, no refined sugar, no churning. Just blend, swirl, freeze (if you want), and enjoy.
It’s a snack, a treat, and a mood.
Add chocolate chips if you want. (I do.)
📝 Ingredients
2 ripe bananas, sliced and frozen
¾ cup frozen blueberries
1–2 Medjool dates, pitted (soaked if dry)
1 heaping tbsp natural peanut butter
2–3 tbsp plant-based milk (just enough to blend)
Optional: 2–3 tbsp vegan chocolate chips
Optional swirl: extra peanut butter or chia blueberry jam
👩🍳 Instructions
1. Blend it up
In a high-speed blender or food processor, combine frozen bananas, blueberries, dates, peanut butter, and 2 tbsp plant milk.
2. Smooth & creamy
Blend until thick and creamy, scraping down sides as needed. Add a splash more milk only if necessary.
3. Add-ins (optional but encouraged)
Stir in chocolate chips, swirl in peanut butter or chia jam if you’re feeling extra.
4. Freeze (optional)
Spoon into a parchment-lined mini loaf pan. Press parchment paper directly on top and freeze 1–2 hours for scoopable texture.
5. Serve your masterpiece
Scoop, slice, or eat it soft-serve style right away. Top with extra PB, berries, or chips.
✨ Tips & Swaps
Swap PB for almond or cashew butter
Use frozen raspberries or cherries instead of blueberries
Skip the freezing step for a soft-serve version
Store leftovers in an airtight container for up to 1 week
💬 The Last Scoop
There’s something nostalgic and a little magical about this dessert. It’s simple, satisfying, and completely plant-based—with just the right amount of indulgence.
Make it for a cozy night in. Or don’t wait for a date night—make it for yourself.
If you try it, tag me @kellysgreenkitchen_ on Instagram! I love seeing what you're blending up.

Tuscan One-Pot Farro Skillet

There’s something about one-pot meals that feel like an exhale after a busy day—minimal cleanup, maximum flavor, and somehow it always feels cozy. This Tuscan-Inspired Farro Skillet with Chickpeas checks all the boxes. It’s hearty from the farro and chickpeas, full of vibrant Mediterranean flavors, and gently wilted greens bring freshness to every bite.
Think: sun-drenched farmhouse vibes, a warm skillet on the table, and a glass of something sparkling nearby. That’s the energy of this dish.
📝 Ingredients:
1 tbsp olive oil
1 small yellow onion, thinly sliced
2 garlic cloves, minced
1 cup farro, rinsed
1 (15 oz) can chickpeas, drained and rinsed
2 ½ cups vegetable broth or water
1 heaping cup cherry tomatoes
2 cups baby spinach
1 cup arugula
½ tsp dried oregano (or Italian herbs)
¼ tsp red pepper flakes (optional)
Salt & pepper to taste
Juice of ½ lemon
½ cup vegan feta (I use Violife), crumbled
Optional garnish: fresh basil or parsley
👩🍳 Instructions:
Sauté aromatics:
In a large pot or deep skillet, heat olive oil over medium. Add onions with a pinch of salt and sauté until soft and translucent, about 5–7 minutes. Stir in garlic and red pepper flakes.Add farro, broth, and chickpeas:
Stir in rinsed farro, chickpeas, and broth. Bring to a boil, then reduce heat and simmer uncovered for about 20–25 minutes, until farro is tender and most of the liquid is absorbed.Stir in tomatoes and greens:
Add halved cherry tomatoes, spinach, and arugula. Stir until wilted, about 2–3 minutes.Finish with flavor:
Squeeze in lemon juice, season with salt and pepper, and top with crumbled vegan feta. Let sit for a couple minutes so the flavors settle.Serve and enjoy:
Spoon into shallow bowls, garnish with fresh herbs if you’d like, and serve warm.
💚 Why You'll Love It:
One pot = easy cleanup
Loaded with fiber and plant-based protein
Warm, rustic, and satisfying
Great for leftovers or meal prep
This is one of those meals that tastes even better the next day—just reheat with a splash of broth or a drizzle of olive oil. I love serving it with warm crusty bread or a scoop of herby hummus on the side. Whether you’re cooking for yourself or feeding your favorite people, this skillet brings that comforting, Tuscan-inspired magic to your kitchen with ease.
Let me know if you try it—and tag @kellysgreenkitchen_ so I can see your version!

🍓 No-Bake Strawberry Oat Crumble Bars (Vegan + Naturally Sweetened)

🕒 Prep time: 15 mins ❄️ Chill time: 2 hours
🍴 Makes: 9 bars
🌱 Vegan 🌾 Gluten-Free 🍬 Naturally Sweetened
✨ A Taste of Strawberry Season
I went to Verrill Farm the very first day the fields opened to pick strawberries — the sweetest start to summer. As soon as I got home, I knew exactly what I wanted to make: these no-bake strawberry oat crumble bars. They’ve become a favorite in our house — soft, jammy, naturally sweet, and packed with nourishing ingredients like oats, almond butter, and dates.
The crust and topping are made in the food processor, the filling comes together in one saucepan, and the fridge does the rest of the work. No oven. No refined sugar. Just fresh summer flavor and feel-good ingredients.
🛒 Ingredients
For the Crust + Crumble:
1 ½ cups rolled oats
10 Medjool dates, pitted
¼ cup almond butter
2 tbsp coconut oil, melted
1 tsp vanilla extract
Pinch of salt
For the Strawberry Filling:
1 ½ cups fresh strawberries, chopped
3 Medjool dates, chopped
1 tbsp maple syrup (optional, for extra sweetness)
1 tbsp chia seeds
1 tsp lemon juice
👩🏻🍳 Instructions
1. Make the crust & crumble
In a food processor, blend oats and dates until broken down. Add almond butter, coconut oil, vanilla, and salt. Blend until mixture holds together when pressed.
Press ¾ of the mixture into a parchment-lined 8x8 pan to form the crust. Reserve the rest for the topping.
2. Make the filling
In a small saucepan, combine chopped strawberries, dates, maple syrup, and a splash of water. Cook over medium heat, stirring often, until strawberries break down and the mixture thickens (about 8 minutes). Mash lightly with a fork.
Remove from heat and stir in chia seeds and lemon juice. Let cool for 5–10 minutes to thicken.
3. Assemble the bars
Spread the strawberry filling evenly over the crust. Crumble the remaining oat mixture on top and press lightly.
4. Chill & slice
Refrigerate for at least 2 hours (or freeze for 45 minutes) until firm. Slice into bars and enjoy!
💡 Kelly’s Notes
Store bars in the fridge for up to 5 days or freeze for up to a month.
Tree-nut allergy? Sub an oat or seed butter instead! You may need to adjust sweetness with maple syrup.
Try swapping strawberries for raspberries or a mix of berries.
Add shredded coconut or cinnamon to the crust for extra flavor.
These no-bake bars are one of those recipes you’ll want on repeat — especially when strawberry season rolls around. They’re soft, sweet, nutrient-packed, and perfect for summer snacking. Whether you're packing them for a picnic or keeping them chilled for an afternoon treat, they're a delicious way to celebrate the season's first berries.
Tag @kellysgreenkitchen_ if you make them — I’d love to see your creations! 🍓✨

🌱 Chocolate Chia Pudding with EarthChimp Protein

The make-ahead breakfast that makes busy mornings feel breezy.
Why You’ll Love It
This chia seed pudding is my go-to when I need something fast, nourishing, and actually satisfying. I mix it up the night before, and by morning I’ve got a creamy, chocolatey, protein-packed breakfast ready to go — no cooking, no stress.
It’s made with just 3 ingredients:
✔️ Chia seeds for fiber & healthy fats
✔️ Plant-based milk for creaminess
✔️ EarthChimp Chocolate Protein for 20g of clean, vegan protein (plus probiotics & digestive enzymes!)
Whether you’re headed out the door, recovering from a workout, or just need a slow start with your coffee, this pudding checks all the boxes.
🥄 Ingredients
3 tbsp chia seeds
1 cup unsweetened plant-based milk (I like oat or almond)
Optional: 1 tsp maple syrup for sweetness
Optional toppings: banana slices, peanut butter, cinnamon, cacao nibs, berries
🥣 Instructions
In a jar or container, combine chia seeds, protein powder, and plant milk. Add maple syrup if using.
Stir well (or shake with lid on!) to mix thoroughly. Let sit for 5 minutes, then stir again to prevent clumping.
Cover and refrigerate overnight (or at least 4 hours).
In the morning, top with your favorites and enjoy chilled — or warm it up if that’s your thing!
🧠 Nutrition Notes
Chia seeds are loaded with omega-3s, fiber, and antioxidants, while EarthChimp adds a major protein boost — plus it’s organic, non-GMO, gluten-free, and free from dairy or soy. It’s a clean, feel-good addition to your routine.
💚 Make It Yours
This recipe is endlessly customizable. I love:
Swirling in almond butter
Layering with strawberries
Dusting with cinnamon or cacao
Adding granola for a crunch
☀️ Take It On the Go
Pour it into a jar the night before and bring it to work, the gym, or school drop-off. It’s the definition of low-effort, high-reward.
🛒 Where to Get EarthChimp
You can find EarthChimp on Amazon! It’s been a game-changer for my mornings.
Follow @kellysgreenkitchen on Instagram for more plant-based recipes that work with your real life. 💫
Tag me if you make this one — I’d love to see your combos!

🌮 Sweet Potato & Cauliflower Tacos with Avocado Lime Slaw

🕒 Prep time: 15 mins 🔥 Cook time: 25 mins 🥗 Serves: 3–4
🌱 Vegan 🌾 Gluten-Free 💚 Meal-Prep Friendly
These tacos are everything I want in a weeknight dinner — colorful, crisp, and layered with flavor. Roasted sweet potatoes and cauliflower get caramelized and golden in the oven, then piled into warm tortillas with a dreamy avocado lime slaw that’s equal parts creamy and zippy.
They’re bright. They’re bold. And they absolutely don’t chicken out.
🛒 Ingredients
For the Roasted Veggies:
2 cups sweet potatoes, peeled and cubed
3 cups cauliflower florets
2 tbsp olive oil (or Graza “Sizzle” 🌿)
1 tsp smoked paprika
1 tsp cumin
½ tsp garlic powder
Salt & pepper to taste
For the Avocado Lime Slaw:
1 ripe avocado
2 cups shredded cabbage or coleslaw mix (mix of purple, green, carrots)
Juice of 1 lime
Chopped cilantro
1 tbsp olive oil
1 tsp maple syrup
1 tsp apple cider vinegar
Pinch of garlic powder, cumin + sea salt
To Serve:
6–8 small tortillas (corn or flour)
Extra lime wedges
Hot sauce or salsa (optional)
👩🏻🍳 Instructions
1. Roast the Veggies
Preheat oven to 425°F (220°C).
Toss sweet potato cubes and cauliflower florets with olive oil, smoked paprika, cumin, garlic powder, salt and pepper.
Spread on a baking sheet and roast for 25–30 minutes, flipping halfway, until tender and golden at the edges.
2. Make the Slaw
In a medium bowl, mash the avocado. Whisk in lime juice, olive oil, cilantro, apple cider vinegar, maple syrup, garlic powder, cumin, and salt.
Fold in shredded cabbage / coleslaw mix and mix until coated. Set aside.
3. Warm the Tortillas
Heat your tortillas in a dry skillet for 20–30 seconds on each side or wrap them in foil and warm in the oven.
4. Assemble the Tacos
Layer each tortilla with a scoop of roasted veggies, a generous spoonful of avocado lime slaw, and a squeeze of lime. Add hot sauce if you like a little heat.
🌿 Make It Yours:
Add crispy chickpeas or black beans for extra protein.
Toss in pickled onions or radishes for crunch.
Swap slaw for guac if you’re short on cabbage.
These tacos are a total crowd-pleaser — cozy enough for a solo night in, but fun and flavorful enough to serve to friends. I love them with a fizzy lime seltzer or iced hibiscus tea on the side.
Tag @kellysgreenkitchen_ if you make them — I’d love to see your take! 🌮💚

🌿 Seedy Almond Crackers

Crispy, herby, and packed with nutritious seeds—your new favorite homemade snack.
🕒 Prep Time: 10 min
⏲️ Bake Time: 25–30 min
🥣 Makes ~30 small crackers
🌱 Vegan | Gluten-Free | Low Carb
If you’ve been around here long enough, you know I’m a self-proclaimed crackeraholic. I’m always hunting for that perfect crunch—one that’s savory, satisfying, and not full of mystery ingredients I can’t pronounce.
Enter: these Seedy Almond Flour Crackers.
They’re everything I want in a snack—crispy, herby, packed with real ingredients like flax, chia, sesame, and almond flour... and finished with a generous sprinkle of everything bagel seasoning. They’re dangerously easy to make, cost a fraction of store-bought versions, and might just be your new favorite thing to dip in hummus.
📝 Ingredients:
1 ½ cups almond flour
2 tbsp ground flaxseed
2 tbsp chia seeds
2 tbsp sesame seeds
1 tbsp sunflower or pumpkin seeds (optional)
1 tbsp nutritional yeast (optional, for savory flavor)
1 tbsp Everything Bagel seasoning
1 tsp dried herbs (Herbes de Provence, rosemary, or thyme work great)
½ tsp garlic powder (optional)
½ tsp salt
2 tbsp olive oil
3–4 tbsp water (start with 3, add more as needed)
👩🍳 Instructions:
Preheat oven to 325°F (160°C). Line a baking sheet with parchment paper.
Mix the dry ingredients in a large bowl: almond flour, seeds, herbs, and seasonings.
Add olive oil and water and stir until a dough forms. It should hold together but not be sticky—add another splash of water if too crumbly.
Roll the dough between two sheets of parchment paper until very thin (about 1/8”). Remove the top sheet and use a knife or pizza cutter to score into cracker-sized pieces.
Bake for 25–30 minutes, or until golden and crisp. Rotate the pan halfway for even browning. Let cool completely before breaking apart.
Store in an airtight container for up to a week (if they last that long!).
💬 Kelly’s Notes:
Add a pinch of smoked paprika or cracked black pepper for extra flavor.
Perfect with hummus, vegan cheese, or on a cozy soup-and-crackers kind of day.
For even crispier crackers, leave in the oven (turned off) for 10 extra minutes to fully dry.
Whether you’re building a snack board, packing lunch, or just looking for something crunchy to nibble on while you work (guilty), these crackers deliver. They’re endlessly customizable, gluten-free, and so simple, you’ll wonder why you ever paid $8 for a box.
Let me know if you make them—tag @kellysgreenkitchen so I can see your cracker creations. And yes… I fully support doubling the batch.

🥗 Sesame Tofu Crunch Bowl

There’s just something about a bowl that checks every box—crunchy, creamy, fresh, and filling. This Sesame Tofu Crunch Bowl is all that and then some.
It starts with crispy golden tofu, layered over cool, crisp veggies like cabbage, cucumbers, and sweet bell peppers. Then it gets drizzled in a Golden Sesame Dressing that’s nutty, bright, and packed with fresh herbs (and yes—you’ll want to pour it on everything). Serve it over rice or soba noodles and suddenly, lunch feels like something you actually look forward to.
It’s colorful. It’s customizable. And it’s completely plant-based.
📝 Ingredients:
1 block firm or extra firm tofu, pressed and cubed
2 cups shredded cabbage (purple, green, or both)
1 cucumber, thinly sliced or ribboned
1 bell pepper, thinly sliced (any color)
¼ cup chopped fresh cilantro or parsley
2 tbsp sesame seeds (toasted if possible)
1 green onion, sliced (optional)
Cooked rice, soba noodles, or lettuce leaves (optional base)
🌟 Golden Sesame Drizzle:
2 tbsp tahini or toasted sesame oil
1 tbsp soy sauce or tamari
1 tbsp rice vinegar
1 tsp maple syrup or agave
1 tsp grated ginger
1 small garlic clove, minced
Water to thin as needed
Optional: stir in 1 tbsp finely chopped cilantro or parsley for extra flavor
👩🍳 Instructions:
Crisp the tofu:
Pan-fry or air-fry tofu cubes until golden and crispy on the outside. Season lightly.Make the dressing:
Whisk all ingredients together until smooth and pourable. Stir in chopped herbs if desired.Assemble the bowl:
In a large bowl or over your base, layer cabbage, cucumber, bell pepper, tofu, and green onion.Drizzle & top:
Pour Golden Sesame Drizzle over everything. Sprinkle with sesame seeds and extra herbs.
💬 Kelly’s Notes:
Use extra-firm tofu for the best crispy texture. Press it well before cooking!
The Golden Sesame Drizzle keeps well in the fridge—double it and use it on roasted veggies, grain bowls, or salads all week.
Sliced avocado makes a dreamy addition—especially if you're skipping the rice or noodles. It adds that creamy richness that ties it all together.
Want heat? Add a drizzle of chili crisp or a pinch of red pepper flakes to the dressing.
This bowl is best served fresh, but leftovers keep well if you store the dressing separately.
This is one of those meals that’s as easy to prep as it is to crave. Whether you build it fresh for dinner or meal-prep it for the week, it’s the kind of bowl that keeps you full and inspired.
If you make it, tag @kellysgreenkitchen so I can see your creations! And if you haven’t already, sign up for my newsletter for more weekly recipes like this.

The Creamiest Hummus Ever

🕒 Prep Time: 10 minutes + 15 minutes boiling
🌱 Vegan | Gluten-Free | Oil-Optional
🥣 Makes ~1½ cups
Let’s talk hummus.
Store-bought is fine in a pinch, but it’s rarely creamy enough. The texture is usually dense, the flavor a little flat, and the ingredient list longer than it needs to be.
This homemade version?
Light, lemony, ultra-smooth—and shockingly easy once you know the trick. The secret is boiling the chickpeas with a little baking soda before blending. It softens them up, loosens the skins, and makes the whole thing beautifully fluffy without needing tons of oil.
I fold in fresh parsley at the end for a springy pop of color and flavor, but this hummus is endlessly customizable. Whether you scoop it onto toast, swirl it into a grain bowl, or serve it with crackers at your next gathering—it never lasts long around here.
🧾 Ingredients:
1 (15 oz) can chickpeas, drained and rinsed
½ tsp baking soda
¼ cup tahini
2–3 tbsp fresh lemon juice (to taste)
1 small garlic clove
¼ tsp ground cumin
Salt to taste
2–4 tbsp ice-cold water
2 tbsp fresh parsley, finely chopped (plus more for garnish)
Optional: 1 tbsp olive oil (for drizzling)
Optional: pinch of paprika or za’atar to top
👩🍳 Instructions:
Boil the chickpeas:
Place chickpeas in a pot with baking soda. Cover with water and bring to a boil. Simmer for 10–15 minutes, or until chickpeas are soft and skins begin to float. Drain and rinse under cold water.Blend:
In a food processor, combine warm chickpeas, tahini, lemon juice, garlic, cumin, and salt. Blend until very smooth, scraping down the sides as needed.Add water:
With the motor running, slowly drizzle in ice-cold water, 1 tbsp at a time, until the hummus is silky, fluffy, and spreadable.Stir in parsley:
Fold in chopped parsley or pulse just until incorporated for a green-speckled finish.Serve:
Spoon into a shallow bowl, swirl with the back of a spoon, and top with a drizzle of olive oil, a sprinkle of paprika or za’atar, and more parsley.
💬 Kelly’s Notes:
Warm + peeled chickpeas = magic. Boiling with baking soda loosens the skins and gives you that dreamy texture without peeling by hand.
Tahini quality matters. Use a good, runny tahini for the best flavor.
Make it your own: Add roasted garlic, swap in cilantro, or stir in harissa for a spicy version.
Leftovers? Store in the fridge in an airtight container for up to 5 days. It’s great cold!
🌿 Why Homemade Is Better:
Homemade hummus skips the fillers, preservatives, and overly dense texture of store-bought versions. You control the flavor, freshness, and texture—and honestly, once you try this version, the tub at the store just won’t hit the same.
I love having a batch of this hummus in the fridge at all times. It makes everything—wraps, grain bowls, snack boards—feel a little more complete (and a lot more delicious).
If you make it, don’t forget to tag me @kellysgreenkitchen—I love seeing your versions! And if you haven’t already, sign up for my newsletter for more weekly recipes like this.

🌿 Herb Garden Rice (Lemony Basil Rice with Asparagus & Dill)

🕒 Ready in 25 minutes
🥣 Serves 4
🌱 Vegan, gluten-free
This is the kind of dish that feels like spring in a bowl—fresh herbs, bright lemon, tender asparagus, and soft, fluffy rice that somehow works warm or at room temp. I call it Herb Garden Rice because that’s exactly the vibe: breezy, green, and full of flavor like you just stepped outside and snipped everything from your backyard.
It’s perfect for dinner parties, summer picnics, or weekday meal prep, and the pine nuts add just the right buttery crunch. You can keep it simple, or add cherry tomatoes and arugula for an extra pop of color and texture.
📝 Ingredients:
Base:
1 cup long grain white or jasmine rice
1¾ cups water or vegetable broth
1 tbsp olive oil
1 yellow onion, thinly sliced
3 cloves garlic, minced
1 bunch asparagus, trimmed and chopped into 1” pieces
Zest + juice of 1 lemon
¼ cup fresh basil, chopped
2 tbsp fresh dill, chopped
¼ cup toasted pine nuts
Salt & pepper to taste
Optional Add-Ins:
1 cup halved cherry tomatoes
1 handful arugula
👩🍳 Instructions:
Cook the rice: In a saucepan, bring water or broth to a boil. Stir in rice, reduce heat, cover, and simmer for 15 minutes or until liquid is absorbed. Let sit covered for 5 minutes, then fluff with a fork.
Sauté the aromatics: In a skillet, heat olive oil over medium. Add onions and garlic; sauté until soft and fragrant, about 3–4 minutes.
Cook the asparagus: Add chopped asparagus to the pan. Cook for another 4–5 minutes, until tender but still vibrant green.
Combine: In a large bowl, mix the cooked rice, sautéed asparagus mixture, lemon zest and juice, chopped basil, dill, and pine nuts. Season generously with salt and pepper.
Optional add-ins: If using, fold in cherry tomatoes and arugula just before serving.
Serve: Warm or at room temperature. Finish with a drizzle of olive oil or a pinch of flaky sea salt, if desired.
💬 Kelly’s Notes:
Toast your pine nuts in a dry pan for 2–3 minutes until golden—it makes a huge difference.
For even more protein, stir in chickpeas or white beans.
This makes a dreamy lunch topped with sliced avocado or tucked into lettuce cups.
Keeps well in the fridge for 2–3 days (the flavor gets even better the next day!).
Whether you’re prepping for a picnic, hosting friends, or just craving something bright and nourishing, this Herb Garden Rice is a go-to. It’s simple, elegant, and endlessly customizable—exactly the kind of dish I love to have on hand all spring and summer long.
✨ Tag @Kellysgreenkitchen_ if you make this and let me know how it turned out!

Banana Tahini Blondies (Vegan, Gluten-free)

Rich, fudgy, and naturally sweetened—these banana blondies are the perfect way to use up ripe bananas and feel like dessert without the sugar crash.
I don’t know about you, but when my kids ask to get bananas… we always end up with a couple that go brown on the counter before anyone eats them. So, instead of tossing them, I turn them into something everyone actually wants—like these vegan banana tahini blondies.
They're gooey, just sweet enough, and packed with ingredients I feel good about: tahini for healthy fats, coconut flour for fiber, and flax for an extra boost. One bowl, no mixer, and they freeze beautifully (if you somehow have leftovers).
🌿 Ingredients:
2 ripe bananas, mashed
½ cup tahini
¼ cup maple syrup
1 tsp vanilla extract
¼ cup coconut flour
½ tsp baking soda
¼ tsp sea salt
½ cup vegan chocolate chunks or chips
Optional: 1 tbsp ground flax for added fiber and texture
🍽️ Instructions:
Preheat oven to 350°F (175°C). Line a loaf pan or 8x8 pan with parchment paper.
In a bowl, mix mashed bananas, tahini, maple syrup, and vanilla until smooth.
Add coconut flour, baking soda, sea salt (and flax if using). Stir until well combined — the batter will be thick!
Fold in chocolate chunks.
Spread into pan evenly and top with a few more chocolate chunks.
Bake for 20–24 minutes, until golden around the edges and just set in the center.
Let cool completely before slicing for the perfect texture!
✨ Kelly’s Notes:
Coconut flour absorbs a lot of moisture, so don’t substitute 1:1 with almond or oat flour.
Want a stronger banana flavor? Add a pinch of cinnamon or a dash of banana extract.
Store in the fridge for a firm texture or microwave for a gooey treat.
✨ Tag @Kellysgreenkitchen_ if you make this and let me know how it turned out!

Vegan Mushroom Stroganoff with Creamy Polenta

There’s something about a creamy mushroom dish that just feels like a hug in a bowl. This plant-based stroganoff is full of earthy baby bella mushrooms, garlic, and thyme, simmered in a silky sauce that’s rich without the heaviness. Served over soft, creamy polenta—it’s the kind of meal that feels fancy but comes together in under 30 minutes.
Whether you’re feeding guests or just craving something cozy, this one’s a go-to.
🍄 Ingredients (Serves 4):
For the Stroganoff:
1 tbsp olive oil
1 small yellow onion, finely chopped
3 cloves garlic, minced
16 oz baby bella mushrooms, sliced
1 tbsp tamari or soy sauce
1 tbsp Dijon mustard
1 tsp thyme (fresh or dried)
½ tsp smoked paprika
¾ cup vegetable broth
½ cup plant-based cream (or full-fat coconut milk)
Salt & pepper to taste
Fresh parsley, for garnish
For the Creamy Polenta:
1 cup quick-cooking polenta
4 cups water or unsweetened plant milk (I do 2 cups water, 2 cups almond or coconut milk)
1 tbsp olive oil or vegan butter
Salt to taste
Optional: 2 tbsp nutritional yeast or vegan parmesan for cheesy flavor
👩🍳 Instructions:
Sauté the veggies: In a skillet, heat olive oil over medium heat. Add onion and garlic, cook until soft.
Cook mushrooms: Add mushrooms, tamari, mustard, thyme, and paprika. Sauté until browned and reduced.
Make it creamy: Slowly add broth and plant-based cream, whisking to avoid lumps. Simmer until thickened. Season to taste.
Cook polenta: In a pot, bring water/milk to boil. Whisk in polenta and reduce heat. Stir until creamy (about 5 minutes). Stir in olive oil, salt, and optional cheese or nutritional yeast.
Assemble: Spoon polenta into bowls. Top with mushroom stroganoff. Garnish with parsley and a drizzle of olive oil.
💚 Kelly’s Notes
If you're on the fence about mushrooms—try slicing them thinner and cooking them until deeply golden. It brings out their rich, almost meaty umami flavor.
Don’t skip the thyme! It adds that cozy, slow-simmered vibe even when dinner's on the table in under 30 minutes.
Polenta tip: Stir constantly at first and finish with a swirl of olive oil or vegan butter for peak creaminess.
Want to impress guests? A sprinkle of fresh parsley and flaky salt at the end makes it feel restaurant-worthy ✨
This is the kind of meal that will convert mushroom skeptics and transform a casual dinner into a full-on moment. Cozy, creamy, plant-based perfection.
✨ Tag @Kellysgreenkitchen_ if you make this and let me know how it turned out!

Summer in a Bowl

This bowl is everything I want to eat in the summer—juicy tomatoes, crunchy cucumbers, tender chickpeas, and hearty farro. It’s bright, fresh, and endlessly satisfying, with a simple lemon-olive oil dressing that brings it all together.
🛒Ingredients
🌿For the bowl:
1 cup cooked farro (or quinoa for gluten-free)
1 cup canned chickpeas, drained and rinsed
1 cup cherry tomatoes, halved
1 cup diced cucumber
¼ cup chopped red onion or scallions
¼ cup chopped parsley
¼ cup chopped mint
Juice of 1 lemon
2 tbsp olive oil
Salt and pepper to taste
For the Lemon Garlic Dressing:
2 tbsp olive oil
Juice of 1 lemon
1 garlic clove, minced
1 tsp Dijon mustard
1 tbsp maple syrup or agave
Salt and pepper to taste
✨Instructions:
In a large bowl, combine farro, chickpeas, tomatoes, cucumber, red onion, parsley and mint.
Drizzle with lemon garlic dressing.
Season with salt and pepper, then toss to combine.
Serve chilled or at room temperature—ideal for meal prep, picnics, or lunch on a sunny porch. It’s fresh, feel-good food that tastes like summer.
Tag @kellysgreenkitchen_ if you make it!
P.S. We were so excited to see @followyourheart comment on our Memorial Day reel—thank you for the love! 💚

Memorial Day BBQ
Celebrate the season with this plant-powered Memorial Day BBQ menu! These easy, vibrant dishes are perfect for a crowd—and entirely vegan.

🥔 Crispy Smashed Potato Salad
A crowd-pleasing BBQ side that’s crispy on the outside, tender on the inside, and tossed with fresh herbs, lemon, and scallions for a zesty finish.

Ingredients:
1½ lbs baby yellow potatoes
2 tbsp olive oil (I use Graza sizzle to roast the potatoes)
1 tsp garlic powder
Sea salt and pepper
¼ cup chopped scallions
2 tbsp chopped shallots
2 tbsp chopped dill
2 tbsp chopped chives
Zest of 1 lemon
Juice of ½ lemon
Optional: drizzle of tahini or vegan sour cream
Instructions:
Boil potatoes in salted water until fork-tender, about 15 minutes.
Let cool slightly, then smash gently with a glass on a lined baking sheet.
Drizzle with olive oil, sprinkle with garlic powder, salt, and pepper.
Roast at 425°F for 25–30 minutes until golden and crispy.
Once cooled, top with shallots, scallions, herbs, lemon zest, and juice. Top with an optional drizzle.
🍋Lemon Orzo Pasta Salad with Basil & Mint
This pasta salad is bright, lemony and dressed with basil and mint. Add crumbled vegan feta if you desire — it’s perfect for warm weather barbecues and family gatherings.

Ingredients:
1½ cups dry orzo (gluten-free if needed)
1 cup cherry tomatoes, halved
½ cup Follow Your Heart vegan feta crumbles
⅓ cup chopped fresh basil
2 tbsp chopped fresh mint
2 tbsp chopped shallots
For the lemon-herb dressing: 3 tbsp olive oil (I use Graza drizzle for dressings), juice and zest of 1 lemon,1 tsp Dijon mustard, 1 tsp white or red wine vinegar, 1 tsp minced garlic, 1/4 tsp sea salt and cracked black pepper
Instructions:
Cook orzo according to package instructions, then rinse and let cool.
In a large bowl, combine orzo, tomatoes, feta, herbs and shallots.
Drizzle with lemon-herb dressing and add crumbled feta just before serving. Season with salt and pepper and enjoy!
🥗 Couscous Crunch Salad
This salad is light, lemony, and packed with crunch from fresh veggies and chickpeas. Bonus: it's easy to make gluten-free with quinoa!

Ingredients:
1 cup dry couscous (or quinoa for gluten-free)
1 cup boiling water
1 cup canned chickpeas, drained and rinsed
For the roasted chickpeas - 1tbsp olive oil, 1 tsp each of paprika, garlic powder and onion powder
1 cup diced cucumber
½ cup chopped red and yellow bell peppers for color
¼ cup chopped parsley
For dressing: 1/2 cup olive oil (I use Graza drizzle for dressings), 2 tsp Dijon mustard, juice of 1 lemon, 1 tsp minced garlic, 1 tsp dried oregano, salt and pepper.
Salt and pepper to taste
Instructions:
Cook couscous according to package instructions. Once cooked, fluff with a fork and let it cool slightly.
Make Crispy Chickpeas: Preheat oven to 400°F. Toss chickpeas with olive oil, salt and paprika if using. Roast for 20-24 minutes until golden and crisp, shaking halfway through.
In a large bowl, combine couscous, cucumbers, bell peppers, red onion and herbs.
Drizzle the dressing and season with salt and pepper. Add crispy chickpeas just before serving and toss to combine!
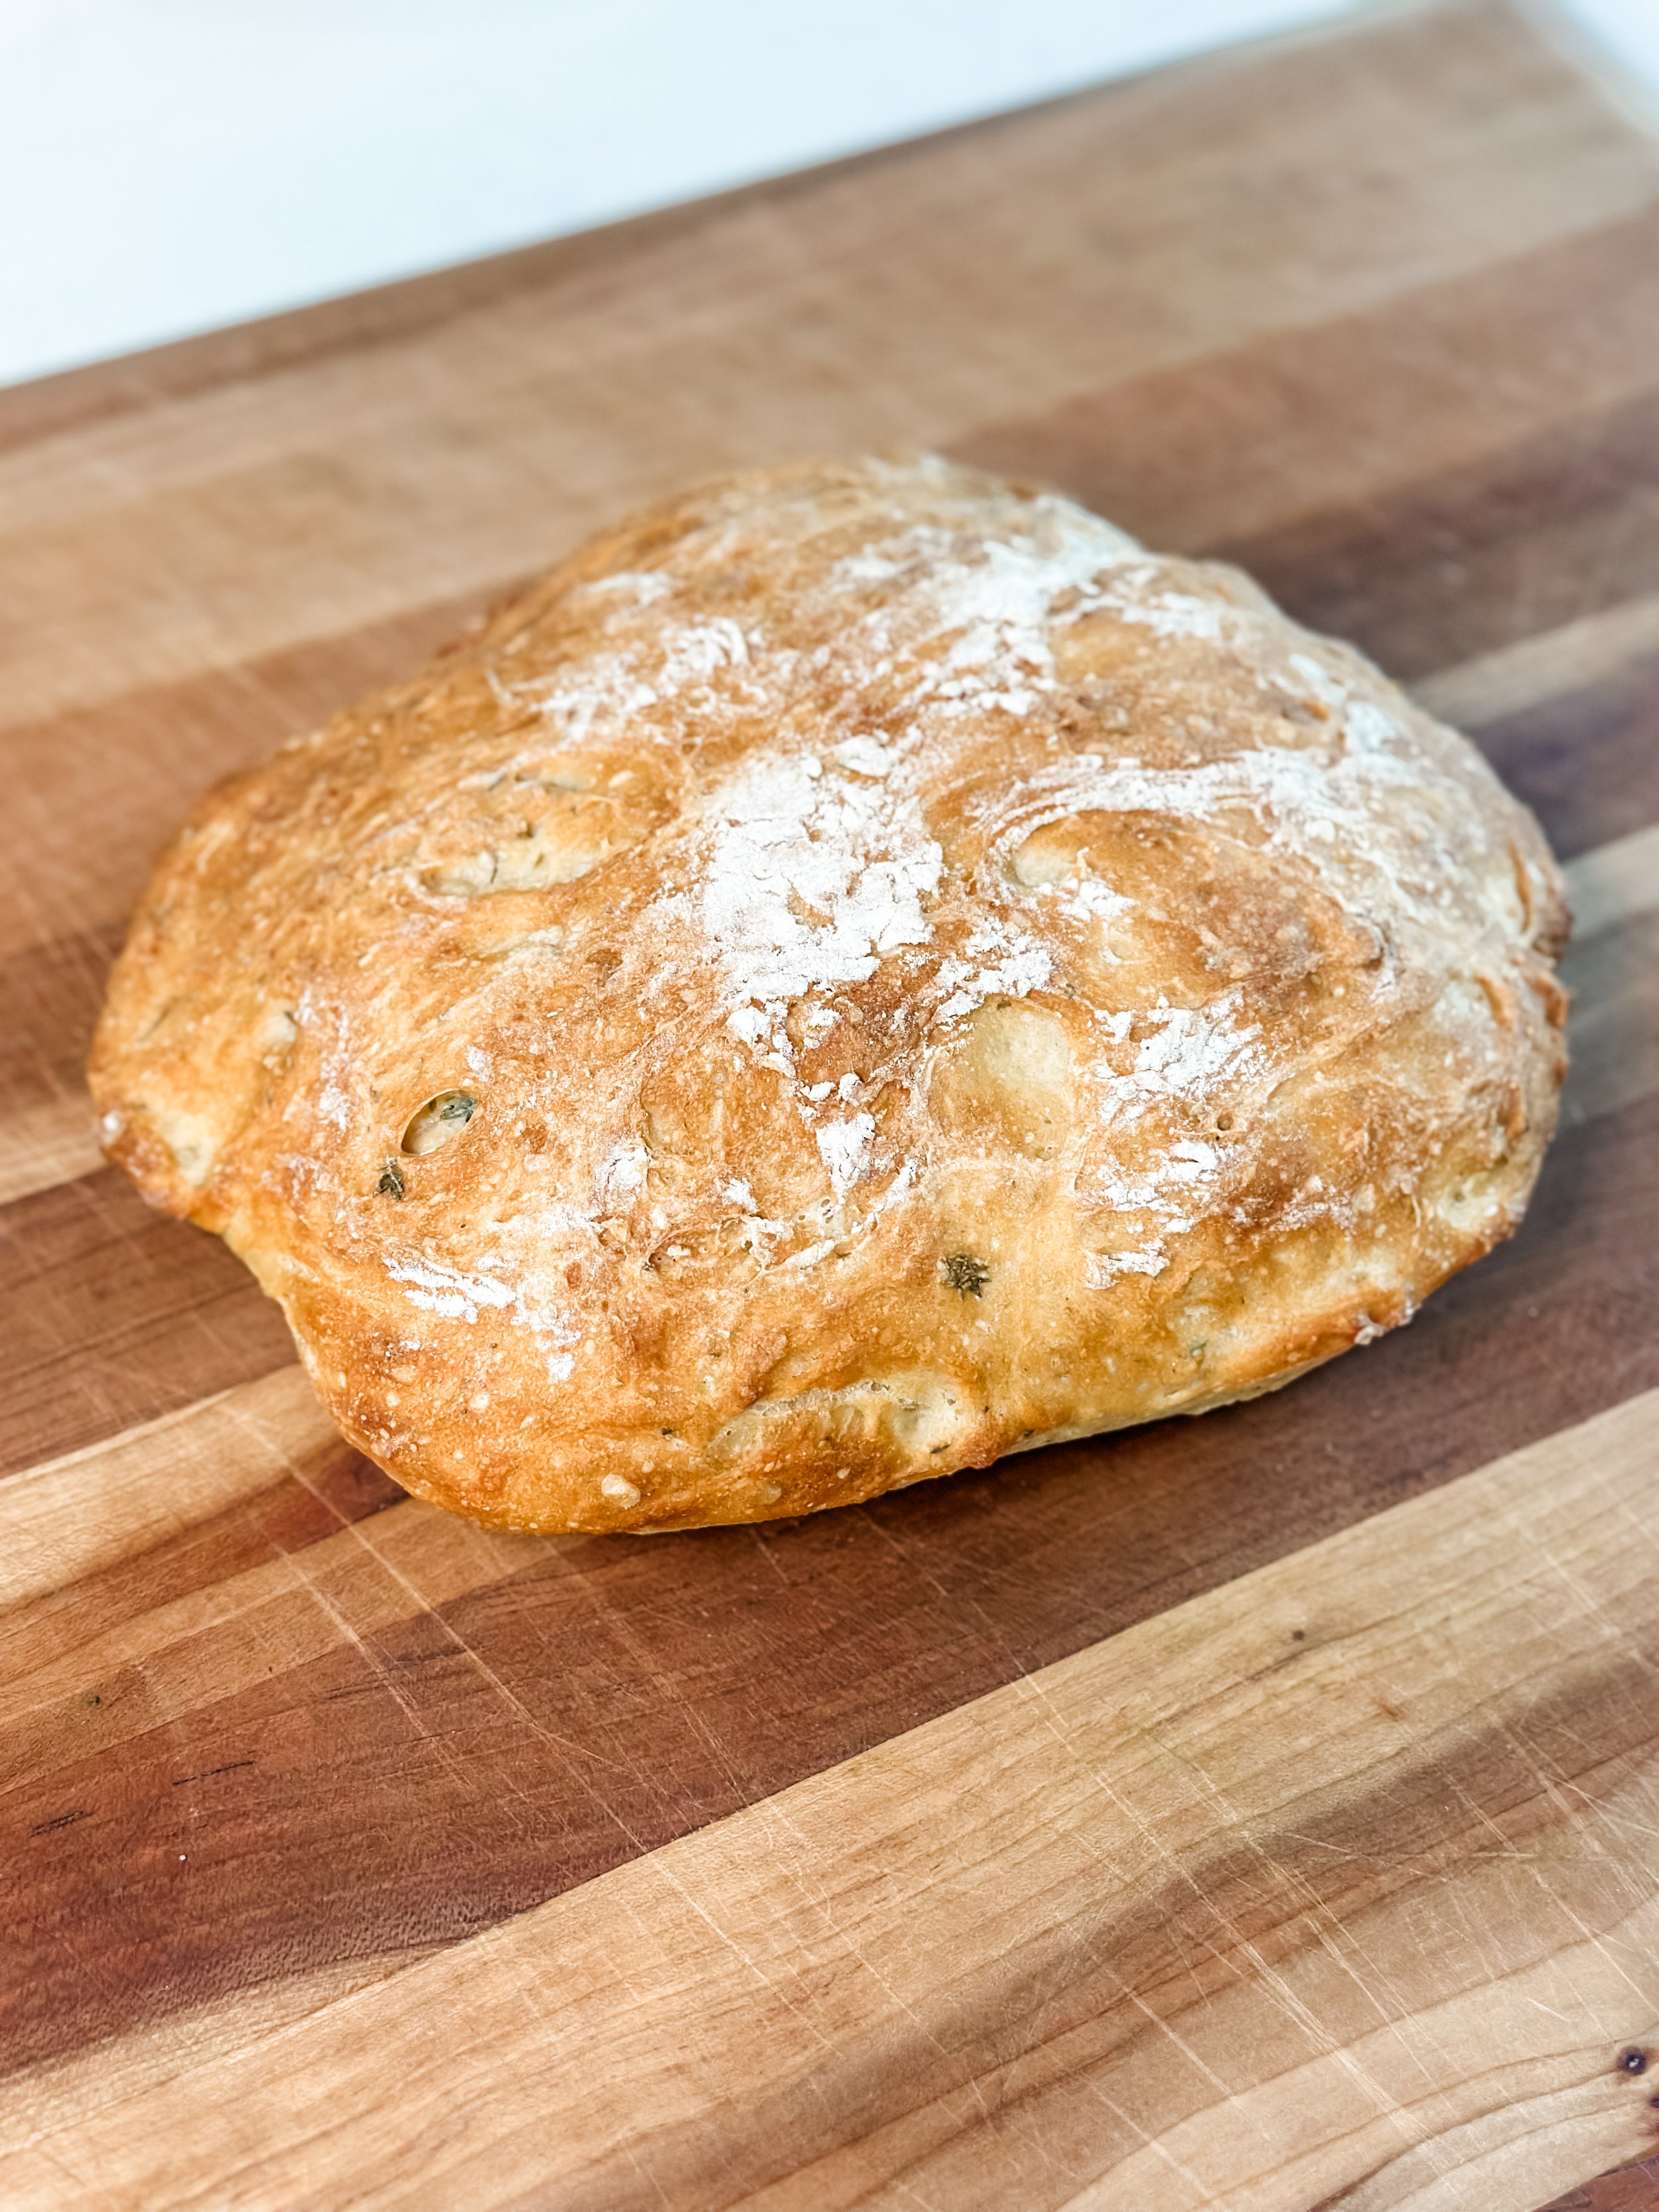
🍞 Homemade No-Knead Garlic & Herb Bread
A soft and savory loaf baked with fresh herbs—ideal for soaking up dressings or pairing with delicious roasted veggies.
Ingredients:
3 cups bread flour or all-purpose flour
2 tsp instant yeast
2 tsp kosher salt
2 tbsp chopped fresh herbs (thyme, parsley, rosemary)
1 tbsp garlic powder
1 cup warm water (not hot)
Instructions:
In a large bowl, mix flour, yeast, salt, herbs and garlic powder.
Stir in warm water until a sticky, soft dough forms. The key is that you want it to be sticky, but not runny like cake batter. If too dry, add more water. If too runny, add more flour. You may need to play around with it a bit!
Cover the bowl with a damp towel and let it rise for 3 hours.
After 3 hours, it should have doubled in size and should feel a bit wobbly when you touch it. It’s ready to bake!
Preheat the oven to 450°F. If you’re using a dutch oven, put it in with the lid on and preheat for 30 minutes prior to baking. (If you don’t have a dutch oven, disregard.)
Scrape out the dough onto a floured surface. Sprinkle top with 1/2 tbsp of flour.
Using a dough scraper, fold the sides inwards (about 6 folds) to roughly form a roundish shape. It doesn’t need to be molded or perfect!
Transfer dough onto a sheet of parchment paper and flip the dough upside down onto the paper (seam side down, smooth side up).
If you are using a dutch oven, remove it from the oven. Use paper to place the dough into the pot, place lid on. Bake for 30 minutes covered and then 12 minutes uncovered or until deep golden and crispy. If no dutch oven, skip to the next step.
If you aren’t using a dutch oven, here’s my simple method: Boil 2 cups of water on the stove. Once the water is boiling and the oven is preheated, pour boiling water into a metal pan. Take the dough on the parchment paper and place onto a baking sheet. Working quickly, place the bread on the top rack of the oven, then place the metal pan with boiling water directly under it so that the steam rises, and close the oven door.
Bake 40 minutes, or until golden and cooked through. Cool before slicing.
🍓 Red, White & Blue Shortcakes
The perfect festive dessert! Fluffy vegan biscuits layered with maple-sweetened berries and coconut whipped cream.

For the Biscuits:
2 cups all-purpose flour (or 1:1 GF blend)
1 tbsp baking powder
¼ tsp baking soda
½ tsp salt
2 tbsp sugar
½ cup cold vegan butter, cubed
¾ cup plant-based milk
1 tsp apple cider vinegar
For the Berries:
1 cup strawberries, sliced
1 cup blueberries
1 tbsp maple syrup (optional)
For the Topping:
Coconut whipped cream (I use Cocowhip)
Instructions:
Preheat oven to 425°F.
Mix dry biscuit ingredients, then cut in butter until crumbly.
Stir in milk and vinegar to form dough.
Pat into 1-inch thick dough, cut into circles.
Bake 12–15 minutes, until golden.
Macerate berries with maple syrup.
Assemble: slice biscuit, layer with whipped cream and berries.
Enjoy this full lineup of flavor-forward, feel-good dishes this holiday weekend. Don’t forget to tag @kellysgreenkitchen_ if you make any of these!

No-Bake Peanut Butter Bliss Bars (Vegan, Gluten-free)

Looking for a no-bake treat that feels indulgent and nourishing? These peanut butter bliss bars are packed with protein, made with wholesome flours, and topped with a smooth chocolate layer that makes them feel like a total treat. They’re perfect for warm-weather snacking, lunchbox-friendly, and secretly healthy—aka my dream combo.
🛒 Ingredients:
1/2 cup chickpea flour
1/2 cup almond flour
3/4 cup natural peanut butter
1 tsp vanilla extract
2–3 tbsp agave or maple syrup (optional, to taste)
1/2 cup dairy-free chocolate chips (I use Enjoy Life)
1 tsp coconut oil (for melting chocolate)
Flaky sea salt (optional topping)
✍️ Instructions:
In a bowl, whisk together chickpea flour and almond flour.
Add peanut butter, vanilla extract, and maple syrup. Stir until a soft dough forms.
Press the dough firmly into a parchment-lined loaf pan or small baking dish.
Melt chocolate chips with coconut oil until smooth, then pour over the base layer.
Sprinkle with flaky salt, then chill in the fridge for 30 minutes until firm.
Slice into bars and store in the fridge for up to 1 week.
💚 Pro Tips:
For peanut or tree-nut allergies, you can use any nut/seed butter you like. I’ve made them with almond butter and they are delicious!
Adjust sweetness to your taste—maple syrup is optional!
Store in the fridge or freezer for a grab-and-go treat.
Whether you're meal prepping or just need a moment of bliss during your day, these bars are a go-to favorite. No baking required, but all the satisfaction.
Don’t forget to tag @kellysgreenkitchen_ if you make them!

🥣 Homemade Granola with Agave, Flax & Sunflower Seeds

There’s something cozy and grounding about baking a batch of granola at home — the cinnamon-spiced scent in the air, golden edges just starting to crisp, and the simple joy of knowing exactly what’s in your food.
At Kelly’s Green Kitchen, I’m all about plant-based recipes that feel good and taste even better — with a little New England charm stirred in. This granola is naturally sweetened, loaded with healthy fats and fiber, and totally free of preservatives. Pantry-friendly, totally customizable, and perfect for slow mornings or on-the-go snacks.
🛒 Ingredients
2 cups rolled oats
¼ cup ground flaxseed 🌾
½ cup raw sunflower seeds 🌻
½ cup unsweetened coconut flakes 🥥
1½ tsp cinnamon
¼ cup agave syrup 🍯 (or maple syrup)
1 tsp vanilla extract
Pinch of sea salt 🧂 (optional)
👩🍳 Instructions
Preheat oven to 325°F (163°C) and line a baking sheet with parchment paper.
In a large mixing bowl, combine oats, flaxseed, sunflower seeds, coconut, cinnamon, and salt.
In a small bowl, whisk together agave and vanilla.
Pour wet ingredients over the dry and mix well until everything’s coated.
Spread evenly on baking sheet and bake for 20–25 minutes, stirring halfway.
Let cool completely — it crisps up as it cools!
Store in an airtight jar and enjoy for up to 2 weeks (if it lasts that long 😉).
🍽 How to Serve
Over vegan yogurt with fresh fruit 🍓
On top of smoothie bowls 🍌
Straight from the jar as a snack 🫙
Sprinkled on baked fruit or dairy-free ice cream 🍏
This granola is everything I love: wholesome, crunchy, cozy, and simple. I hope it becomes one of your pantry staples too.
📌 Save this post — your breakfasts (and snacks) will thank you.
💬 Tried it? Tag @kellysgreenkitchen_ — I love seeing what you create!

🥣 Layered Mediterranean Bowl with Tzatziki & Tahini Drizzle

🥣 Layered Mediterranean Bowl with Tzatziki & Tahini Drizzle
Creamy, crunchy, cozy, and 100% vegan.
If you’ve been craving a bowl that hits all the textures—cool and creamy, warm and roasted, fresh and crunchy—this one’s for you. Built over a swoosh of homemade vegan tzatziki (made with Violife sour cream), this Mediterranean-inspired bowl is packed with lemony farro, roasted and raw veggies, and spiced chickpeas, all tied together with a dreamy tahini drizzle.
It's the kind of lunch or dinner that feels just a little extra—but is totally easy to pull off.
🌿 Ingredients (Serves 2)
For the Bowl Base
1 cup cooked farro (from about ⅓ cup dry)
1 tbsp lemon juice
1 tbsp olive oil
Pinch of salt
For the Vegan Tzatziki
½ cup Violife vegan sour cream
¼ cup grated cucumber (squeezed dry)
2 tbsp chives, diced
1 clove garlic, minced
1 tbsp chopped dill
1 tsp lemon juice
Salt and pepper to taste
Roasted Veggies
2 carrots, peeled and sliced on the bias
1 cup baby potatoes
1 red pepper, sliced into wedges
1 tbsp olive oil
1 tsp each paprika, garlic and onion powder
Salt and pepper to taste
Raw Veggies
Handful of cherry tomatoes, halved
½ cucumber, sliced into thin circles
Spiced Chickpeas
¾ cup canned chickpeas, drained and rinsed
½ tbsp olive oil
½ tsp paprika
¼ tsp garlic powder
Salt to taste
Tahini Drizzle
2 tbsp tahini
1 tbsp lemon juice
1 tsp agave
1 tbsp water (more as needed to thin)
Pinch of salt
🥗 Instructions
Step 1: Prep the Farro
Cook farro according to package instructions. While still warm, toss with lemon juice, olive oil, and a pinch of salt.
Step 2: Make the Tzatziki
Mix all tzatziki ingredients in a bowl. Adjust salt and lemon to taste. Chill until ready to use.
Step 3: Roast the Veggies
Preheat oven to 400°F (200°C). Toss carrots, potatoes, and red peppers with olive oil, salt, pepper, paprika, garlic and onion powder. Roast on a sheet pan for 20–25 minutes, flipping halfway, until tender and slightly golden.
Step 4: Cook the Chickpeas
In a skillet, heat olive oil over medium heat. Add chickpeas, paprika, garlic powder, and salt. Cook for 5–7 minutes until lightly crispy and golden.
Step 5: Make the Tahini Sauce
Whisk together tahini, lemon juice, agave, water, and salt until smooth and pourable.
Step 6: Assemble the Bowl
Start with a generous swoosh of tzatziki on the bottom of your bowl.
Add a scoop of farro in the center.
Layer roasted veggies on one side, raw veggies on the other.
Top with spiced chickpeas.
Finish with a zigzag drizzle of tahini sauce and a handful of chopped herbs (dill, parsley, or mint).
Optional: add lemon zest, a sprinkle of za’atar, or a few olives for extra flair.
💚 Make it Your Own:
Swap farro for quinoa or couscous
Add pickled red onions or vegan feta
Use crispy tofu or toasted pepitas instead of chickpeas
It’s the kind of bowl that looks like it came from your favorite café—and now it’s coming from your kitchen ✨
Tag @kellysgreenkitchen_ if you make it!

Vegan Pasta e Fagioli with Tiny Stars

A cozy bowl of nostalgia made plant-based.
There’s something undeniably comforting about a bowl of pasta e fagioli. This version keeps it light yet satisfying with butter beans, tiny stelline pasta, and a broth infused with garlic, oregano, and basil. It’s the kind of meal that feels like a warm hug—perfect for breezy spring evenings, weeknight dinners, or anytime you want something cozy and wholesome. To make this meal, I use my favorite pot from Our Place — and I reach for it constantly.
It’s the one-pot wonder of my dreams:
✨ Non-toxic, nonstick ceramic coating
🍲 Deep enough for soups, pastas, and grains
🧽 So easy to clean (no scrubbing!)
🔥 Works on all stovetops
👩🍳 Comes with a built-in steamer + nesting wooden spoon
Bonus? It’s actually pretty enough to live on your stove.
Now— let’s get to the good stuff!
🌿 Ingredients (Serves 4)
1 tbsp olive oil
2 carrots, diced
2 celery stalks, diced
2 cloves garlic, minced
1 tsp dried oregano
½ tbsp fresh basil
Salt & pepper to taste
4 cups vegetable broth
1 cup crushed tomatoes
1 can (15 oz) butter beans, drained and rinsed
¾ cup stelline Jovial gluten free pasta (or another small pasta)
Optional toppings: olive oil drizzle, fresh basil, nutritional yeast, lemon zest
🍲 Instructions
Sauté the base
Heat olive oil in a large pot over medium heat. Add the diced carrots and celery, plus a pinch of salt. Cook for about 5–7 minutes, until softened.Add flavor
Stir in the minced garlic, oregano, and basil. Sauté for another minute, until fragrant.Simmer the broth
Pour in the vegetable broth and bring to a gentle boil. Add the butter beans and let simmer for 5 minutes.Add the pasta
Stir in the stelline pasta. Simmer for 6–8 minutes, or until the pasta is tender. Stir occasionally to prevent sticking.Taste + serve
Adjust seasoning as needed. Serve warm with a drizzle of olive oil, a sprinkle of fresh herbs, or your favorite toppings.
💚 Make it your own:
Use ditalini, small shells, or orzo instead of stelline.
Add a handful of chopped greens (like spinach or kale) at the end for extra nutrients.
Top with vegan parmesan or chili flakes for a little kick.
Tag @kellysgreenkitchen_ if you make it!
If you’re not already obsessed with tiny star pasta, this might be the recipe that converts you ✨

No-Bake Peanut Butter Energy Bites (Vegan + Meal Prep-Friendly)

One bowl, no oven, all the cozy snack vibes.
You know those snacks that feel like a treat but still leave you feeling good afterward? These are those. These no-bake peanut butter energy bites are my go-to when I want something sweet, satisfying, and secretly nourishing.
They’re made with pantry staples, take five minutes to mix up, and store beautifully in the fridge. I love having a batch ready to go for mid-day munchies, post-dinner treats, or tossing into lunchboxes. And the best part? They’re endlessly customizable.
✨Ingredients
1 cup rolled oats
½ cup natural peanut butter
¼ cup agave or maple syrup
1 tbsp ground flaxseed
½ tsp cinnamon
⅓ cup mini chocolate chips (I use Enjoy Life)
1 tsp vanilla extract
Pinch of salt
🥄Instructions
In a bowl, stir together oats, flaxseed, cinnamon, and salt.
Add peanut butter and agave. Mix until well combined.
Fold in chocolate chips.
Roll into bite-sized balls.
Chill for 20–30 minutes to firm up.
Store in an airtight container in the fridge for up to a week—or freeze for later!
🌿 A Little Flax Love
Flaxseed might be tiny, but it packs a big nutritional punch. Just one tablespoon adds a boost of plant-based omega-3s, fiber, and protein. It helps keep you full longer and supports heart and hormone health. Pretty powerful for something that looks like birdseed, right?
💚 Make It Your Own
These are super flexible! Try adding:
Shredded coconut
Chopped dates or dried cherries
A spoonful of chia seeds
Make these once, and you’ll wonder how you ever lived without a batch in your fridge.
If you try them, tag @KellysGreenKitchen_ and let me know how they turned out!